
A patio cover is one of the most practical additions you can make to your outdoor living area. Whether you want a shaded place to entertain guests, protect your outdoor furniture, or enjoy your backyard in all seasons, installing a patio cover can significantly improve both the comfort and functionality of your home.
Thanks to modern DIY aluminium patio kits, installing a patio cover has become much more accessible for homeowners. These kits are engineered for straightforward assembly and are designed to provide a durable, low-maintenance solution that stands up to Australia’s demanding weather conditions. When paired with high-quality polycarbonate roofing, they offer excellent protection from the sun while still allowing natural light to brighten your outdoor space.
While many homeowners choose to complete the installation themselves, proper planning is essential. Measuring the site accurately, understanding local council requirements, and using the right tools all contribute to a successful project.
In this guide, you’ll learn everything you need to know before you install a patio cover, including how to choose the right materials, prepare your site, and ensure your installation meets Australian building requirements.
Important: This guide provides general information only. Building regulations and approval requirements vary between Australian states and local councils. Always check your local requirements before beginning construction.
Installing a patio cover is about more than simply adding shade. A well-designed aluminium patio cover extends your living space, protects your outdoor area from the elements, and enhances the overall appearance of your property.
Australian weather can change quickly, from intense summer heat to unexpected rain showers. A patio cover creates a comfortable outdoor area that can be enjoyed throughout the year, whether you’re hosting a barbecue, dining with family, or simply relaxing outside.
Unlike an uncovered patio, a covered space allows you to make better use of your backyard regardless of the weather.
Constant exposure to sunlight, rain, and falling debris can shorten the lifespan of outdoor furniture. Installing a patio cover helps shield your furniture from harsh UV rays and weather damage, reducing wear and helping maintain its appearance for longer.
A professionally installed aluminium patio cover can complement both modern and traditional Australian homes. Clean lines, durable finishes, and quality materials create a polished outdoor area that enhances the overall look of your property.
Rather than building an expensive extension, a patio cover provides additional usable space for entertaining, outdoor dining, children’s play areas, or simply enjoying fresh air in comfort.
Material selection plays an important role in the long-term performance of any outdoor structure. Aluminium has become one of Australia’s preferred choices because it offers strength, durability, and minimal maintenance.
Australia’s climate can be demanding, with strong UV exposure, heavy rainfall, coastal salt air, and high temperatures. Aluminium performs exceptionally well in these conditions because it resists corrosion, rust, and weather-related deterioration.
Unlike many traditional materials, aluminium won’t:
This makes it an excellent investment for homeowners looking for a reliable outdoor solution.
One of aluminium’s biggest advantages is its minimal maintenance requirements.
Routine care usually includes:
Compared to materials that require regular sealing or painting, aluminium saves both time and long-term maintenance costs.
Although aluminium is lightweight, it provides impressive structural strength when engineered correctly. This makes transportation, handling, and installation easier while maintaining excellent durability.
Many DIY patio kits are designed using precision-engineered aluminium components that fit together efficiently and securely.
Aluminium patio covers offer a clean, contemporary appearance that suits a wide variety of home designs.
Combined with polycarbonate roofing, they create an attractive outdoor space that balances shade with natural daylight, making the area feel open and inviting.
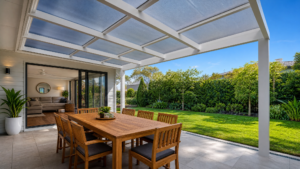
A DIY aluminium patio cover kit is a pre-engineered system that contains all the major components required to build a covered outdoor area.
Rather than sourcing individual materials and designing the structure yourself, the kit is manufactured to precise specifications, making installation much more straightforward.
A quality patio cover kit typically includes:
Because every component is designed to work together, DIY kits help reduce installation errors while saving time during construction.
Selecting the right patio cover before installation will help ensure your finished project meets both your practical needs and your home’s style.
Begin by assessing the available area.
Think about:
Taking these factors into account will help determine the most suitable patio cover size and layout.
Your client specialises in polycarbonate roofing, which offers several advantages for Australian homes.
Polycarbonate roofing:
It provides an excellent balance between weather protection and maintaining a bright outdoor environment.
A patio cover should complement your home without overwhelming the available space.
Consider:
Careful planning now can help avoid costly modifications later.
Successful installation starts long before construction begins.
Accurate measurements are essential when ordering a DIY patio kit.
Measure:
Double-check all measurements before placing your order.
If your patio cover will attach to your home, inspect the wall carefully.
Ensure it is:
If you have any doubts, consult a qualified building professional before proceeding.
Australia’s climate varies considerably across different regions.
Consider:
Choosing a patio cover engineered for your local conditions will improve long-term performance.
One of the most common questions homeowners ask before they install a patio cover is whether council approval is required.
The answer depends on several factors, including:
Some smaller projects may qualify as exempt development, while larger structures often require approval before construction begins.
Starting construction without confirming local requirements can lead to unnecessary delays, additional costs, or changes to the completed structure.
Before purchasing your patio cover kit:
Completing these steps before installation helps your project progress more smoothly.
Having the correct tools ready before installation improves both efficiency and safety.
Prepare:
Accurate layout work is essential for a professional finish.
Most DIY aluminium patio kits require:
Always follow the manufacturer’s instructions regarding any modifications or drilling.
Keep these nearby:
Never overlook safety.
Wear:
If working at height, use a stable ladder and appropriate fall protection equipment.
Proper site preparation helps ensure a smoother installation.
Before assembly begins:
Taking time to prepare your site properly reduces the risk of alignment problems and helps every stage of the installation proceed more efficiently.
Once you’ve selected the right DIY aluminium patio cover kit, confirmed any council requirements, and prepared your tools and work area, you’re ready to begin the installation.
Although every manufacturer provides specific installation instructions, the following steps outline the general process homeowners can expect when installing an aluminium patio cover with polycarbonate roofing.
Important: Always follow the installation guide supplied with your patio cover kit. If your project involves structural modifications or you are unsure about any stage of the installation, seek advice from a qualified building professional.
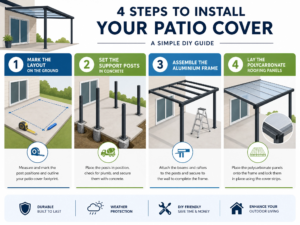
Every successful installation starts with accurate measurements.
Using your installation plans, mark the exact positions for:
Use a tape measure, chalk line, and spirit level to ensure everything is square and level before drilling or excavating.
Taking extra time during this stage helps prevent alignment issues later in the installation.
Your patio cover relies on strong foundations for long-term stability.
Depending on your installation, support posts may be:
If new footings are required, dig the holes according to the engineering specifications supplied with your DIY kit.
Allow the concrete to cure fully before installing the remaining framework.
Support posts form the main structural framework of your patio cover.
Position each aluminium post according to the installation plan and check that it is perfectly vertical using a spirit level.
Secure each post with the recommended fixings before moving on to the next stage.
Correctly aligned posts make the remainder of the installation much easier.
Most patio covers are attached directly to the house using a wall beam or mounting plate.
Ensure the attachment point is:
Correct installation at this stage provides a stable connection between your home and the patio cover.
Once the support posts and wall connection are complete, install the main beams.
These beams distribute the roof load across the entire structure.
Before tightening all fasteners:
Because DIY aluminium patio kits are precision-engineered, the components should fit together smoothly when measurements have been completed accurately.
Roof rafters provide support for the polycarbonate roofing panels.
Install each rafter according to the spacing specified by the manufacturer.
Avoid changing the spacing or modifying components unless specifically permitted by the engineering documentation supplied with the kit.
Properly installed rafters improve both the strength and appearance of the completed patio cover.
With the frame complete, it’s time to install the roofing.
Polycarbonate roofing panels are lightweight, durable, and designed to provide excellent weather protection while allowing natural light into the outdoor area.
When installing the panels:
Correct installation helps minimise water penetration and ensures long-term performance.
Flashings prevent rainwater from entering the connection between your home and the patio cover.
Complete the installation by fitting:
These components improve both the appearance and weather resistance of the structure.
Before using your new outdoor space, inspect the entire installation.
Check that:
A careful inspection helps identify any adjustments before the patio cover is exposed to severe weather.
Even high-quality DIY kits can produce poor results if common installation mistakes are overlooked.
Failing to measure accurately or confirm council requirements can lead to unnecessary delays and additional costs.
Always complete your planning before ordering your patio cover.
Small measurement errors can affect the alignment of the entire structure.
Measure carefully and verify every dimension before drilling or installing components.
DIY patio cover kits are engineered as complete systems.
Avoid modifying structural components or changing installation methods unless specifically approved by the manufacturer.
Support posts rely on stable foundations.
Incorrectly positioned or poorly prepared footings may affect the strength and stability of the finished structure.
Avoid installation during:
Safe working conditions improve installation accuracy and reduce the risk of accidents
Many homeowners wonder whether they should install a patio cover themselves or hire a professional installer.
The right choice depends on your experience, available time, and confidence with DIY projects.
| DIY Installation | Professional Installation |
| Lower labour costs | Higher overall investment |
| Flexible installation schedule | Faster project completion |
| Personal satisfaction | Professional expertise |
| Ideal for experienced DIY homeowners | Suitable for complex installations |
| Requires careful planning | Less physical effort required |
Modern DIY aluminium patio cover kits are designed to simplify installation for homeowners.
However, if your project involves difficult site conditions or structural alterations, professional assistance may provide greater peace of mind.
One of the biggest advantages of aluminium patio covers is their low maintenance requirements.
With routine care, your patio cover can continue performing well and looking great for many years.
Wash the frame using mild soap and water to remove dirt, dust, and outdoor debris.
Avoid abrasive cleaners that may damage the powder-coated finish.
Clean the roofing panels regularly using clean water and a soft cloth or sponge.
Removing dirt and leaves helps maintain natural light while preventing unnecessary build-up.
Periodically inspect:
Tighten any loose components according to the manufacturer’s recommendations.
Leaves and debris can block drainage systems.
Regular cleaning helps rainwater flow freely and reduces unnecessary stress on the guttering.
Following storms or strong winds, inspect your patio cover for any loose fixings or damaged roofing panels.
Addressing minor issues early helps extend the life of your outdoor structure.
Yes. Many homeowners successfully install DIY aluminium patio cover kits by carefully following the manufacturer’s instructions and ensuring the project complies with local building requirements.
Approval requirements vary across Australia depending on your location, property, and the size of the structure. Always check with your local council before beginning construction.
Aluminium is lightweight, durable, corrosion-resistant, termite-resistant, and requires very little maintenance, making it well suited to Australian conditions.
Polycarbonate roofing allows natural light into your outdoor space while providing protection from rain and harmful UV rays. It is also lightweight, durable, and easy to maintain.
Installation time depends on the size and complexity of the project. Smaller DIY patio cover kits may be completed over a weekend, while larger installations may require additional time.
Cleaning the frame and roofing several times a year, along with regular inspections of gutters and fasteners, is generally enough to keep an aluminium patio cover in excellent condition.
Installing a patio cover is a practical way to create a more comfortable and functional outdoor living space while adding value to your home. With a quality DIY aluminium patio cover kit, careful planning, and the right tools, many homeowners can complete the project themselves and enjoy reliable weather protection for years to come.
Before starting your installation, take the time to measure your site accurately, confirm any council approval requirements, and carefully follow the manufacturer’s installation instructions. These steps help ensure your patio cover is installed safely, performs as intended, and stands up to Australia’s changing weather conditions.
By choosing an aluminium patio cover with durable polycarbonate roofing, you’ll benefit from a low-maintenance outdoor solution that enhances your lifestyle while providing year-round comfort. Whether you’re creating a space for entertaining, relaxing, or spending more time outdoors with family, a professionally planned DIY installation is an investment that can deliver lasting value..