
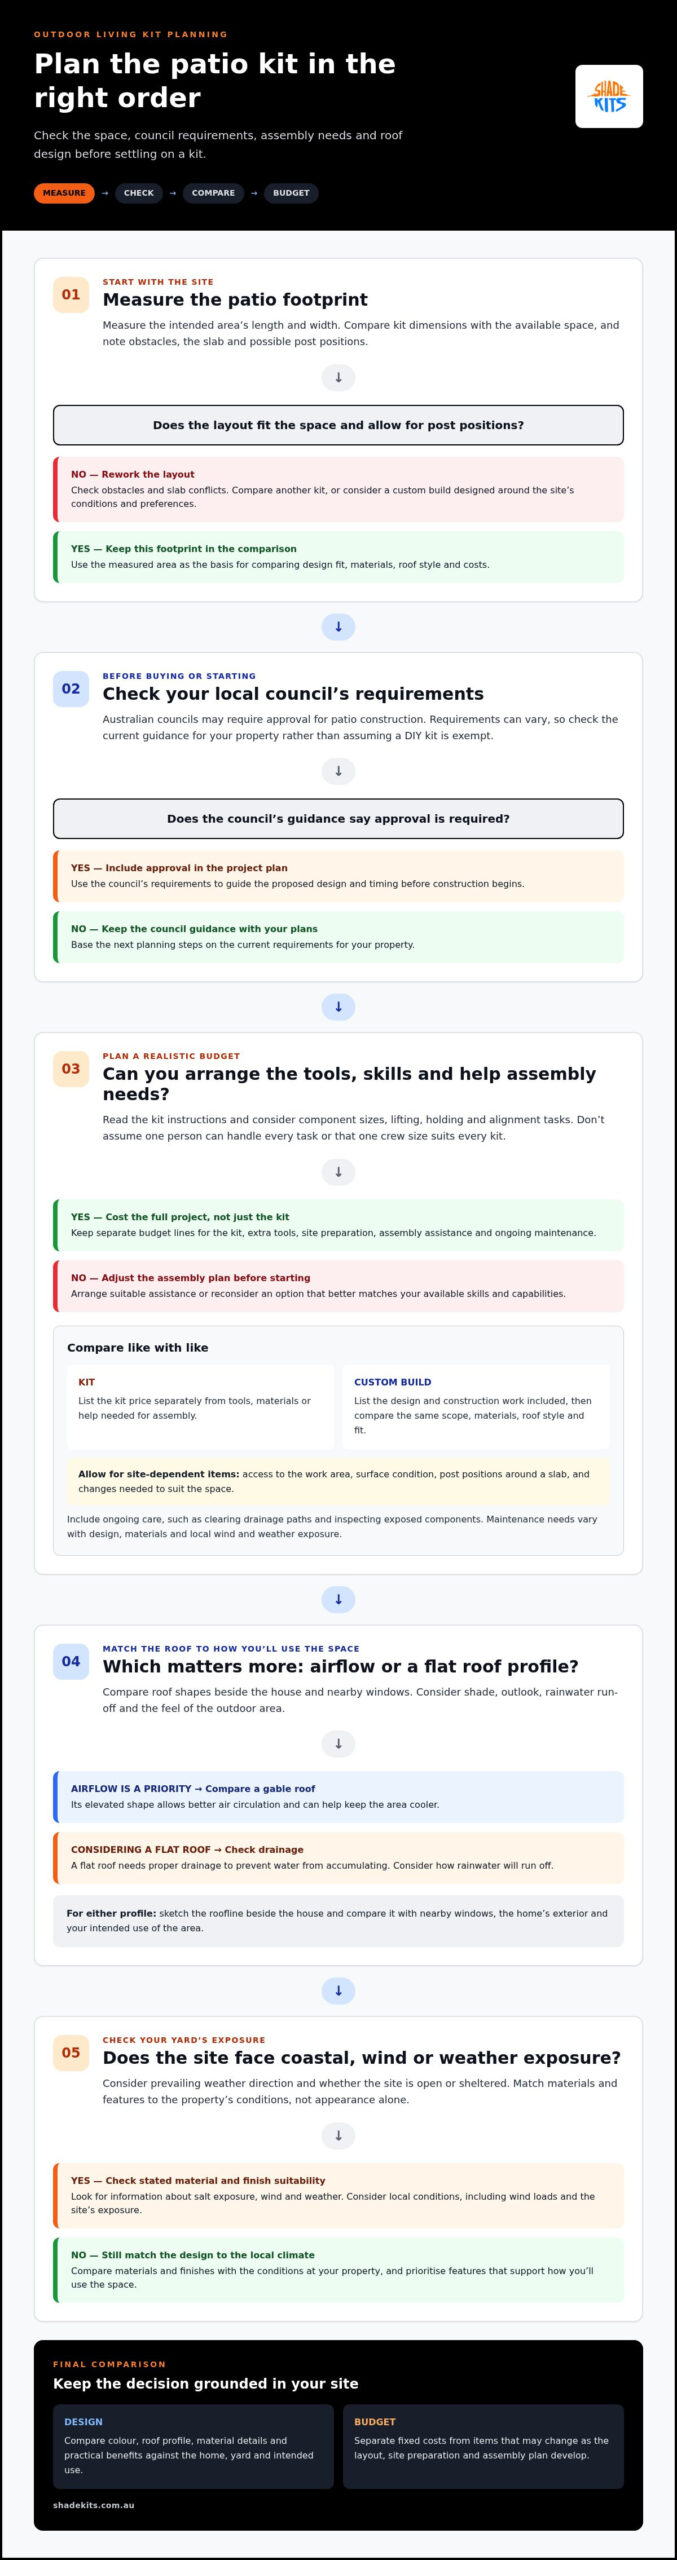
Start budgeting for DIY outdoor living kits by measuring the patio’s length and width. Compare kits that fit the available footprint, then account separately for tools, site preparation and any assembly help you need. Australian councils may require approval for patio construction, so check the rules for your property before buying or starting work.
The kit is only one part of the decision. Roof style, how the structure meets the house and conditions in your yard all matter. A design that looks right on paper must also fit the space and suit your site’s wind and weather exposure.
This guide shows you how to measure your patio, plan a practical budget and compare attached, freestanding, flat-roof and gable designs. It also explains what to check with your local council, so you can plan the project in a clear order.
Separate the kit, assembly requirements and ongoing care in your budget. Assembly may call for extra tools or assistance. Use the kit’s instructions and component sizes to plan how many people are needed, rather than assuming one person can handle every task.
Before comparing costs, list what each option includes. A kit provides components for you to assemble, while a custom build can be designed around specific site conditions and preferences.
Separate the kit price from any additional tools, materials or help needed for assembly. For a custom build, list the design and construction work included. Compare the same scope, materials, roof style and fit with your measured patio area.
Use your intended layout as the basis for comparison. If an option needs adjustments to fit an existing slab or the house, record them as separate budget items. That way, you can see what may change instead of burying it in one estimate.
List the assembly tasks before planning for installation. Check the instructions for required tools and identify any tasks involving lifting, holding or aligning components. Include the necessary tools and assistance in your plan.
Common budget surprises include tools you don’t own, extra site preparation and changes to suit the space. Check access to the work area, the surface condition and whether planned post positions conflict with a concrete slab. Flat roofs also need proper drainage to prevent water from accumulating.
Plan for ongoing care, too. Keep access clear for removing debris from drainage paths and inspecting exposed components. Maintenance needs vary with the design, materials and local exposure to wind and weather. Include them in your budget rather than assuming the structure will need no upkeep.
Read the assembly instructions and match each task to the skills available. Assembly may involve following a sequence, aligning components and holding parts steady. If a task exceeds your experience or the help you can arrange, plan for assistance before starting.
There’s no single crew size that suits every kit. Follow the instructions and consider component size and handling requirements when deciding how many people you’ll need. Don’t start a lift or fitting task unless the people present can manage it safely.
Group your budget under kit, tools, preparation, assistance and maintenance. Note which items depend on site conditions, such as adjusting post positions around a slab. This makes it easier to distinguish fixed costs from items that may change as the layout develops.
Review the list before committing to a design. If it requires tools or assistance you can’t arrange, revise the assembly plan or choose an option better suited to your capabilities.
Choose colours and roof profiles by weighing appearance against shade, airflow, drainage and site exposure. Comparing these factors helps you prioritise features that suit your space.
Compare colour samples with your home’s exterior, paving and garden before choosing a finish. Light and dark roofs create different visual effects, so assess colours against nearby surfaces rather than in isolation.
Next, compare roof profiles with how you’ll use the space. A gable roof’s elevated shape allows better air circulation and can help keep the area cooler. A flat roof needs proper drainage to prevent water accumulating, so consider how rainwater will run off.
Check how each roof profile sits beside the house and nearby windows. A design can complement the building while affecting the outlook, shade and feel of the outdoor area. Sketch the roofline beside the house to compare options before choosing.
Match materials to your site’s climate and exposure, especially near the coast. Compare the stated materials and finishes, and look for information about suitability for salt exposure, wind and weather. Appearance alone doesn’t show how a component will perform outdoors.
In Australia, patio designs should account for local conditions, including wind loads and exposure. Consider the prevailing weather direction at your property and whether the site is open or sheltered. These factors help determine which design features to prioritise.
Write down how you plan to use the space before choosing extra features. For outdoor dining, prioritise comfortable shade and airflow. For sheltered entertaining, consider how the roof handles rain and how the layout connects with the house.
Separate essential features from visual preferences. A feature that adds complexity should solve a real site-specific problem, such as managing sun exposure or making the space more usable in changing weather. This keeps the design focused and makes options easier to compare.
Make a simple comparison table with columns for colour, roof profile, material details and practical benefits. Add a row for each design, then note how it suits your yard’s exposure and intended use.
For example, compare a gable roof’s airflow with the drainage needs of a flat roof. Check both against your home’s exterior and the site’s wind exposure. Base your choice on these conditions, not just on which design looks distinctive.
An attached patio uses the existing building for support on one side. Make clear in your project description whether your design relies on this arrangement, and show the connection to the house on your site plan. Keep the description consistent with the design you’re checking, so the council can assess the attached layout. If you also consider a freestanding option, describe it separately and identify which design you intend to pursue. Before proceeding, make sure the plan and project details match your chosen design. Ask the council for clarification if you’re unsure how it treats the proposed attachment.
Measure the intended patio area’s length and width before selecting a kit. Then map obstacles and post positions, and plan the route from the house to the yard.
A freestanding patio stands independently of the house and can be positioned in the yard. Plan post locations carefully, especially around existing concrete slabs.
If your measurements and design preferences are ready, explore Shade Kits’ outdoor shade options. For an area beside your home, compare Patio Cover Kits, Pergola Kits and Awning Kits with the space and level of shelter you want. Carport Kits are designed for a different purpose, so consider them when vehicle cover is the priority.
Narrow your options using your site measurements, preferred roof profile and local requirements. This keeps the decision grounded in how you’ll use the space, not appearance alone. Ready to explore a suitable shade structure? Contact Shade Kits to discuss your project.
Turn your patio plan into a practical shortlist. Decide which structure suits the space’s purpose, then match it to the available area and your preferred design. Shade Kits offers Carport Kits, Pergola Kits and Awning Kits for different outdoor needs.
Before moving ahead, make sure the structure, its position and your intended use work together. A well-considered choice makes DIY outdoor living kits easier to assess against your plans, rather than choosing by appearance alone.
If you’re ready to discuss the next step, Ask Shade Kits about your project. Your careful planning gives you a strong starting point for shaping an outdoor area that suits your home.
The cost of a kit depends on its type, dimensions, materials, design features and included components. Compare products with similar specifications, then account separately for site preparation, tools and any assembly help you need. A deck or outdoor kitchen has a different scope and components from a patio structure, so one kit’s price isn’t a guide to another’s. Check the current details for the specific product you’re considering.
Approval requirements depend on the project and local council. Australian councils may require permits for patio construction, so describe your proposed structure to the council before buying materials or starting work. Include its dimensions, position and whether it will attach to the house. For a deck or pergola, ask about the requirements for that specific design and site.
Follow the requirements that apply to your proposed structure and local approval process. Start with council guidance, then use the kit’s assembly instructions and structural specifications. Account for local wind exposure, suitable support positions and drainage, especially with a flat roof. Assemble components as instructed and don’t make structural changes based on guesswork. These checks help align the design, site and installation method.