
There isn’t one average cost of a DIY pergola kit that suits every Australian project. Size, materials, roof design and included components all affect the total. The kit price is only one part of the budget: site preparation, extra materials, tools and professional installation can add to the finished cost. Compare what each option includes to get a clearer picture than the kit price alone.
Weigh the time and work involved in assembling a kit against the convenience of professional installation, and allow for local approval requirements. This guide explains the main cost factors, how DIY and installed options compare, and what to consider before building. Your pergola’s design and location also matter when setting a realistic budget for your outdoor space.
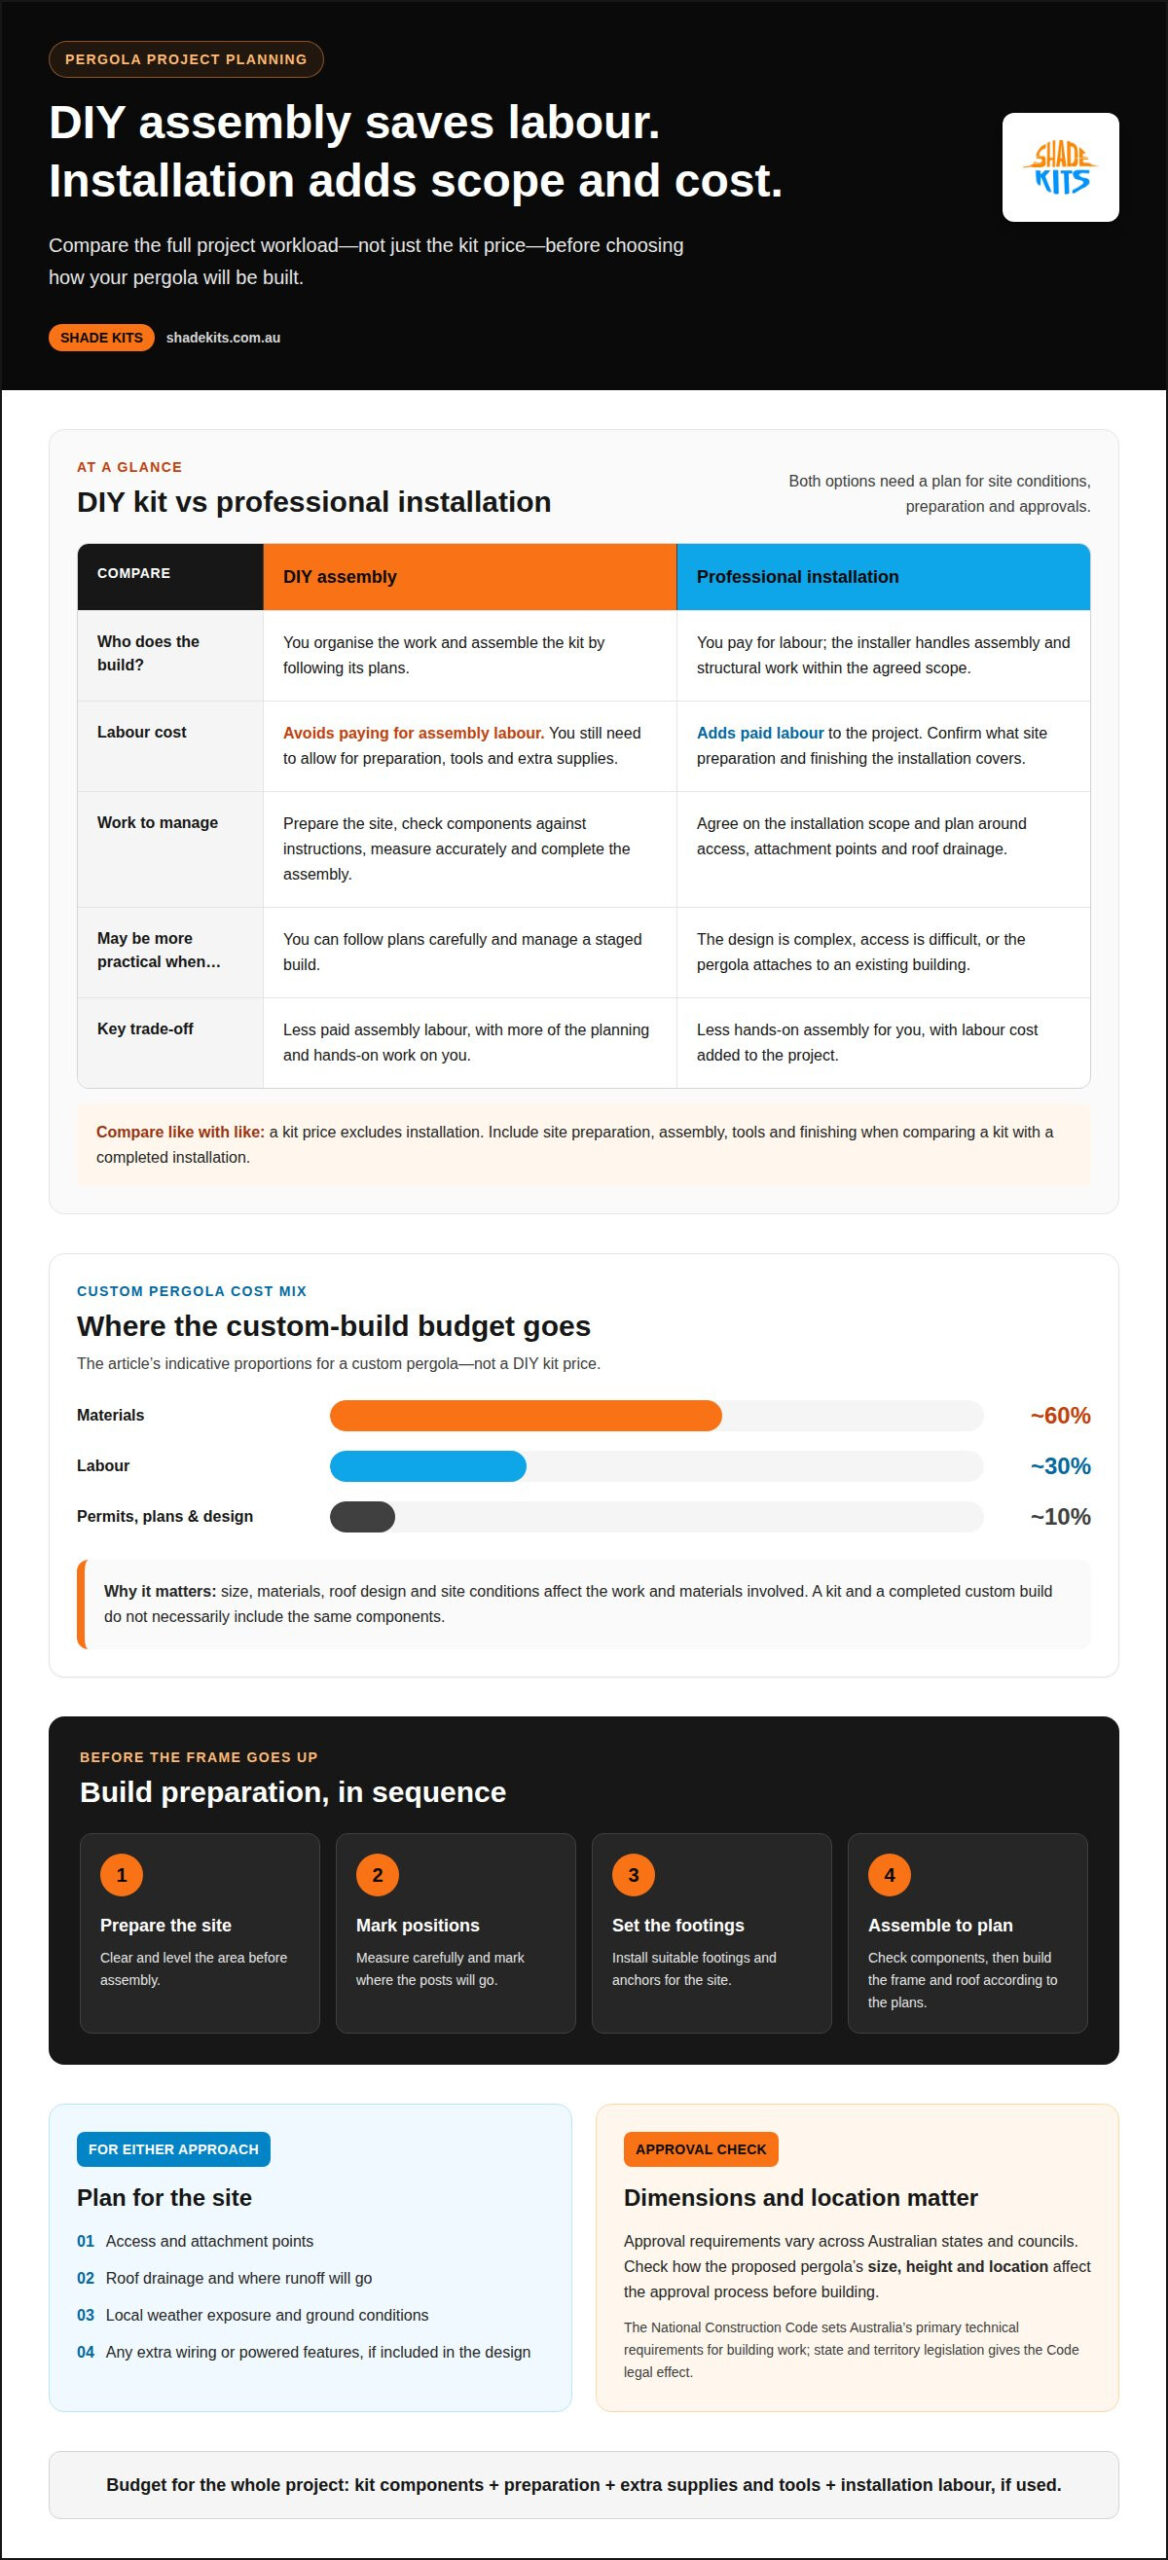
Before assembling a DIY kit, prepare a clear, level site and mark the post positions. Install suitable footings and anchors, then assemble the frame and roof according to the plans.
The square-metre range gives a starting point, while the overall build estimate reflects a broader project scope. For a custom pergola, materials account for around 60% of costs, labour around 30%, and permits, plans and design around 10%. Those proportions help you identify which decisions are likely to shape your budget most.
Size and specifications matter: a larger structure needs more materials and may require more site preparation. A kit and a completed custom build also include different components.
These figures cover different parts of a project, so compare like with like when estimating the total.
Assembling the kit yourself avoids paying for that labour, but you’ll still need to plan the work, prepare the site and allow for extra supplies. Kit prices also exclude installation, so distinguish clearly between the cost of materials and labour.
A custom pergola’s cost depends on its dimensions, materials, roof design and site conditions. Premium materials or a more complex structure can increase the budget, while an attached design needs to suit the existing building. Decide which features matter most before comparing designs, because each specification affects the materials and work involved.
Site preparation may include clearing the area, marking post positions and preparing stable footings. Lighting or powered features require suitable wiring and installation. Plan for drainage too: roof runoff needs a route away from the structure and nearby areas. Electrical and drainage needs depend on the design and site, so include them in your plans rather than assuming they come with the kit.
Approvals are another planning consideration, and requirements vary across Australian states and councils. Before building, check how the proposed size, height and location affect the approval process. This helps you confirm that your design, site preparation and budget are aligned before assembly starts.
With a DIY kit, you handle the assembly; professional installation adds paid labour to the project. Compare more than the kit price: site preparation, assembly, tools and finishing all affect the work involved. For a pergola beside a living area, access, attachment points and roof drainage also shape the installation plan.
DIY suits people who can follow plans carefully and manage a staged build. Before assembly, confirm the ground is suitable, mark the post positions, and prepare the footings and anchors. Check each component against the instructions before raising the frame. Accurate measurements matter: misplaced posts can complicate roof alignment and attachment.
Professional installation means paying someone to handle the assembly and structural work. It may be more practical when the design is complex, access is difficult, or the pergola attaches to an existing building. The trade-off is the added labour cost. Compare the full scope, including site preparation and finishing, rather than comparing a kit with a completed installation.
Material choice affects both assembly and ongoing care. Timber components may need cutting or finishing, while the frame and roof determine how the parts connect. Consider exposure to local weather and how the structure will drain before choosing a design. These details matter even when the kit supplies preselected components.
Assembling a kit is different from designing a custom structure. A kit follows a set layout; custom work may require changes to the dimensions, attachment points and roof details to suit the property. That can mean extra planning and coordination before construction. Either way, make sure the instructions, dimensions and site layout match before assembly.
Australian requirements matter alongside the build method. The Australian Building Codes Board explains that the National Construction Code sets Australia’s primary technical requirements for building work, while state and territory legislation gives the Code legal effect. A pergola’s design and location influence the approvals to consider, so include local requirements in your installation plans as well as the manufacturer’s instructions.
Use these comparisons to assess the work involved:
Choosing between DIY and professional installation comes down to the design, site conditions and the work you can manage. Define the project scope clearly so you can compare options without overlooking preparation or finishing.
A useful comparison starts with the kit’s contents, dimensions and warranty terms. Australian kit sellers include specialist suppliers and building-material retailers; warranty coverage varies, with some ranges offering a 10-year structural warranty.
A kit’s inclusion list shows which structural components come together and which materials need separate planning. Some kits supply brackets only, with timber excluded. That changes how you compare options and plan the full build. Read the components list before choosing a kit for your outdoor space.
For an accurate comparison, match each kit’s dimensions and layout to your site. A larger design may need more framing material than a compact one, while a roofed option includes different parts from an open-frame design. Check what the kit includes, then list separately sourced materials, tools and site-preparation items in your project plan.
Ground conditions also affect planning. Mark the proposed post positions and compare them with the kit layout before preparing footings. Sloping ground or a design against a wall can affect positioning and assembly. Keep the kit instructions and a site sketch together to ensure measurements stay consistent during the build.
Australian pergola kits are available through specialist suppliers and building-material retailers, while manufacturers define warranty coverage for their products. Compare the warranty period and the structural components it covers; a 10-year structural warranty appears in some kit ranges. The stated period alone doesn’t explain every term, so read the warranty alongside the product specifications.
Ask the same questions about each kit: are the brackets, timber and roof components included, and what structural coverage applies? Record the answers alongside the kit name and dimensions. This makes it easier to distinguish a bracket-only package from a more complete kit without assuming similar descriptions mean identical contents.
Include permits and site layout in your comparison from the start. Before choosing a model, match its footprint and attachment style to the available space. Consider the proposed height, roof arrangement and proximity to existing structures when planning for local approval requirements. A kit’s dimensions help define the proposal, but don’t replace approval checks for your location.
For a clear decision, compare each option across these points:
These checks help you compare like with like. A precise contents list, accurate measurements and written warranty terms make it easier to assess the differences between pergola kits.
Small pergolas cover about 6 to 12 square metres, medium designs 12 to 24, and large structures 24 to 32 square metres and above. Dimensions alone don’t determine a kit’s cost: materials, roof design and included components also affect the total.
For a practical comparison, a 3m × 3m × 2.6m example has a 9-square-metre footprint. A 6m × 3m × 2.6m example covers 18 square metres. The first sits within the small range, while the second falls within the medium range. These examples show why the intended footprint matters when comparing pergola kits.
The layout involves more than area. A freestanding design needs clear space for its posts, while an attached structure must align with the adjoining building. Measure the available outdoor living space and note any obstacles before choosing a kit. Accurate measurements help match the footprint to the site and avoid a frame that crowds doors or walkways.
Height also changes the structure’s proportions. The dimension examples use a height of 2.6m, while another pergola reference gives 2.5m. Treat these as separate examples, not a universal specification. Check the selected design’s stated height alongside its width and projection, especially where an attached frame meets a wall or roofline.
Rafter layout is another useful point of comparison. Longer spans and wider coverage affect the roof frame, so compare kit drawings rather than relying on area alone. Drawings show where the posts sit, how the rafters run and how the roof meets the frame. Use them to assess whether the structure suits its intended location before assembly.
Compare small, medium and large options using the same checklist: footprint, height, roof type, material and included components. Relate those details to your available space and intended use. A larger pergola may provide more coverage, but also requires more materials. The total cost depends on the full specification, not just the size category.
The average cost of a DIY pergola kit in Australia depends on its size, material, roof and included components. A kit-only price differs from the full project budget, which may also include site preparation, separate materials, tools and approvals. Compare kits with matching specifications to see what each price covers.
Specifications can vary widely. A basic bracket package differs from a complete timber frame or a motorised louvre system. Roof type also changes what the kit needs to include. Check whether timber, roofing and fixings are supplied, then note what you’ll need to source separately. This prevents mistaking the price of a partial kit for the full build cost.
Dimensions provide another useful comparison. A 3m × 3m pergola covers 9 square metres, while a 6m × 3m design covers 18 square metres. The larger footprint affects the amount of framing and roof coverage needed. Compare the kit drawings with your intended space, rather than judging cost by the footprint alone. Materials and design still affect the specification.
Material choices affect both the kit contents and the work involved. Treated pine, hardwood and metal systems have different components and assembly requirements. A roofless design also differs from one with a Colorbond roof. First compare options with the same dimensions and roof arrangement, then consider how the materials suit your outdoor space.
Separate project costs depend on the site and design. Ground preparation, footings, drainage and electrical work may affect the overall budget, depending on the intended build. Council approval requirements also vary across Australia. For example, South Australia generally requires approval when a roofed pergola area exceeds 15m², or 10m² in a Historic Conservation Zone. A 3m × 3m example is below both area thresholds, but other approval criteria can apply.
In Queensland, building approval is generally not required for a pergola smaller than 10m² if the other listed conditions are met. That threshold gives a useful comparison for a 3m × 3m footprint, but it does not settle every approval question. State rules and site conditions matter, so include the proposed dimensions and location in your planning.
For a meaningful price comparison, record each option’s footprint, material, roof type and included parts. Then list site preparation and any separately sourced items. This gives you a like-for-like comparison and shows whether the kit suits your planned build. The lowest kit price may cover fewer components, not a lower total project cost.
Shade Kits offers Pergola Kits for creating an outdoor covered area, a natural next step after comparing dimensions, materials and inclusions. If you need shade for a vehicle rather than an entertaining space, Carport Kits may suit your project better. Awning Kits and Patio Covers provide other ways to add shade around the home.
Before choosing, consider what you want to cover and how the structure will fit your property. This helps narrow down the right product type and gives you a clearer starting point for planning. For a pergola, focus on the design and kit specifications that suit your intended space.
Contact Shade Kits to discuss which option best fits your project.
Before making a final decision, write down what you want the finished space to do. Consider how you’ll use it, which design details matter most and what you need to resolve before work begins. A short project brief keeps your priorities clear as you compare options or discuss a design.
Use the average cost of a DIY pergola kit as one budgeting reference, not the only measure of value. The right option fits your intended use and gives you a clear understanding of the project scope. If your plans are still taking shape, start with the design and requirements that matter to your property.
Shade Kits can help you take the next step with your pergola project. Contact Shade Kits about your pergola to discuss your plans and explore a suitable direction. With a clear brief in hand, you can move ahead with greater confidence and turn your outdoor plans into a practical project.
A pergola can make an outdoor area more useful, but it doesn’t guarantee a higher sale price. Buyers may value a sheltered place to dine or relax, particularly when it suits the home and yard. Keep the design in proportion to the property, maintain it and consider how it connects with existing outdoor areas. These choices can improve everyday use, even when resale value is uncertain.
It depends on the quote: a supply-only kit and an installed project cover different things. Before comparing offers, separate the structure, roofing, fixings, site preparation and assembly labour. For example, a materials package might supply the frame but leave footing preparation or electrical work outside its scope. A written breakdown shows which tasks and components are included, so you can plan the remaining work accurately.
Material affects the cost of the frame, its finish and future upkeep. Timber can suit a natural look but may need periodic sealing, staining or painting. Aluminium is relatively light to handle, while steel provides another frame option. Compare the material, protective finish, roof components and care requirements together. The cheapest initial material may not suit your preferred appearance or maintenance routine.
Use this as a broad comparison, not a precise quote for a particular design. A simple open structure and a larger roofed project can differ in materials, preparation and labour. To estimate the area, multiply the proposed length by its width in metres, then consider the structure’s specifications and site needs.
Choose timber if its natural appearance and care requirements suit your home. Consider metal if you prefer a frame that doesn’t need regular timber painting or staining. The decision also depends on the roof design, the look of nearby buildings and how much maintenance you’re prepared to do. Compare complete designs, including connections and roof materials, rather than choosing by frame material alone.
Allow for project costs beyond the main frame, such as site clearing, footing preparation, tools and separately sourced roofing or fixings. A sloping or obstructed site may need extra preparation before assembly. Lighting requires electrical work, and roof runoff needs drainage planning. Approval-related expenses depend on the project and location, so allow for these possibilities in your overall budget.
The main cost drivers are the pergola’s footprint, frame and roof materials, design complexity, site preparation and installation scope. An attached design needs to work with the existing building, while a freestanding layout requires separate post positions. Access and ground conditions can also affect preparation. Compare proposals with the same dimensions and inclusions to see how each factor changes the total.
Timber, aluminium and steel affect kit prices through material quantities, frame design, finishes and the components needed to connect the structure. Roof choice matters too: an open frame and a roofed kit have different specifications. Check whether timber, brackets, roofing and fixings are included. A brackets-only kit needs separately sourced timber, so its starting price doesn’t cover the complete materials package.