
DIY can suit a small, standard-size carport for one vehicle if you have the right tools and help. The main DIY carport mistakes to avoid are misplacing posts, underestimating vehicle clearance, and overlooking council requirements, drainage or wind conditions. For larger or more complex builds, professional installation may be the safer choice.
It’s easy to focus on assembling the frame, but a carport’s position, foundations and wind engineering matter just as much. This guide explains how to weigh up DIY against professional installation, check local approval requirements and prepare your site before work begins.
You’ll also learn how Australian wind regions and terrain can affect a carport’s engineering, and what to consider when planning post placement, roof runoff and access. Working through these checks in the right order can help you make a more confident choice and avoid costly mistakes.
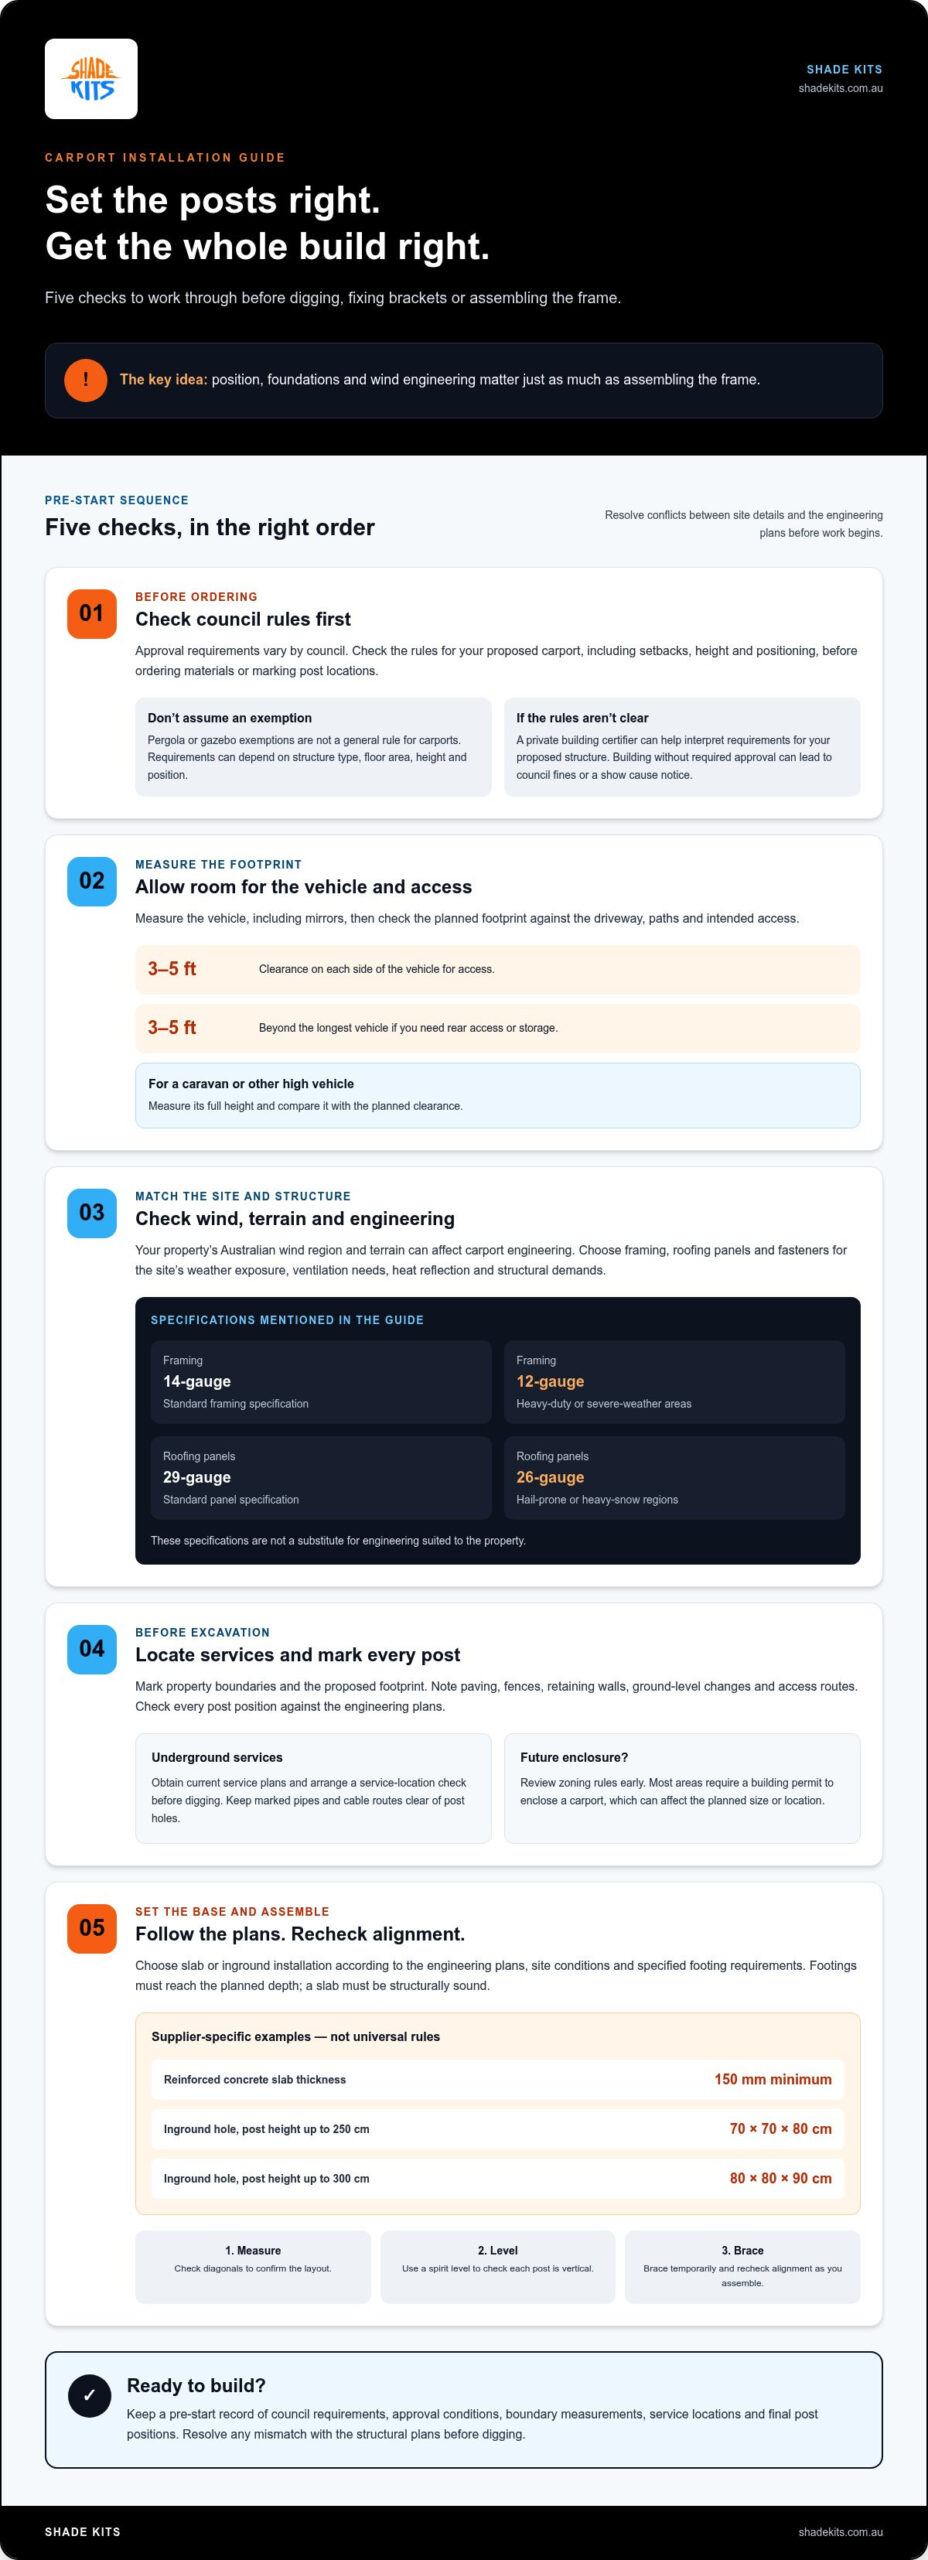
One of the DIY carport mistakes to avoid is setting posts in the wrong positions. Posts support the frame and roof, so incorrect placement can undermine stability in high winds. Before digging or fixing brackets, mark every post location against the engineering plans. Check that the layout also leaves clear access for the vehicle, doors and walkways.
Measure the vehicle, including mirrors, then allow 3-5 feet of clearance on each side for access. Extend the carport 3-5 feet beyond the longest vehicle if you need rear access or storage. For a caravan or another high vehicle, measure its full height and compare that with the planned clearance. Check the measurements against the driveway and existing paths before settling on the footprint.
Choose framing, roofing panels and fasteners for the site’s weather exposure, ventilation needs, heat reflection and structural demands. The guide recommends 14-gauge tubing as a standard framing specification, and 12-gauge tubing for heavy-duty or severe-weather areas. It also identifies 29-gauge panels as standard, with 26-gauge panels for hail-prone or heavy-snow regions. These specifications are not a substitute for engineering suited to the property.
Should you choose slab or inground installation? Start with the engineering plans, site conditions and specified footing requirements. Footings must reach the depth set out in the plans, while a slab must be structurally sound. One supplier specifies a minimum reinforced concrete slab thickness of 150 mm for its slab installation method. For its inground method, the specified hole is 70 × 70 × 80 cm for installed post heights up to 250 cm, or 80 × 80 × 90 cm up to 300 cm. Treat these as supplier-specific dimensions, not universal rules.
What is the typical DIY carport cost in Australia, including materials and permits? There’s no single useful total: materials, dimensions, foundation work and local approval requirements all affect the budget. Separate kit and site-preparation costs from any council charges, and include your chosen slab or inground method in the estimate.
How do you measure, level and brace a carport frame correctly? Mark the post positions from the plan, measure the diagonals to check the layout, then use a spirit level to check that each post is vertical. Temporarily brace the frame before fixing the roofing, and recheck alignment as you assemble it. A square layout and plumb posts help the beams and panels fit as intended.
Check local council requirements before ordering materials or marking post locations. Approval rules vary by council, and setbacks, height and positioning can affect whether a carport needs approval. Homeowners are responsible for meeting local legislation and setback requirements. If the rules are unclear, a private building certifier can help interpret them for your proposed structure. Building without required approval can lead to council fines or a show cause notice.
Don’t assume an exemption for a pergola or gazebo applies to a carport. Permit exemptions can depend on a structure’s type, floor area, height and position on the property. Treat exemption examples as specific to the council and structure they cover, not as a general rule for carports across Australia. Check the requirements for your proposed build with the relevant local authority.
Before preparing the site, record the proposed carport’s dimensions, height, position and intended use. Compare these details with the council’s current planning and building guidance. Setback, height and positioning requirements vary between councils. Check the exact property location and proposed structure rather than relying on a neighbour’s approval or an older nearby project. Keep any approval conditions with the plans used for construction.
Site readiness matters as much as paperwork. Mark the property boundaries and proposed footprint, then note existing paving, fences, retaining walls and access routes. Check for obvious changes in ground level and confirm that the planned post positions match the engineering plans. If you may enclose the carport later, review zoning rules before finalising its size or location. Most areas require a building permit to enclose a carport, so plan for that possibility early.
How do you check underground services before digging carport post holes in Australia? Obtain current underground service plans for the property and identify any pipes or cables near the proposed holes. Arrange a service-location check before excavation, then keep marked service routes clear of post positions.
Keep a simple pre-start record of council requirements, approval conditions, boundary measurements, service locations and final post positions. Resolve any conflicts between these details and the structural plans before digging. This helps prevent a correctly assembled frame from breaching a setback, obstructing access or clashing with an underground service.
A small, basic carport for one vehicle may suit DIY if you have the right tools and help. A wider structure brings more lifting, alignment and coordination challenges. Carports 24+ feet wide are typically safer with professional installation. Consider your construction experience, available assistance and the project’s structural demands before choosing who should assemble it.
Is a kit carport or a fully DIY design cheaper and easier to build? A kit can simplify assembly because its components are selected to work together, while a full DIY design means sourcing and matching each part. Neither option is automatically cheaper: materials, site preparation and approval requirements all affect the overall cost.
Plan for the next 5-10 years, not just the vehicle in your driveway today. List likely changes, such as a second vehicle, a caravan, workshop storage or an enclosed space. A carport that fits one car now may create problems later if you need room for bikes, tools or a larger vehicle. Include those needs when setting its position and footprint.
Everyday access also shapes the layout. Picture unloading shopping, helping children in and out of the car, and moving bikes or equipment past parked vehicles. Mark door-opening space and walking routes on the ground before installation. A post beside a car door, for example, can make routine access awkward even if the vehicle fits under the roof.
Planning for future enclosure takes more than adding walls. Walls, windows or doors may need extra structural support, and the existing foundation must support the added load. Check both before treating an open carport as a future garage. Enclosure can also involve zoning rules and building approval, so include those steps in your timeline rather than leaving them until materials are installed.
Plan electricity before the frame goes up. Decide where lights, switches and outlets could be useful, then have a licensed electrician carry out the electrical work. If you’ll use an enclosed space frequently, consider floor insulation as part of the design. Planning these details early helps avoid routing services around finished walls or changing the layout later.
For a first-time installer, DIY assembly can take a full weekend or more. A standard residential carport typically takes professional installers a few hours to a full day; larger double, triple or commercial structures can take 1-2 days. These timeframes help compare the work involved, but preparation, site access and future-use planning still matter whichever approach you choose.
Poor runoff planning can leave a persistent puddle beside the driveway. Before installation, observe how water flows across the site in wet weather. Mark low spots, existing drains and the proposed roof edge, then plan how water will move away from posts, paths and the home. Careful grading helps prevent runoff from collecting around the carport base.
Roof pitch affects how quickly rainwater reaches the lower edge. A typical carport roof slope is 5° to 15°, with a steeper slope recommended for snow-country areas. Follow the design specified for the structure, and make sure the roof’s fall directs water towards the intended gutter line. A roof sloping towards a wall or narrow path can concentrate runoff where it causes problems.
Check ground levels before setting out posts. Use a straight edge and level to identify high and low points, then consider how the finished driveway will meet the carport floor. A low corner beside a post, for example, can hold water after rain, while a raised edge can send runoff across a walking route. Plan grading and drainage together rather than trying to fix pooling after assembly.
What drainage, guttering and stormwater mistakes should you avoid when building a carport? Keep gutters and downpipes clear, size them for the roof area, and plan where collected water will go. Don’t let discharge pool around footings, cross an access path or flow towards the home.
Gutter capacity should suit the roof area, not just the visible length of the carport. Check that each downpipe connects to the planned drainage route and that its outlet won’t undermine the ground near a post. Leaves and debris can block the flow, so include gutter and downpipe cleaning in regular maintenance. A blocked outlet can overflow in heavy rain, even if the roof and gutters were positioned correctly.
Test the site plan before construction by tracing the likely path of water from the roof edge to its destination. Check whether existing paving, garden beds or drains interrupt that route. If you plan to enclose the carport later, plan runoff first: walls can limit access to edges and make drainage problems harder to fix. Direct rainwater appropriately before adding an enclosure, and keep roof discharge away from areas where vehicles and people need clear access.
These checks help avoid installing a sound structure over a poorly drained site. Consider the roof slope, gutter position, downpipe outlets and ground grading as one system. After the first substantial rain, check for overflow, erosion and standing water. Clear obstructions or adjust the runoff route before they damage the outdoor area.
Wind engineering is a critical part of choosing a carport in Australia. The National Construction Code (NCC) and AS/NZS 1170.2 are references for wind-region requirements affecting outdoor structures. A carport’s engineering can depend on both the property’s wind region and its terrain category. Those details influence the design loads the structure must resist, so a kit suited to one site may not suit another.
Which Australian building codes and wind ratings apply to DIY carports? The NCC and AS/NZS 1170.2 provide the relevant framework, while the site’s wind region and terrain category affect the engineering requirements. Match the carport’s engineering to its actual property location and exposure, not just its general state or city.
Australia’s wind conditions vary considerably. In parts of severe cyclonic Region D, wind speeds can reach 260 km/h. That figure illustrates why a general-purpose design cannot automatically be assumed suitable for every location. Before selecting a kit, identify the property’s wind region and terrain category, then make sure its engineering addresses both. Exposure around the site also matters: open terrain differs from a more sheltered setting.
Look beyond the roof panels when reviewing engineered details. Posts, beams, connections, footings, fasteners and tie-downs work together to transfer wind forces into the ground. Moving a post or substituting a fixing can affect that load path. Follow the design and assembly instructions, and don’t assume one strong component means the complete structure suits the site.
For carports wider than 24 feet, guidance recommends working with a dealer who provides certified engineering. Wider spans place greater demands on the frame, so the engineering should correspond to the proposed dimensions and location. Confirm that the plans, kit configuration and installation method align before work starts. This is especially important if the design changes after the site has been prepared.
High-wind areas also call for careful roof detailing. Vertical roof panels and properly specified clips and tie-downs are recommended for these conditions. Panel direction affects how the roof sheds weather, while connections help secure the structure. Don’t assume stronger-looking fasteners or extra fixings will correct a mismatch; follow the engineered details for the design.
Common mistakes include choosing a kit by appearance alone, overlooking terrain exposure, and changing engineered post positions during assembly. Match the engineering to the site first, then build to those details. For a larger span or an exposed property, make engineering suitability a deciding factor when selecting the carport design.
Shade Kits supplies DIY Carport Kits with aluminium-alloy frames and twin-wall polycarbonate roof panels, designed for straightforward self-installation. A kit brings its components together, but site preparation, approvals, drainage planning and wind requirements still need careful attention.
Before choosing a kit, match its design to your vehicle, planned post positions and property conditions. If your project is focused on shade over a patio or entertaining area, Shade Kits also offers Patio Cover Kits, Pergola Kits and Awning Kits.
Use the checks in this guide to clarify what your site needs and which installation approach suits your experience. Contact Shade Kits to discuss DIY Carport Kits, or explore the available options online.
A sound carport project starts with a clear decision: what the space needs to do, what the site allows and whether you’re ready to manage the build. Use your measurements, plans and approval notes to define the brief before choosing a design. This gives you a basis for comparing DIY and professional installation without letting convenience alone decide.
The best way to prevent DIY carport mistakes is to treat preparation as part of the build, not a task to rush through before assembly. If your plans change, revisit the layout and structural requirements before continuing. Pausing to check can be easier than correcting a mismatch after the frame is in place.
Shade Kits offers Carport Kits, Pergola Kits and Awning Kits for different outdoor requirements. If a carport kit is the right fit for your plans, contact Shade Kits to discuss your carport. Take your project forward with a clear brief and a build approach that suits your site.
DIY can suit a straightforward single-car project if you can follow the plans, use the required tools and arrange help for lifting. Choose professional installation for a large span, complex site or design that needs careful coordination. Also consider whether you can manage preparation and assembly time: a first-time DIY build may take a full weekend or more. If electrical work is part of the project, use a licensed electrician.
The foundation should match the carport’s engineering, the site and the installation method. A reinforced concrete slab is a durable, permanent option; one supplier specifies a minimum thickness of 150 mm for its slab installation method. Inground posts instead need footings designed to the engineering plans. Don’t apply one kit’s slab or hole dimensions to another design, as post loads and installation details can differ.
Incorrect post positioning is a key installation mistake because posts support the frame and roof. Shifting a corner post to clear a path, for example, can change the planned structure and make vehicle access awkward. Before digging, compare marked post locations with the engineering plans, property layout and vehicle entry route. Recheck the measurements before fixing posts, not after assembling the beams and roofing.
Common DIY carport mistakes to avoid include rushing the layout, using unsuitable fixings and changing the design during assembly. Sort the components by plan reference before starting, then check each connection as you fit it. Keep the installation instructions to hand throughout the build. Don’t substitute a fastener or alter a structural member just because it appears to fit; these details affect how the assembled frame performs.
Approval requirements depend on the property and local council, so check before construction begins. A carport may need a building permit, and building without required approval can lead to a council fine or show cause notice. Ask the council about the proposed structure’s location, dimensions and intended use, or consult a private building certifier. Keep approval documents and conditions with the construction plans.
There isn’t one setback or height rule that applies uniformly across Australia. Local requirements vary between councils and may depend on the carport’s position, height and distance from boundaries. Use the property’s actual boundary information and proposed dimensions when checking planning requirements. Don’t rely on a nearby carport as a precedent: its approval and site conditions may differ.
Footing design depends on ground conditions, drainage, slope and the loads shown in the structural design. Soft ground, fill or soil that changes with moisture may require a different footing approach from stable, well-drained ground. Identify site conditions before choosing slab or inground installation, and follow the engineering plans for footing depth and placement. A generic hole size cannot account for every soil profile or carport design.
Start by considering your site’s wind exposure, UV conditions and roofing needs. Check that the frame, roof panels, connections and fixings are specified together for the structure. In a bushfire-prone location, don’t assume a material is suitable based only on its appearance or composition. Review relevant local requirements and use documented product specifications when selecting materials for your site.