10% off Patio Covers - all of November. UXSC6EQA Shop now
10% OFF Patio Covers UXSC6EQA Shop

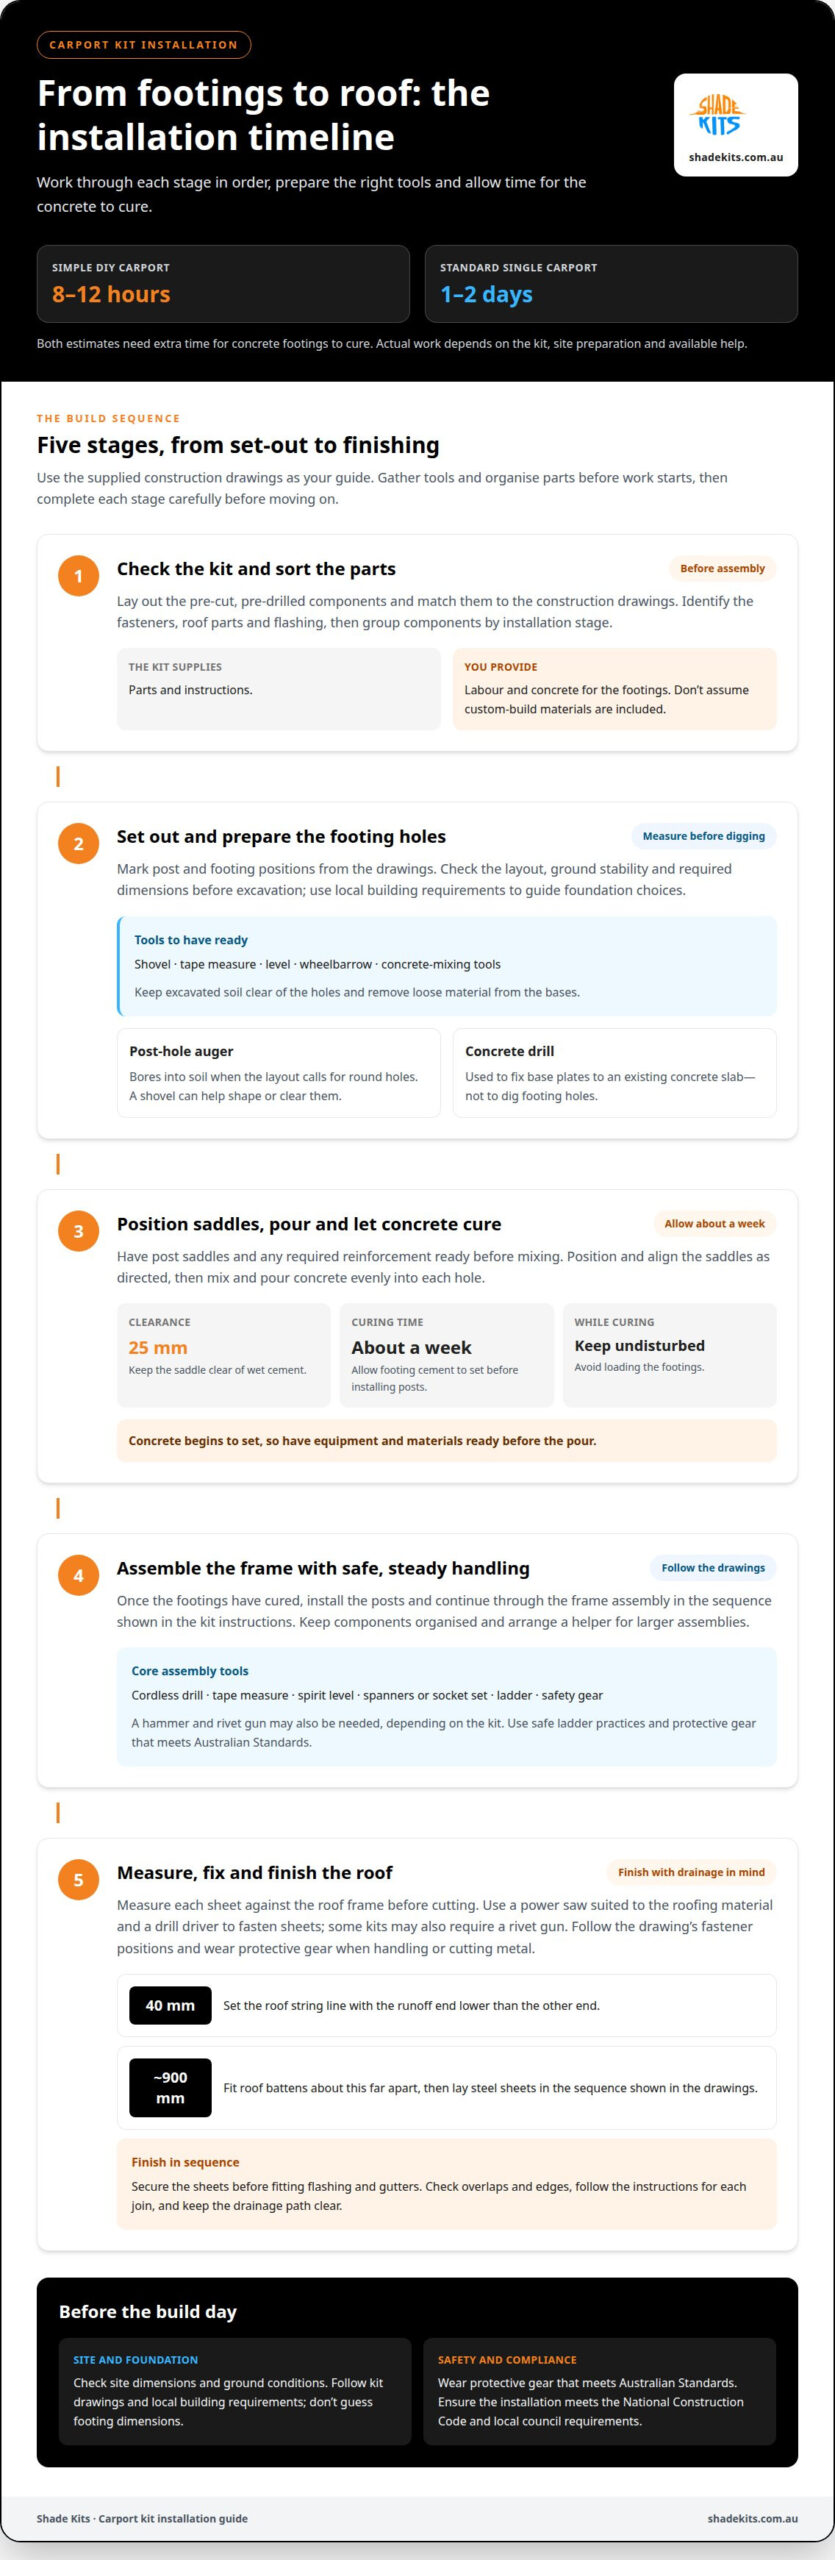
A simple DIY carport can take 8-12 hours to install, while a standard single carport typically takes one to two days, plus time for concrete footings to cure. The tools needed to build a carport kit generally include a cordless drill, tape measure, spirit level, spanners or socket set, ladder and safety gear. Footing work also calls for concrete tools and careful site preparation.

It’s easy to focus on assembling the frame, but having the right tools ready and allowing time to prepare the footings matter just as much. The work is more manageable when you know what each stage involves and have a helper for larger assemblies.

This guide covers the hand and power tools to gather, how to measure and prepare your site, and what’s involved in making concrete footings. You’ll also get a practical sense of the planning and experience a carport kit installation takes, so you can decide whether the project suits your skills and schedule.

Key Takeaways

  • Match your tool kit to the stages of the job, from setting out and footing work to assembling the frame and roof.
  • Use the kit’s drawings and instructions to guide assembly, and keep components organised so each part is ready when needed.
  • Prepare the footing locations carefully and allow the concrete to cure before raising the posts.
  • Check the site dimensions and ground conditions before setting out the structure, so the finished carport suits the space and intended vehicle.
  • Plan for safe access and a helper during assembly, particularly when handling larger components.

DIY carport kit contents and installation instructions

Start with the supplied drawings and work through the project in order, from footings to roof sheets. Wear protective gear that meets Australian Standards, and ensure the installation meets the National Construction Code and local council requirements.

1. Check the kit contents and instructions

Lay out the pre-cut, pre-drilled parts and match them to the kit’s construction drawings before assembly. Identify the fasteners, roof components and flashing, then group them by installation stage. The kit supplies parts and instructions; you provide the labour and concrete for the footings. Don’t assume materials for a custom build are included.

2. Dig and install the post footings

Mark the post positions from the drawings before digging, so the footings align with the frame. Prepare concrete tools and set each post saddle in place as directed. Keep the saddle 25 mm clear of the wet cement. Allow about a week for the footing cement to set before installing the posts, and avoid loading the footings while they cure.

3. Cut and fasten the roofing sheets

Measure each sheet against the roof frame before cutting. Use a power saw suited to the roofing material and a drill driver to fasten it. Some kit components may also require a rivet gun. Wear protective gear when handling or cutting metal, and follow the drawing’s fastener positions. Careful measuring helps prevent short sheets and misaligned fixings.

4. Install roof sheeting and flashing

Set the roof string line with the runoff end 40 mm lower than the other end. Fit the roof battens about every 900 mm, then lay the steel sheets in the sequence shown in the drawings. Secure the sheets before fitting flashing and gutters, so overlaps and edges align. Follow the supplied instructions for each join, and keep the drainage path clear.

5. Plan assembly time and labour

Allow 8-12 hours for a small, simple DIY carport, or one to two days for a standard single carport, plus concrete curing time. Actual work depends on the kit, site preparation and available help. Plan the footing, frame and roof stages before setting an assembly day.

Materials may include nails and fasteners, anchor bolts, concrete, sand, and timber or metal sheets and framing studs.

Concrete footing tools and preparation

Choose digging and pouring tools to suit the footing layout and ground. Prepare each footing location before mixing concrete, using the kit drawings and local building requirements to guide dimensions and placement.

1. Prepare the post holes and footings

Mark footing positions from the construction drawings, then gather a shovel, tape measure, level, wheelbarrow and concrete-mixing tools. Keep excavated soil clear of each hole so it doesn’t fall back in. Before pouring, check that the ground is stable and the holes line up with the planned post positions.

Use local building requirements to guide foundation choices, including any frost-depth requirements that apply to the property. These conditions affect footing design, so don’t guess the hole dimensions. Have the post saddles and any required reinforcement ready before mixing. Concrete begins to set, and stopping to find equipment can disrupt the pour.

  1. Mark each footing position and compare the layout with the kit drawings.
  2. Dig the holes to the required dimensions and remove loose material from the bases.
  3. Position the post saddles as directed, then check their alignment before adding concrete.
  4. Mix and pour concrete with a shovel or mixing tool, filling each hole evenly.
  5. Finish the surface and leave the footings undisturbed while the concrete sets.

2. Choose tools for digging the holes

A concrete drill and a post-hole auger do different jobs. Use an auger to bore into soil when the footing layout calls for round holes; a shovel can help shape or clear them. A concrete drill is for fixing base plates to an existing concrete slab, not for digging footings.

Some carport kits can use base plates on an existing concrete slab that’s in good condition. Whether you need a concrete drill depends on the fixing method. Follow the kit instructions for anchor positions and fixing types, and mark and check base plate positions before drilling. For new footings, prepare concrete tools rather than relying on a drill to replace excavation equipment.

Pouring a slab is a separate preparation choice from making post footings. If the design uses a slab, prepare the area and arrange the pour to match the kit’s base plate layout. Keep the surface level and let it set before fitting anchors. A slab in poor condition is not a sound surface for base plates, so decide on the foundation before assembly begins.

For a carport structure, matching the foundation approach to the kit drawings helps keep the posts aligned and the assembly sequence clear.

How much knowledge or experience do I need before doing a project like this?

Assembling a carport kit calls for careful measuring, safe ladder use and close attention to the construction drawings. Follow the stages in order, and arrange help for larger frames and panels.
  1. Match the job to your experience. Check that you can measure accurately, use a cordless drill and follow assembly drawings before starting. The kit’s pre-cut and pre-drilled parts reduce some measuring and cutting, but you still need to position components correctly and fasten them securely. If you haven’t assembled a large frame before, practise using the drill and spanners on a separate task first. Don’t rush steps that affect alignment.
  2. Gather assembly tools before lifting components. Set out a tape measure, spirit level, cordless drill, spanners or socket set, hammer and rivet gun if the kit requires rivets. Keep fasteners grouped by assembly stage, rather than tipping them together. A power saw may be needed for specified cuts, while a shovel belongs with footing preparation. Wear suitable personal protective equipment and keep the work area clear.
  3. Plan access for frame and panel work. Have preferably two ladders available, so the frame can be reached safely at different points. For a larger or double carport, arrange a helper during assembly. One person can hold a panel or frame section steady while the other aligns holes and starts fasteners. Agree on lifting and positioning before raising components, and don’t try to control an awkward panel from an unstable ladder.
  4. Set a realistic tool budget and decide what to hire. The cost of essential tools depends on which items you already own, the quality and type you choose, and whether you buy or hire equipment. Hiring suits a tool needed for a short, specific task; account for the hire period, transport and collection when comparing it with buying. In Australia, tool-hire options depend on the equipment and location, so plan the tool list before arranging hire.
  5. Work through a dry assembly sequence. Identify each frame section and panel from the drawings before lifting it into place. Use the level to check alignment as you assemble, and tighten fasteners only when the parts sit correctly. Keep the vehicle and other people clear of the lifting area. Pause if the structure shifts or a component doesn’t match the drawing, then correct its position before continuing.

How to Choose Tools for Carport Kit Footings and Assembly

Hand tools and power tools

The tools needed to build a carport kit depend on whether you’re measuring, fastening, cutting or preparing the site. Sort tools by task before starting, and keep the kit drawings nearby so you can match each tool to the right fixing or component.

  1. Set out measuring and checking tools. Use a tape measure to compare component positions with the construction drawings, then check the frame with a spirit level as it takes shape. Keep both within reach instead of relying on visual estimates. Rechecking alignment before tightening fasteners helps prevent small positioning errors from carrying through to later assembly stages.
  2. Choose a drill driver for fastening. A cordless drill is a core power tool for fitting screws and other specified fixings. Select the correct driver bit for the fastener, and keep the fasteners organised by assembly stage. Use steady pressure and avoid forcing a fixing that won’t align. The drawings indicate where components join and where each fixing belongs.
  3. Keep hand tools ready for adjustments. A hammer can help with light positioning, while spanners or a socket set tighten bolts used in frame connections. Use the size that fits each fastener securely, rather than applying force with a poor fit. Keep these tools close to the assembly area, so adjustments don’t leave a partly supported section unattended.
  4. Use cutting tools only where needed. A power saw may be required when the instructions call for a cut, but pre-cut and pre-drilled parts reduce the need for extensive on-site cutting. Measure the component against the drawing before cutting, and support it securely. Don’t alter a part simply because it appears too long or doesn’t align at first placement.
  5. Prepare for riveted connections. Include a rivet gun if the kit instructions specify rivets. Match the tool and rivets to the connection shown in the drawings, then ensure the components sit flush before fastening. A rivet gun isn’t a substitute for a drill driver or spanners, because each tool serves a different fixing type.
  6. Gather tools for ground-level preparation. A shovel helps with excavation and clearing soil, while concrete tools are used during footing preparation and pouring. Keep these separate from assembly equipment to avoid carrying muddy tools across the frame or roof area. Group the tools needed to build a carport kit by task, keeping ground work separate from fastening and measuring.
  7. Plan safe access and protection. Have preferably two ladders available for construction, and position them on stable ground before lifting components. Set aside Australian Standard-approved protective gear before work begins. Keep measuring and fastening tools accessible from your work position, rather than reaching across a ladder or passing tools overhead.

Measuring and preparing the site

Mark out the proposed footprint before digging or assembling anything. A tape measure, string line, pegs and spirit level help you turn the kit dimensions into clear post positions.

  1. Measure the usable area. Compare the available space with the kit dimensions, then allow room for the vehicle to enter and park. A single-car example measures 3 m × 6 m × 2.4 m, while a two-car example measures 6 m × 6 m × 2.4 m. Treat these as examples, not universal dimensions; vehicle size and site conditions affect the layout.
  2. Allow practical vehicle clearance. Measure the vehicle’s length, width and height, including accessories that affect its overall size. Allow at least 300-500 mm of clearance when sizing a carport for a vehicle. A caravan or boat may need at least 3.5 m of height clearance, so measure its highest point before choosing the structure dimensions.
  3. Mark the post positions. Use pegs and string to show the outside edges, then measure diagonally between opposite corners to check the set-out. The example layout uses four corner locations for concrete post footings. Keep the string taut and confirm the marked footprint matches the drawings before excavation begins.
  4. Check the ground and drainage direction. Walk the proposed area and note slopes, soft ground and places where water collects. The roof runoff direction affects how the structure sits on the site, so keep the drainage path in mind when setting the string lines. Clear vegetation and loose material from the marked footprint before measuring again.
  5. Check the site plan against boundaries and buildings. Compare the marked footprint with nearby fences, walls, driveways and existing structures. An attached design needs a suitable connection to the building, while a freestanding layout uses its own post positions. Keep access for the vehicle clear and make sure each post location remains reachable for digging and assembly.
  6. Confirm local requirements before ground work. Carport permit requirements can depend on local zoning rules, so check with the local council before installation. The National Construction Code and local council requirements affect Australian carport projects. Resolve the site layout and approval requirements before digging, rather than changing footing positions after excavation has started.
  7. Record the final measurements. Write down the footprint, post locations and vehicle clearances, then compare them with the kit drawings. Recheck the example 3 m width or 6 m double-car width only if those dimensions suit the selected design. Keep the notes beside the set-out, so measurements remain consistent through footing preparation and assembly.

Shade Kits: Carport Kits

Shade Kits supplies Carport Kits with coordinated components and assembly instructions, so you don’t need to source every part separately. After assessing the site, footing method, tools and help available, a kit can be a practical next step in planning your build. Compare the drawings and dimensions with your vehicle, available space and intended footing layout before choosing a design. This preparation also helps you understand the assembly tasks and tools involved. Shade Kits also offers Pergola Kits, Awning Kits and Patio Covers for other outdoor cover needs. If you’re considering a carport kit, contact Shade Kits to discuss your project.

Plan your next step with confidence

Before committing to a build, consider how the structure needs to fit your daily routine. Think about the vehicle or outdoor area it will shelter, how you’ll use the space, and whether you’re comfortable coordinating the preparation and assembly. The tools needed to build a carport kit are just one part of the decision; the design, site and footing method also shape the work ahead.

Shade Kits offers Carport Kits, Pergola Kits and Awning Kits, giving you options to consider for different outdoor spaces. If you’re ready to discuss which direction suits your project, contact Shade Kits about your project. A clear plan is a practical starting point, and you can take the next step at your own pace.

Frequently Asked Questions

How long does installation take?

A small, simple DIY carport can take 8-12 hours to install, while a standard single carport typically takes one to two days, plus footing curing time. These are different project scopes, not a guaranteed schedule. Allow extra time if the site needs preparation, components require careful positioning, or help is limited. Plan footing work, curing and assembly as separate stages when setting your project timetable.

What tools are required?

For a typical assembly, have a tape measure, spirit level, cordless drill, spanners or socket set, hammer and ladder ready. Ground and footing work calls for a shovel and concrete tools. A power saw or rivet gun may be needed for specific kit components. Use the construction drawings to identify the right tools for the fasteners and parts, rather than assuming every project requires the same equipment.

What tools are needed to assemble a carport kit in Australia?

Assembling a carport in Australia commonly calls for measuring, fastening and access tools, such as a tape measure, level, cordless drill, spanners or socket set and ladder. Footing work also requires excavation and concrete tools. Your selection depends on the foundation method and the kit’s fixings. Keep protective gear suited to the tasks close at hand, and follow the assembly drawings.

What tools are included with Australian carport kits?

Carport kits generally supply the structural parts, hardware and assembly instructions, not a complete set of hand and power tools. Shade Kits’ DIY kits include hardware and clear instructions. You’ll still need suitable equipment for measuring, fastening and reaching assembly points. Read the instructions to identify any task-specific tool, such as a rivet gun, before starting.

What power tools are needed to install a steel carport kit?

A cordless drill or drill driver is the main power tool for assembling and fastening kit components. A power saw may be useful if the instructions call for a cut, while a rivet gun is needed only for riveted connections. Use a concrete drill to fix base plates to an existing concrete slab, not to dig soil footings. Follow the kit instructions to match each tool to its task.

What hand tools and safety equipment are needed to build a carport?

Useful hand tools include a tape measure, spirit level, hammer, spanners or socket set and shovel. A ladder provides access during elevated assembly; two ladders can make the work easier. Wear protective gear that meets Australian Standards and suits the work. Keep hand tools organised near the work area, but avoid reaching across an unstable ladder or leaving a component unsupported.