
What if the best shade for your window isn’t the darkest one? Polycarbonate window awnings can help manage sun and rain, but the roofing finish affects how much daylight passes through. Clear panels generally preserve a brighter feel, while tinted or diffused options soften the light. The right balance depends on the window, its sun exposure and how you use the room.
Choosing a practical awning means looking beyond appearance. Its dimensions, projection, frame and fixing points all affect how well it suits your home. Before deciding, consider how the window is exposed to sun and weather, what you want shaded and whether the wall and surrounding space suit the planned installation.
This guide compares clear and tinted polycarbonate, explains how to plan an awning’s size and placement, and covers exposure and secure installation. You’ll also learn what to consider when choosing a DIY kit with an aluminium frame and UV-resistant polycarbonate roofing, while keeping applicable building and installation requirements in view.
A polycarbonate window awning is an external cover fitted above a window to provide shade and some shelter from the weather. Its roof projects from the wall, intercepting some direct sun before it reaches the glazing. The projection and position determine how much shade falls on the glass and the nearby wall.
A shallow cover may shade only part of a window at certain times, while a deeper one can cast shade further down the glass or across the wall below. The shadow changes as the sun moves. Nearby eaves, trees and buildings can also affect how much of the window is shaded.
Polycarbonate is the roofing material, not necessarily the frame. Shade Kits’ DIY awning kits pair UV-resistant polycarbonate roofing with aluminium frames. For a general overview of the material’s properties and uses, see Polycarbonate.
An external awning works differently from an indoor blind. A blind adjusts light from inside the room, after sunlight has passed through the glazing. An awning sits outside, where it can intercept some direct sun before it reaches the window.
By covering the upper part of a window, an awning can reduce direct sun on the glass when the sun’s angle aligns with its position and projection. It may also shelter the window from some rain. How much protection it provides depends on factors such as wind direction, exposure and the area covered.
Think of an awning as an added layer of overhead cover, not a guarantee of a cooler room or complete weather protection. Existing eaves and the direction a window faces can help you judge whether an awning would add useful coverage.
An awning may suit an exposed window that receives strong direct sun, an entry window where overhead cover would be useful, or a window beside an area where shelter matters. The best placement depends on the home’s layout as well as the window itself.
Observe where sunlight falls at different times and seasons before deciding. The window’s orientation, nearby structures and existing roof overhangs all influence the shade an awning casts. A broader aluminium awnings guide can provide useful context for comparing awning approaches. This section focuses on the role of polycarbonate roofing over a window.
As a practical starting point, note:
These observations help you relate the awning’s position and projection to your needs, rather than choosing by appearance alone.
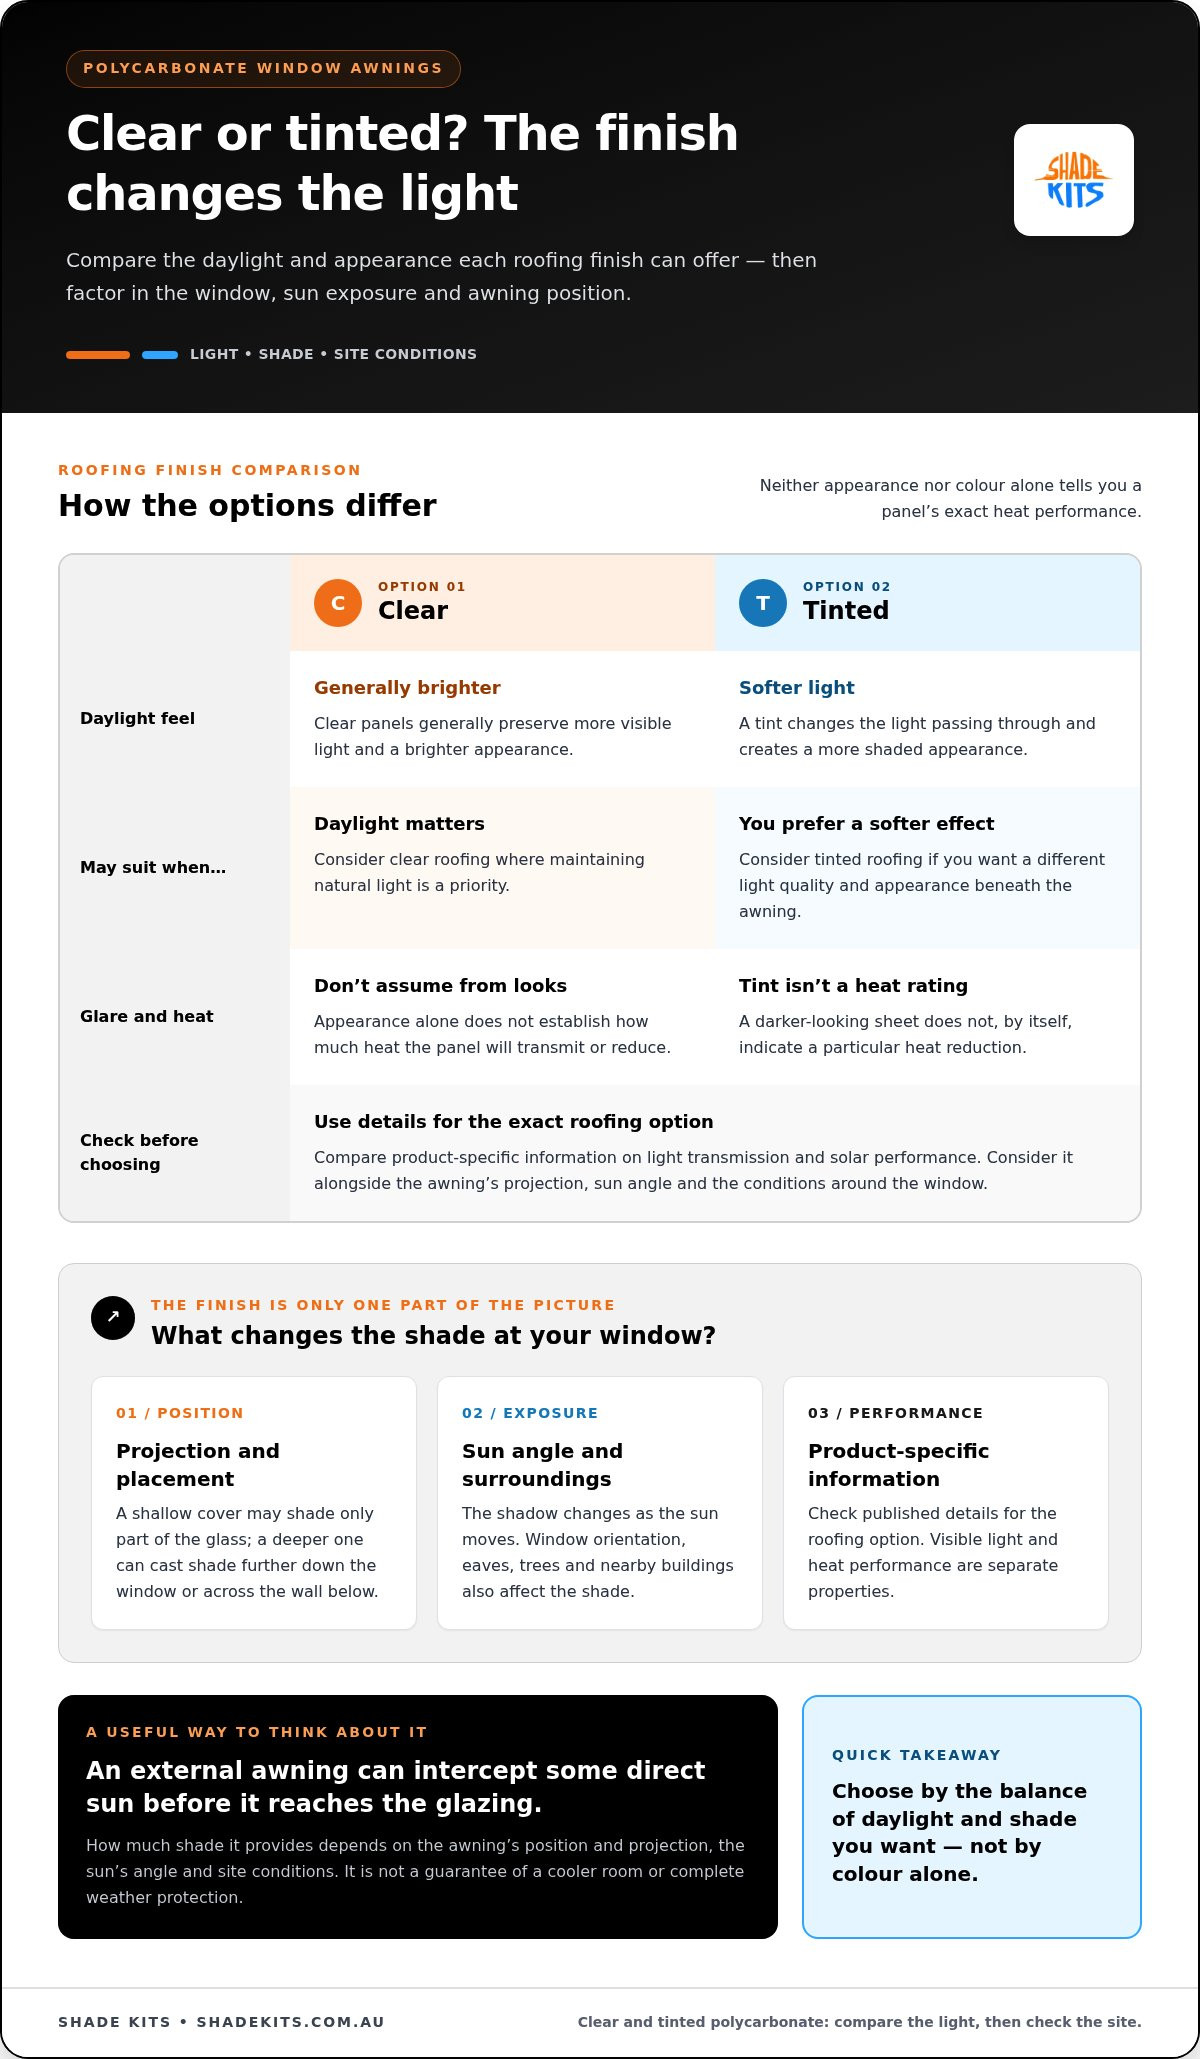
Clear and tinted roofing create different experiences beneath an awning. Clear panels generally preserve a brighter appearance, while a tint changes the amount and quality of light passing through. Don’t judge a panel by colour alone: its specific properties, the awning’s projection and the conditions around the window all influence the result.
Visible light and heat performance are separate properties: a panel’s appearance alone can’t tell you exactly how much heat it will transmit or reduce. For a particular roofing option, look for product-specific information on light transmission and solar performance. Don’t assume a darker-looking sheet will deliver a particular reduction in heat.
Clear roofing generally allows more visible light through than darker or more opaque options, so it may suit a room where maintaining daylight is a priority. It can also preserve a more open appearance above the window. The actual effect depends on the awning’s projection, the sun’s angle and shade from nearby trees, eaves or buildings.
Consider the room as well as the exterior. A living area where natural light matters may call for a different balance from a window where reducing direct sun is the main aim. Think about how the space feels at different times of day before choosing a finish.
A tint changes the light passing through the roof and can create a softer, more shaded appearance. That may help manage brightness around a window, but glare control and heat performance aren’t interchangeable. A tint’s colour or darkness alone doesn’t establish a particular heat reduction.
Compare product information for the exact roofing option you’re considering. Claims about light transmission or heat control should be supported by that product’s published technical details and considered alongside the awning’s position and site conditions.
A simple comparison can keep the decision practical:
For example, if a window receives strong sun but the adjoining room still needs daylight, compare the available roofing details rather than choosing by appearance alone. If a nearby roof already shades the glass for much of the day, the same tint may feel different from how it would on a fully exposed window.
Shade Kits’ DIY awning kits use aluminium frames with UV-resistant polycarbonate roofing. As you compare options, match the roofing appearance and available product information to the window’s daylight needs and exposure. Then consider a kit-based solution that suits your measurements and installation plan.
Shade solutions differ by where they sit and what they’re designed to do. An external awning adds overhead cover outside the window; an internal blind adjusts light and privacy from inside. The roof material matters too. Polycarbonate roofing lets some daylight through, while an aluminium-only awning uses aluminium as the covering material. These are different approaches, not interchangeable descriptions of the same construction.
Polycarbonate and aluminium describe materials, but check which part of the awning each refers to. A frame supports the roof; it doesn’t determine the roofing material. Shade Kits’ awning kits pair aluminium frames with UV-resistant polycarbonate roofing. An aluminium-only awning instead uses aluminium for its cover. Compare the specific design and intended appearance rather than assuming every option has the same light or shade effect.
Think about how you want the area beside the window to feel. A polycarbonate roof can maintain some daylight through the overhead cover, depending on its properties and site conditions. An aluminium roof may provide a more visually solid cover. Neither description alone tells you exactly how much shade will reach the glass or whether the room will feel darker.
Product details and placement make a difference. The roofing finish, awning projection, sun angle and surrounding structures all contribute to the result. So, two polycarbonate window awnings can create different conditions at different homes, even if both use the same broad material category. Consider the actual roof design alongside the window’s exposure and your preference for daylight, rather than choosing by label alone.
An external awning is positioned to intercept some sun before it reaches the glazing and can provide overhead cover outside. An internal blind manages light and privacy once you’re indoors. If your main need is privacy after dark, a blind addresses a different concern from an awning. If you want exterior cover, an awning is the more direct option. Some households may use both for separate purposes.
Use these questions to narrow down the choice:
There’s no single best option for every home. Start with the problem you’re trying to solve, then compare material, placement and function. For a combination of exterior cover and some daylight overhead, a DIY awning kit with an aluminium frame and polycarbonate roof is one approach to consider. Shade Kits’ kits are designed for self-installation, providing a kit-based option to compare with your window measurements and priorities.
A good fit starts with the window and the wall around it, not just the width of the glass. Work through the planning in order: assess the area, take measurements, check the fixing surface, then prepare for assembly. This helps you identify practical issues before choosing a kit or starting a DIY installation.
Measure the window opening, then note the available wall space above and to each side. Record the width you want the awning to cover and consider how far it should project from the wall. The projection affects how much overhead coverage it provides, but it also needs to suit the space below.
Check for anything that could affect placement or access, including eaves, downpipes, lights, window hardware, nearby doors and paths. Consider whether the window opens outwards and whether the proposed awning could obstruct it. Compare your measurements with the selected kit’s specifications rather than assuming a general size will suit every window.
A simple site note can help you keep track: write down the window dimensions, clear wall area, preferred coverage and any obstructions. For polycarbonate window awnings, relate those details to the roofing and frame layout in the kit so you can judge whether the planned width and projection work together.
Look closely at the fixing surface and the area where assembly will take place. Consider whether the wall is suitable for the intended fixings, and whether you can access the installation area safely with the tools and help needed to handle the components. Don’t make assumptions about the wall’s structure.
Before assembly, read the supplied instructions and check the listed components and tools against what’s included with your chosen kit. Organise the work area, keep the parts accessible and follow the manufacturer’s sequence. If the fixing surface, structural suitability or safe access is uncertain, seek appropriate professional guidance before proceeding.
Also account for requirements that may apply to your property. Planning and building requirements can differ across Australian states, territories and local areas, so check the rules that apply to your location before installation. Don’t rely on a general online guide to decide whether a particular awning needs approval.
Use this sequence as a final planning check:
Shade Kits’ DIY awning kits are designed for self-installation, making careful planning and following the supplied instructions central to the process. Once you’ve taken your measurements, explore DIY awning kits to compare your window requirements with a kit-based option.
Once you’ve worked through the window measurements, shade priorities and installation considerations, compare them with a kit designed for a DIY project. Shade Kits supplies factory-direct awning kits for Australian homes, with aluminium frames and UV-resistant polycarbonate roofing. The kit approach gives you a defined awning project to plan around, with the roof material, frame and installation considered together.
There’s no single combination that suits every window. A bright room may call for a different balance of daylight and overhead cover from a window where limiting direct sun is the main goal. Your measurements and preferred appearance help narrow the options, while the kit’s specifications and instructions guide your planning.
A kit gives you a project to prepare for: compare its design with the area you measured, review the supplied instructions and organise the installation. Shade Kits’ kits are designed for straightforward self-installation. Plan for the access, preparation and assembly the project requires.
Use the kit’s product information to understand its specifications and what you’ll need to prepare. Don’t assume every kit includes the same components or suits every wall. Review the details for the option you’re considering, then compare them with your window, fixing surface and installation plan.
Bring four decisions together before choosing: the window dimensions, how much shade you want, how much daylight you’d like to retain, and whether you’re ready to manage a DIY installation. This keeps the choice grounded in your home rather than relying on appearance alone.
If you’re comparing roofing with frame material or planning a different kind of exterior cover, the existing aluminium awnings guide can provide broader context. Keep the distinctions clear: the frame supports the awning, while the roofing material influences its appearance and how light passes through it. For a window project, assess the complete kit and its specifications rather than assuming a material label determines the outcome.
Shade Kits offers Australia-wide delivery, with kits designed for homeowners to install themselves. Once you’ve matched your measurements and priorities to the product information, you can take the next step at your own pace. Explore DIY awning kits and plan an option that suits your window, preferred daylight and installation approach.
Before choosing, picture the finished space. How should the window look from outside, and how much natural light do you want to preserve inside? Your preferences, measurements and installation readiness can turn your research into a clear next step.
Polycarbonate window awnings are most useful when the design responds to the actual window and its surroundings. Match the kit to your project using its product details, and keep applicable local requirements in view as you plan. Shade Kits supplies factory-direct DIY shade kits for Australian homes, with aluminium frames, UV-resistant polycarbonate roofing and Australia-wide delivery.
You don’t need to settle every detail at once. Start with the window and your priorities, then explore an option that fits your plan. Browse DIY awning kits and take the next step towards a practical shade solution for your home.
Yes, polycarbonate can suit an external window awning if you want overhead cover and a choice of light transmission. The right option depends on the window’s position, how much shade you want, the roofing specifications and conditions around your home. When comparing polycarbonate window awnings, review the selected kit details against your project rather than assuming every panel performs the same way.
Clear roofing may retain more visible daylight than darker options, but that doesn’t mean it blocks all direct sun or controls heat. The awning’s projection and the sun’s angle affect how much sunlight reaches the glass, while surrounding buildings, trees and eaves can change the result. If the room needs both brightness and shade, consider its exposure at different times and check product-specific performance information.
There isn’t a universal yes or no. The outcome depends on the roofing specification and colour or tint, the window’s orientation, awning placement and surrounding conditions. A panel’s appearance alone can’t confirm how it affects heat. Compare performance information for the specific roofing option, then decide whether your main priority is daylight, shade or a balance of both for that room.
Measure the window opening, then record the usable wall space, the width you want covered and the intended projection. Note anything that could affect placement, such as an outward-opening sash, downpipe, light fitting or nearby doorway. Compare those measurements with the selected kit’s specifications and recheck them before ordering. During assembly, follow the supplied instructions rather than relying on measurements alone.
DIY installation may suit a prepared homeowner if the kit instructions, access and fixing surface are appropriate for the project. Plan how you’ll handle the components safely, and follow the product instructions throughout assembly. Not every window or wall will be suitable for a DIY approach. If you’re unsure about the structure, safe access or requirements that apply locally, seek appropriate professional guidance before proceeding.
Clear and tinted roofing differ in appearance and in how much visible light they transmit. A clear finish may help maintain a brighter feel, while tint changes the quality of light beneath the awning. The result depends on the specific product and site conditions, including exposure and placement. Choose based on the room’s daylight needs and your preferred shade, not on an assumption that tint guarantees heat reduction.
Follow the care instructions supplied for your awning and check it periodically for visible dirt, accumulated debris or components that appear loose. Use only cleaning methods approved for the specific roofing material, as unsuitable products or techniques could damage the surface. If you notice a problem, consult the product guidance before attempting a repair. Don’t assume cleaning methods suitable for other roofing materials are appropriate here.