
Could your carport withstand a sudden East Coast Low, or is it just one stray gust away from becoming your neighbour’s backyard ornament? It’s a question that keeps many Australian homeowners awake during storm season, especially when they’re tackling the installation themselves. Learning how to anchor a carport to concrete is the most critical stage of your build, as it’s the only thing standing between a secure aluminium structure and a costly structural failure. We understand the hesitation you might feel before drilling into a slab. You’re likely worried about hitting reinforcement bars, choosing the wrong fastener, or causing the concrete to crack under pressure.
The good news is that securing your structure doesn’t have to be a guessing game. This guide simplifies the technical side of the process, giving you the confidence to achieve a rock-solid foundation that meets local wind rating requirements. We’ll compare the performance of screw anchors against traditional expansion bolts and explain why your slab’s thickness is the most important factor in your planning. By the end of this article, you’ll have a clear, methodical plan to ensure your carport remains a permanent, professional-looking fixture on your property for years to come.
Before you begin the process of how to anchor a carport to concrete, you must understand that standard household tools won’t cut it. Cured concrete is a high-density material designed to withstand immense pressure, and drilling into it requires specific mechanical force. A rotary hammer drill is non-negotiable for this task. While a standard hammer drill relies on small internal discs to create vibration, a rotary hammer uses a piston to deliver a concentrated impact. This allows you to bore into the slab without overheating your bits or burning out your motor. It’s the difference between a smooth, five-minute task and an afternoon of frustration.
Pairing your drill with the right bit is equally vital. High-quality masonry bits, specifically those with an SDS-plus shank, ensure the drill’s energy is transferred directly to the concrete rather than slipping in the chuck. These bits are carbide-tipped to maintain their edge against the aggregate. Once you’ve drilled your holes, cleaning the workspace is paramount. Dust acts as a lubricant that can prevent mechanical anchors from gripping or chemical adhesives from bonding. Using an industrial vacuum or a blow pump to clear every speck of debris ensures the various types of concrete anchor bolts can achieve their full structural capacity.
A successful installation relies on precision. You’ll need a torque wrench to ensure every bolt is tightened to the manufacturer’s exact specifications; over-tightening can crack the concrete just as easily as under-tightening can lead to structural lift. Your kit should also include a depth gauge to prevent drilling through the entire slab. Don’t forget your safety essentials. Silica dust is a serious health hazard, so a P2-rated dust mask is a must, alongside high-impact eye protection and hearing protection to handle the high decibel levels of masonry work. For marking, use a chalk line and high-visibility pencils to ensure your base plates are perfectly aligned before the first hole is bored.
Your aluminium carport is only as strong as the ground it sits on. Most residential carports in Australia require a concrete slab with a minimum thickness of 100mm to 150mm. Before drilling, inspect the area for ‘honeycombing’, which are small voids in the concrete that look like a beehive. These air pockets significantly reduce the anchor’s holding power. Finally, maintain a safe edge distance. Drilling too close to the perimeter of the slab often causes the concrete to blow out under the pressure of an expansion anchor, compromising the entire foundation. If your slab is older or shows significant cracking, it’s worth consulting a professional before you proceed with anchoring.
Selecting the right hardware is just as vital as the frame itself. When you’re determining how to anchor a carport to concrete, the decision usually comes down to three main technologies: mechanical expansion, screw-in, or chemical bonding. Your choice will depend on your slab’s condition, its age, and whether you’re building in a high-wind region. Each anchor type transfers loads differently, and matching the fastener to your specific site conditions is the best way to ensure long-term structural integrity.
Traditional wedge anchors, often known by the brand name ‘Dynabolts’, have been the Australian standard for decades. They work by pulling a wedge into a sleeve as the nut is tightened, creating intense friction against the sides of the hole. While they are cost-effective and widely available, they place significant expansion stress on the concrete. This means you must be careful not to install them too close to the edge of your slab, as the internal pressure can cause the concrete to burst or spall. They are best suited for thick, modern slabs where edge distance isn’t a primary concern.
Modern concrete screw anchors, such as AnkaScrews, are quickly becoming the preferred choice for DIYers. These fasteners feature a hardened, self-tapping thread that cuts directly into the masonry. Because they don’t rely on expansion to hold, they exert much less stress on the slab. This allows for closer spacing and installation nearer to the edges without risking a blowout. They are also fully removable, which is a major advantage if you ever need to reposition a post during the build. Their straightforward ‘drill and drive’ installation makes them incredibly efficient for securing a DIY aluminium carport.
For older slabs that may be prone to cracking, or for locations facing extreme wind loads, chemical injection systems offer the highest level of security. This method involves filling the hole with a high-strength epoxy resin before inserting a threaded stud. It creates a zero-stress bond that essentially fuses the anchor to the slab. When using this method in the Australian summer, be mindful of curing times. High temperatures can cause the resin to set much faster than the manufacturer’s standard rating. Regardless of the anchor type, drilling into concrete releases silica dust; always adhere to the Safe Work Australia silica safety guidelines by using a vacuum-shrouded drill or a P2-rated respirator. Finally, ensure you choose the right material. Galvanised steel is standard, but if you’re located near the coast, 316-grade stainless steel is the only way to prevent salt-air corrosion.
Execution is everything. Once you’ve selected your hardware and prepared your tools, the actual process of how to anchor a carport to concrete requires a methodical approach. Precision at this stage ensures that your aluminium carport frame remains square and plumb, which is essential for the roof panels to fit correctly. A slight error in your initial post placement can compound as the structure grows, leading to a finish that looks amateur and lacks structural integrity. Take your time with the layout before you commit to the first drill hole.
Start by squaring the carport frame on your slab. The most reliable way to do this is the 3-4-5 triangle method. Measure 3 metres along one side and 4 metres along the perpendicular side; the diagonal between those two points must measure exactly 5 metres. If it doesn’t, your corners aren’t square. Once the frame is positioned, use the holes in the aluminium base plates as a template. Mark the centre of each hole with a high-visibility pencil or a centre punch. Double-check your diagonal measurements across the entire carport footprint before you move the base plates aside to begin drilling.
Set the depth stop on your rotary hammer drill to the required embedment depth. A professional tip is to drill approximately 10mm deeper than the length of the anchor. This extra space provides a ‘sump’ for any residual dust that isn’t removed, ensuring the bolt doesn’t bottom out prematurely. As you drill, maintain a strict 90-degree angle to the slab. If you hit reinforcement mesh, don’t force the drill. You may need to switch to a rebar-cutter bit to bypass the steel. After drilling, use the ‘Clean-Blow-Clean’ method. Vacuum the hole, use a blow pump to clear deep debris, and vacuum again. This sequence is vital for maximum friction, especially in areas identified by a Geoscience Australia wind hazard assessment as prone to high-velocity gusts.
Drive your anchors into the holes through the base plate. If you’re using screw anchors, start them by hand to ensure the threads catch correctly before using an impact wrench. For wedge anchors, a few firm taps with a hammer will set them in place. Always use a torque wrench for the final tightening. Guessing the tension is a recipe for disaster; under-tightening leads to movement, while over-tightening can cause the concrete to crack or the bolt to snap. Finally, use a spirit level to check each post. If the slab isn’t perfectly flat, use galvanised steel shims under the base plate to achieve a perfectly plumb result before the final torque is applied.
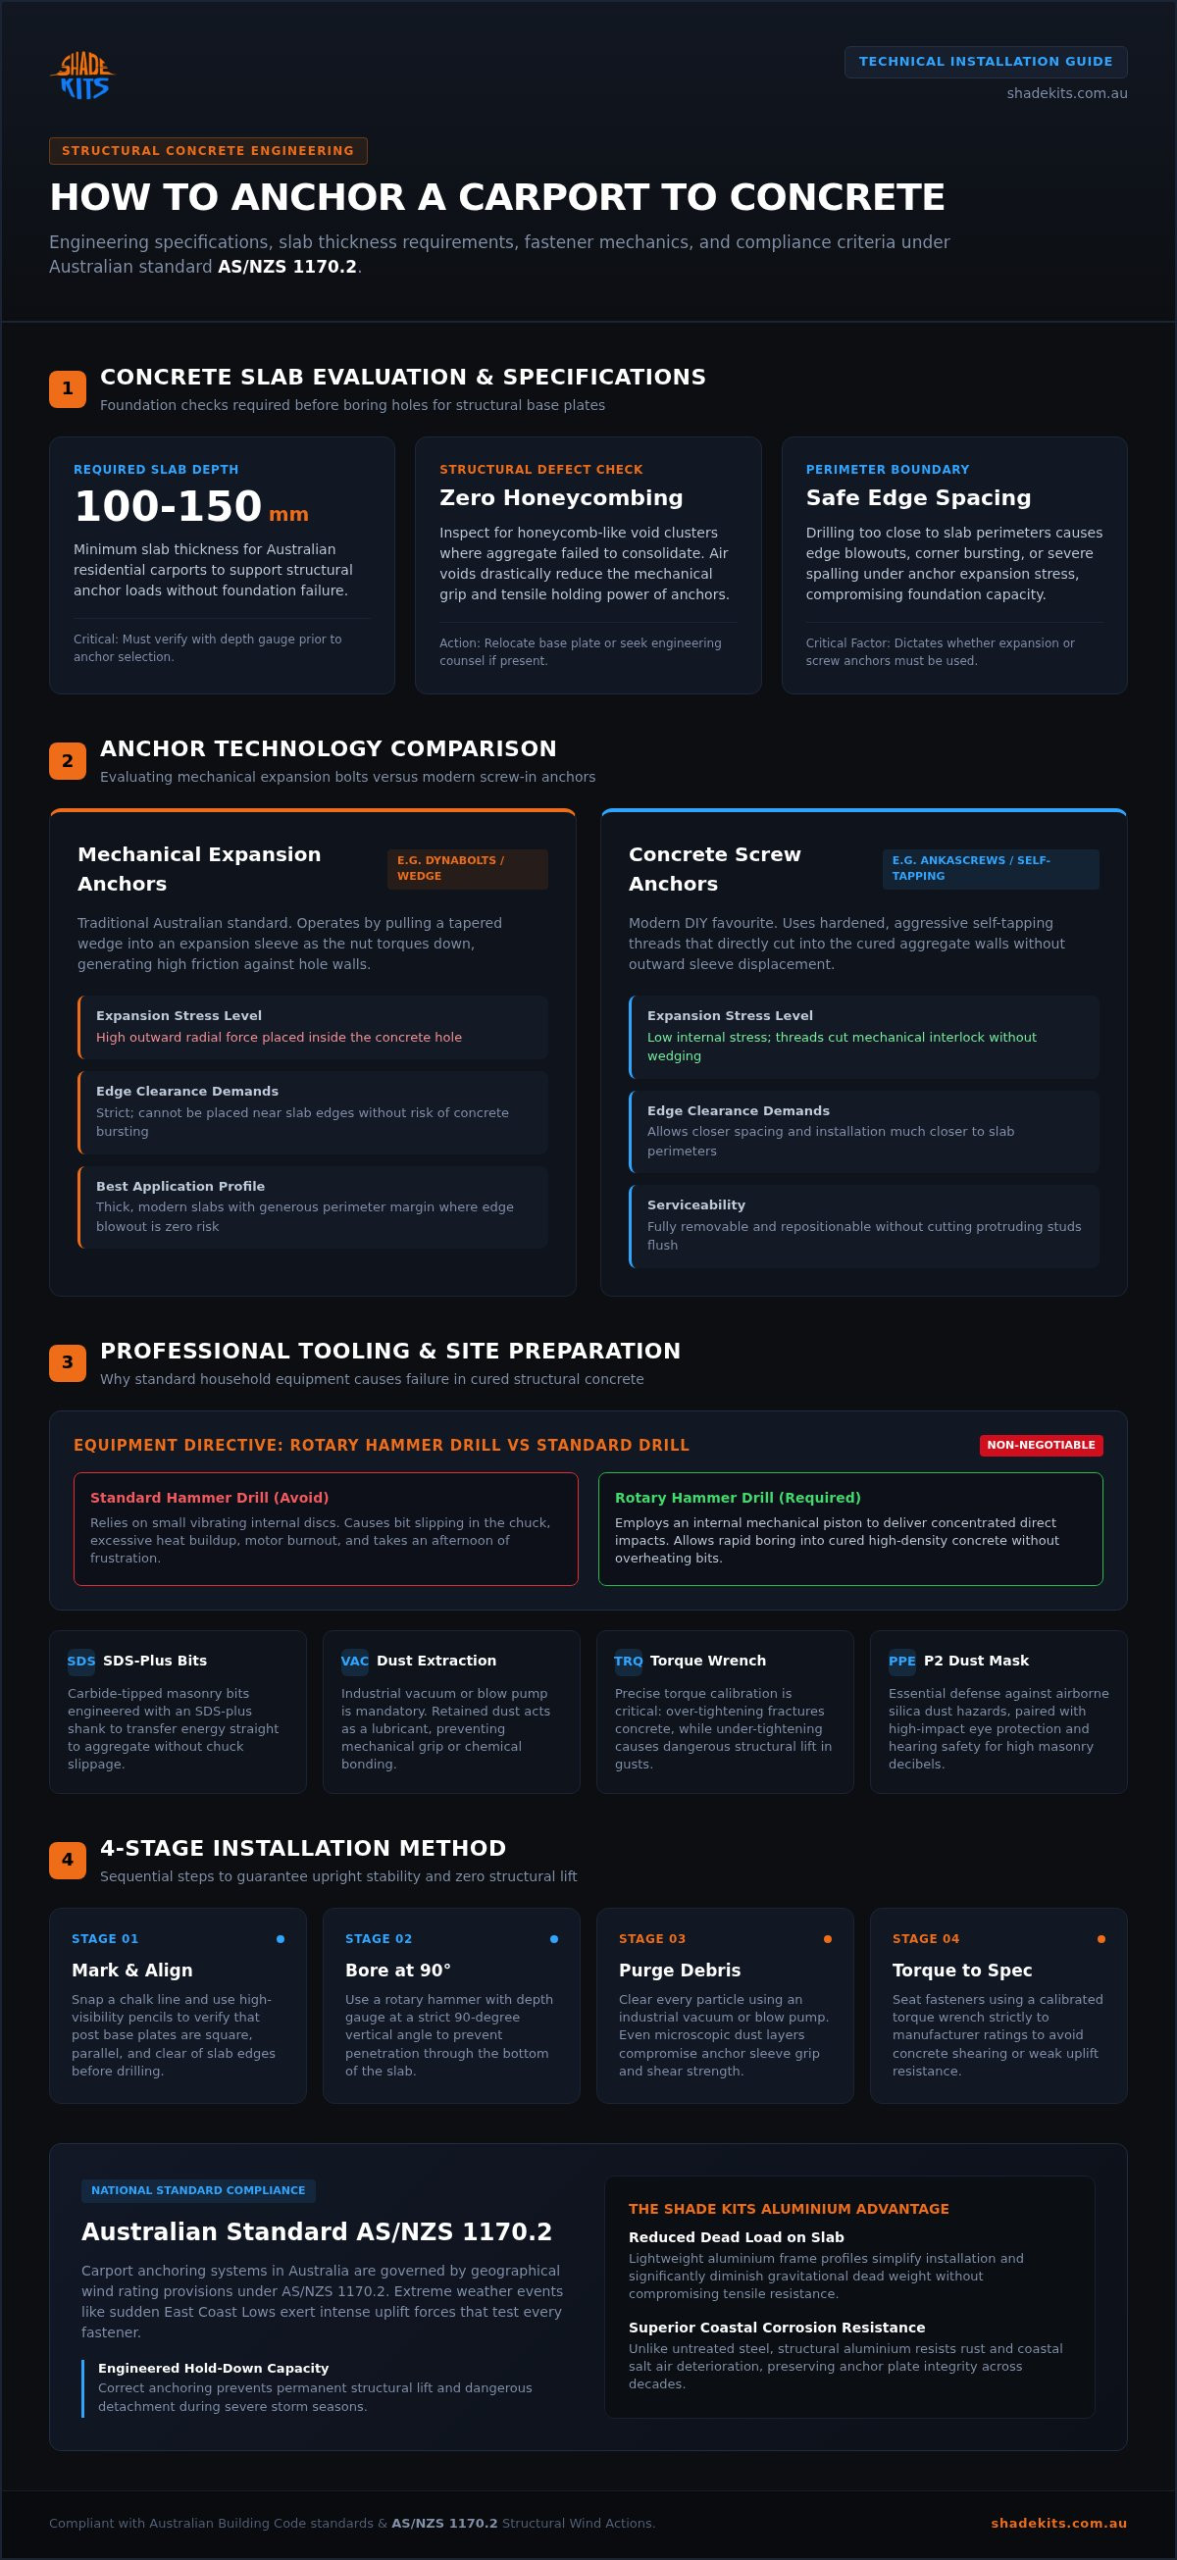
Understanding the legalities of structural engineering is the first step toward a safe build. In Australia, the AS/NZS 1170.2 standard dictates how structures must behave under wind loads. Many homeowners mistakenly believe that the weight of their vehicle or the carport itself provides enough stability. In reality, a carport acts like an aerofoil during a storm. Wind rushing under the roof creates significant uplift forces that can literally rip a poorly secured structure out of the ground. This is the primary reason why knowing how to anchor a carport to concrete according to engineered specifications is vital for your home’s safety and insurance compliance.
Australia’s vast landscape is categorised into four distinct Wind Regions, ranging from the relatively calm Region A to the severe cyclonic conditions of Region D. Your specific anchoring requirements will change based on whether you live in a sheltered suburban street or on an exposed coastal ridge. Terrain categories also play a role; open fields offer no wind break, increasing the pressure on your fasteners. Because Shade Kits designs are engineered for these diverse Australian conditions, you can be sure that the provided specifications match the physical demands of your local environment. This engineering ensures the base plates and anchor points are rated for the specific stresses of your zone.
A high-quality anchor is useless if the concrete around it fails. For a residential carport, your slab should ideally be made of 20 to 25 MPa concrete with a thickness of at least 100mm to 150mm. If your slab is too thin or shows signs of deep structural cracking, it won’t provide the necessary pull-out resistance. In these cases, the best solution is to excavate and pour dedicated concrete footings at each post location rather than relying on the existing surface. Before you start drilling, review the Essential Australian Carport Checklist to verify your foundation meets the necessary criteria for a secure installation.
Always check with your local council before commencing work. Most jurisdictions require a building permit for permanent structures, and they will want to see engineered plans that prove your anchoring method can withstand local wind events. Choosing a pre-engineered solution takes the guesswork out of this process. Explore our range of engineered carport kits to find a structure that meets both your aesthetic needs and Australian safety standards.
Choosing the right material for your build is just as important as knowing how to anchor a carport to concrete. While traditional steel structures have their place, aluminium offers a distinct advantage for residential DIY projects. The primary benefit lies in the reduced dead load. Because aluminium is significantly lighter than steel, your anchors don’t have to work as hard to support the weight of the frame itself. This allows the structural capacity of your fasteners to be almost entirely dedicated to resisting the uplift forces mentioned in the previous section. It’s a pragmatic choice that increases the overall safety margin of your installation.
Corrosion resistance is another critical factor, particularly in coastal Australian environments. Concrete is a porous material that naturally retains moisture, which can lead to accelerated rusting at the base of steel posts. Aluminium naturally resists this moisture-induced degradation. Our Shade Kits carports are designed with integrated base plates that simplify the alignment process, ensuring that your anchoring points are exactly where they need to be for maximum stability. For those who aren’t ready to commit to a permanent installation, such as renters or those with temporary shade needs, the CarCave offers a high-quality alternative that doesn’t require drilling into a concrete slab.
The lighter weight of aluminium makes the entire positioning and anchoring process a manageable task for one or two people. You won’t need heavy lifting equipment to hold a post in place while you mark your drill holes. This ease of assembly translates into significant time savings and a lower risk of injury. Beyond the immediate installation benefits, there’s a clear long-term value proposition. Investing in a durable, rust-free structure provides a better return on investment over the lifespan of the product. You can explore the details in our guide on the ROI of a DIY Carport Kit.
Once your carport is standing and the anchors are torqued, your job isn’t quite finished. We recommend a final inspection after the first week of use, or after the first significant wind event, to ensure no settlement has occurred. Use your torque wrench to double-check that the bolts haven’t loosened. Maintenance is straightforward; a simple wash-down of the aluminium frame and polycarbonate roofing every six months will keep the structure looking professional. If you’re ready to start your build, you can begin by ordering your customised carport kit today. Our team is here to ensure you have the right engineering and hardware to make your project a success.
Securing your new structure shouldn’t be a source of stress. By mastering the specifics of how to anchor a carport to concrete, you’ve taken the most important step in protecting your property against the unpredictable Australian elements. Whether you choose the ease of modern screw anchors or the high-strength bond of a chemical system, your focus on precision and slab integrity ensures a professional result that meets strict structural standards.
A successful build combines the right technique with high-quality materials. Our factory-direct aluminium frames are specifically engineered for Australian wind loads, offering a lightweight yet incredibly durable solution that simplifies the anchoring process. You don’t need a team of contractors to achieve a rock-solid finish; with the right tools and a methodical approach, you can complete the job independently.
Ready to upgrade your home’s protection? Browse our range of engineered DIY Carport Kits today and experience the benefits of a structure designed for longevity and ease of installation. Your vehicle deserves a shelter that’s as reliable as it is resilient.
Chemical anchoring is usually the best choice for aged or weakened slabs. It doesn’t rely on expansion pressure, which can cause old concrete to crack or blow out. Instead, a high-strength resin fuses the threaded stud directly to the masonry. This method provides a zero-stress bond that is ideal for maintaining structural integrity when you’re figuring out how to anchor a carport to concrete on a surface that isn’t brand new.
You should typically drill to a depth of 100mm to 120mm, depending on your specific bolt length and slab thickness. A professional tip is to drill about 10mm deeper than the required embedment depth. This extra space acts as a sump for any residual dust that wasn’t cleared, ensuring the anchor doesn’t bottom out before it’s fully seated. Always check your kit’s engineering specifications for the exact measurements required for your local wind region.
No, you shouldn’t anchor a structural carport directly to pavers. Pavers are not a monolithic surface and will lift or shift under the significant uplift forces generated by wind. If you have a paved area, you must remove specific pavers and pour concrete footings that reach at least 600mm deep, or as specified in your engineering plans. For those who can’t pour concrete, a non-permanent solution like the CarCave is a much safer alternative for vehicle protection.
Yes, most Australian councils require a building permit for any permanent structure, even if it’s being fixed to an existing driveway. Regulations vary between local government areas, but you’ll generally need to submit engineered plans that prove the structure can withstand local wind speeds. It’s always best to contact your local planning department before you start drilling to ensure your project remains compliant and doesn’t face any costly retrospective fines or safety issues.
Stop drilling immediately if you feel the bit jump or notice steel shavings in the dust. You have two main options: you can either move the base plate slightly if the engineering allows, or use a specialised rebar-cutter bit to bore through the steel. Never force a standard masonry bit through reinforcement mesh, as this will destroy the bit and potentially cause the concrete to spall. Precision is key to maintaining a plumb and secure post.
A standard single carport typically requires two to four anchors per post, depending on the post size and the wind rating of your area. For a four-post aluminium carport, this usually means a total of eight to sixteen anchors across the entire structure. Your DIY kit will include specific base plates with pre-drilled holes. It’s essential to fill every hole provided in the plate to ensure the structure meets its engineered uplift capacity during a storm.
Chemical anchoring is worth the investment if you’re building in a high-wind zone or working with a slab of unknown quality. While the resin and applicator gun add to the initial cost, the resulting bond is often stronger than the concrete itself. It provides peace of mind that your carport won’t shift during a sudden East Coast Low. For standard suburban builds on new slabs, modern screw anchors are often a more cost-effective and simpler alternative for most DIYers.
A standard cordless drill or a basic hammer drill isn’t suitable for this task. You’ll need a rotary hammer drill, which uses a piston mechanism to deliver the high-impact force required to bore into structural concrete. Using the wrong tool will lead to burnt-out motors and blunt bits. If you don’t own a rotary hammer drill, they are easily available for hire at most hardware centres and will save you hours of physical labour during your installation.