
Could your next home improvement project accidentally lead to a costly council fine? Many Australian homeowners feel a sense of dread when considering carports, worried that they will struggle with complex building codes or pick a material that won’t stand up to a summer hailstorm. It’s common to feel overwhelmed by the choice between heavy steel and modern aluminium, or to worry that a DIY kit might be too difficult to assemble without professional help.
We are here to simplify the entire process and give you the confidence to take control of your property. This essential checklist offers a clear roadmap to help you select the right kit, understand council exemptions, and achieve a professional finish on your own. You will learn the specific benefits of factory-direct aluminium, how to ensure maximum UV protection, and the step by step secrets to a successful weekend installation. By the end of this guide, you will have everything you need to protect your vehicle with a structure that is built to last.
A professional DIY result depends on what you do before the first bolt is tightened. Many homeowners focus on the aesthetics of carports, but the technical logistics of your site determine the long-term success of the build. You need to look beyond the footprint of the structure and consider how it interacts with your vehicle and the land itself.
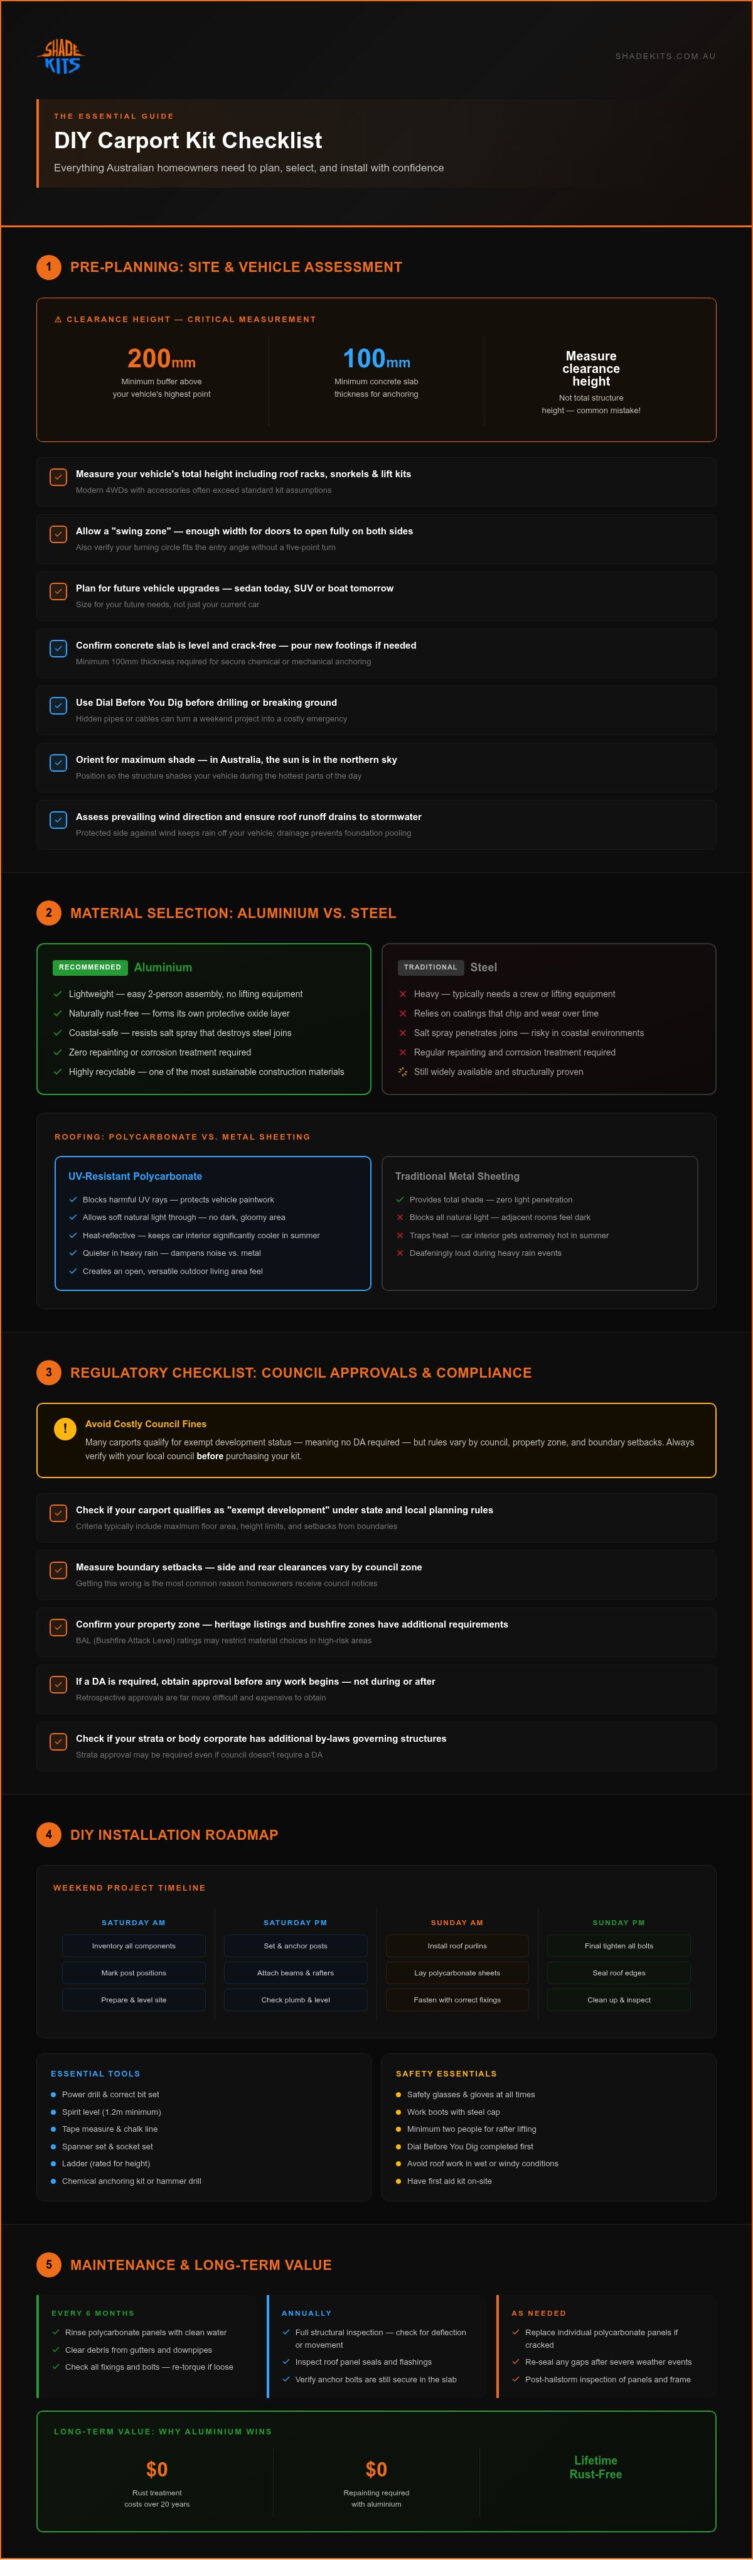
Start by measuring your internal clearance height rather than the total height of the structure. It’s a common mistake to assume a standard kit will fit every vehicle. If you own a modern 4WD with a lift kit, roof racks, or a snorkel, you need to ensure the lowest point of the frame provides enough room. Aim for at least 200mm of buffer space above your highest point to account for any bounce when driving over the driveway threshold.
Your ground surface is the foundation of your project. Check if your existing concrete slab is level and at least 100mm thick. This thickness is usually required for secure chemical or mechanical anchoring. If the slab is cracked or uneven, you may need to pour new footings. Before you break ground or drill, always use the Dial Before You Dig service. Hitting a hidden water pipe or electrical cable can turn a weekend project into an expensive emergency.
Think about your future needs as much as your current car. You might drive a sedan today, but will you upgrade to a larger SUV or a boat in two years? Ensure the width allows for a comfortable “swing zone.” You need enough space to open car doors fully on both sides without hitting the support posts. Additionally, check your turning circle. If the entry angle is too tight, you’ll find yourself performing a five-point turn every time you come home, which quickly becomes a daily frustration.
The sun’s path is a critical factor for maximum shade. In Australia, the sun sits lower in the northern sky during winter. If you place your structure too far south of your parking spot, your car might still sit in direct sunlight during the hottest parts of the day. Evaluate the prevailing wind direction as well. Placing the protected side of the structure against the wind can prevent rain from blowing directly onto your vehicle. Finally, consider drainage. Ensure the roof runoff is directed into existing stormwater systems so you don’t end up with a muddy pool at your home’s foundation.
Selecting the skeleton of your structure is a decision that affects both the build weekend and the next twenty years of maintenance. While traditional steel has been a common choice in Australia, modern aluminium is rapidly becoming the preferred material for residential projects. It provides a level of durability that steel simply cannot match in certain environments, especially when you factor in the ease of a DIY installation.
Aluminium is remarkably lightweight, which makes it the gold standard for independent home improvements. This weight advantage is a game changer for DIY builds. Lifting a heavy steel rafter into place usually requires a small crew or specialised lifting equipment. Aluminium components are far easier to handle; a two person team can manage the assembly without the physical strain or risk of injury associated with heavier metals. Using a material that’s easier to move means you can focus on precision and alignment rather than just struggling with the weight of the parts.
The low maintenance nature of aluminium is another significant benefit. It’s naturally rust-free, whereas steel relies on coatings that can chip or wear away. If you live near the coast, salt spray will eventually find its way into steel joins and cause structural issues. Aluminium creates its own protective oxide layer, so you won’t need to spend your weekends repainting or treating corrosion. It’s also a more sustainable choice, as aluminium is one of the most recyclable materials used in construction today. Before committing to a kit, it’s worth reviewing a detailed breakdown of aluminium carport prices Australia homeowners can expect in 2026, so you can budget accurately and avoid being caught off guard by hidden costs.
Traditional metal sheets provide total shade, but they also block all natural light. This often makes the adjacent rooms of your house feel dark and uninviting. UV-resistant polycarbonate roofing offers a smarter alternative. It blocks the harmful rays that damage your vehicle’s paintwork while allowing soft, natural light to filter through. This creates a more open, airy feel under the canopy, turning your parking space into a versatile outdoor area.
Modern polycarbonate also features heat-reflective properties to keep your car’s interior significantly cooler during a mid-summer heatwave. Noise is another factor to consider. While heavy rain on a metal roof can be deafening, polycarbonate tends to dampen the sound, providing a much quieter environment. If you want to see how these materials look in a real world setting, browse our range of carports to find a style that suits your home’s architecture.
Choosing a colour and style that complements your existing home is the final step in the design process. Most modern kits come in a variety of powder-coated finishes that match popular Australian roofing colours. By aligning the frame colour with your gutters or window trims, you ensure the new addition looks like a planned extension of your property rather than an afterthought. Homeowners who want to extend this cohesive look further often pair their carport with aluminium awnings over nearby windows to reduce solar heat gain and protect interior furnishings from UV damage.
Understanding the legal requirements is often the most daunting part of adding a structure to your property. However, it doesn’t have to be a roadblock. Most local governments have clear rules designed to keep the neighbourhood safe and aesthetically consistent. By following a methodical approach to compliance, you can avoid the stress of potential fines or the headache of having to dismantle a non-compliant build later.
In many parts of Australia, small carports fall under the category of “exempt development.” This means if your structure is under a certain floor area, typically 20sqm or 25sqm depending on your state, and meets specific height and location limits, you won’t need to lodge a formal application. It is vital to verify these exact limits for your specific suburb before you order your kit.
You must also respect boundary setbacks. These are the minimum distances required between your structure and the fence line or the front of your property. Building over these “invisible lines” without a formal variation can lead to significant legal issues. Wind ratings are equally critical. Australia is divided into specific wind regions, from Region A for most of the interior to Region D for cyclonic areas. Your kit must be engineered to withstand the wind loads of your specific region. Additionally, legal stormwater management requires that runoff is directed into an approved drainage system, rather than simply spilling onto a neighbour’s land.
To start, search for your local council’s “Development Control Plan” (DCP) on their official website. This document outlines the specific “deemed to satisfy” rules for your area. You’ll also need to decide between a Development Application (DA), which involves a full council review, or a Complying Development Certificate (CDC), which is a faster approval process for projects that meet all standard requirements. Exempt development refers to minor building projects that do not require council approval or a building certificate, provided they meet very specific criteria regarding size, height, and location.
Never settle for a kit that lacks certified engineering. Quality manufacturers provide documentation proving the structure meets Australian Standards, specifically AS/NZS 1170 for structural design actions. This ensures the frame can handle the weight of the roof and the force of the wind during a storm. Fire safety is another factor; if your structure is positioned close to a boundary or a habitable room, certain fire-rated materials or specific setbacks may be mandatory to prevent the spread of flames between structures.
Taking delivery of your kit is the moment your project truly begins. While the engineering has been done for you, the quality of the final result depends on your approach to the assembly process. You don’t need a professional workshop to install modern aluminium carports, but having the right tools and a methodical mindset is essential for a smooth weekend build. Preparation is the bridge between a box of parts and a structural asset for your home.
Before you start, gather your essential tool kit. You will need a high-quality spirit level, a hammer drill for concrete anchoring, a socket set, a tape measure, and at least two sturdy ladders. A string line is also vital for ensuring your structure is perfectly square. Having these items ready prevents unnecessary trips to the hardware store mid-build, keeping your momentum high and your frustration low.
The first task is to unbox your kit and inventory every component. Check every nut, bolt, and bracket against the packing list provided. It is much better to identify a missing fastener now than when you are halfway through a roof assembly on a Sunday afternoon. Organise your workspace by laying out the aluminium frames on soft grass or the cardboard packaging. This simple step protects the powder-coated finish from scratches during the initial stages of assembly. The golden rule of DIY is to read the manual from start to finish before you pick up a single tool. Understanding the sequence of events helps you visualise the build and avoids common mistakes.
Start by setting out your perimeter using string lines and the 3-4-5 triangle method to ensure the posts are perfectly square. When you begin joining the frame, use the ‘loose-fit’ method. Don’t tighten all the bolts fully until the entire structure, including the roof panels, is in place. This allows for small adjustments and ensures everything aligns correctly without forcing components into place. Once the frame is square and level, you can secure the anchors into your concrete slab or footings.
Working at heights requires extreme care. Always have a second set of hands to steady the ladders and help lift the longer frame components into position. For information on local logistics, see our specific guides for carport kits in Sydney or carport kits in Melbourne for regional delivery info. Finally, pay close attention to the sealing process. Applying high-quality silicone to the guttering and flashing ensures your structure remains watertight for years to come. A little extra care now prevents annoying drips later.
Ready to start your project? Explore our range of factory-direct carport kits and find the perfect fit for your driveway.
Once your project is complete, the focus shifts to protecting that investment. While aluminium carports require far less attention than timber or steel alternatives, a small amount of routine care ensures the structure remains in peak condition for decades. This isn’t just about aesthetics; it’s about maintaining the structural integrity and the financial value your new addition provides to your property.
Cleaning your polycarbonate roof is a straightforward task, but it must be done correctly to avoid damage. Always use a soft cloth or a long-handled soft brush with a mild detergent and plenty of lukewarm water. You should avoid harsh chemicals, abrasive sponges, or pressure washers, as these can strip away the UV-resistant coating that protects your vehicle. Regular rinsing prevents the build-up of grime and bird droppings, which can become harder to remove if left in the Australian sun.
Don’t forget the gutters. Leaf build-up is a common issue that leads to overflows, which can cause water to pool around your home’s foundation or the carport’s support posts. Clearing the gutters at the change of every season is a simple habit that prevents long-term drainage problems. Finally, perform a quick check of your anchoring bolts once a year or after a significant high-wind event. Ensuring that the structure remains firmly bolted to the concrete slab or footings provides peace of mind during the next storm season.
If you live in a high-risk hail zone or a rental property where permanent structures aren’t allowed, you might consider a CarCave. This foldable solution provides excellent protection without the need for a permanent foundation, making it a versatile alternative for specific logistical needs or temporary vehicle housing.
A well-chosen structure does more than just provide shade; it actively preserves your wealth. By shielding your car’s paintwork and interior plastics from relentless UV damage, you significantly improve its eventual resale value. Beyond the vehicle itself, a modern aluminium structure adds “curb appeal” to your home. It looks like a deliberate, high-quality architectural addition rather than a temporary fix or a rusty old shed.
A professional DIY installation can offer a substantial return on investment by increasing the overall marketability of your property. For more design inspiration, read our Ultimate Guide to DIY Carport Kits in Australia (2026). When you are ready to protect your vehicle, explore our range of durable Carport Kits to find the right solution for your home.
Building a high-quality structure is entirely achievable when you follow a clear, methodical roadmap. By prioritising accurate site measurements, selecting rust-resistant aluminium frames, and staying ahead of local council requirements, you remove the guesswork from the process. You’ve learned that a successful project isn’t just about the build weekend; it’s about the decades of vehicle protection and added property value that follow.
Modern DIY kits have demystified home improvements, allowing you to achieve professional results without the high cost of on-site labour. With rust-resistant aluminium frames and UV-resistant polycarbonate roofing, our solutions are built specifically for the harsh Australian climate. Whether you are in a capital city or a regional town, we provide Australia-wide delivery to get your project started.
Secure your vehicle today with a factory-direct DIY Carport Kit. You now have the checklist and the confidence to transform your driveway with durable, stylish carports. It’s time to stop worrying about the weather and start building.
Approval requirements depend on your local council’s rules and the size of your project. Many small carports are classified as exempt development if they are under a certain floor area, typically 20 to 25 square metres. However, you must still comply with height limits and boundary setbacks. It is essential to check your local Development Control Plan online to confirm the specific criteria for your suburb.
Aluminium is widely considered the best material for DIY installations because it is lightweight and naturally rust-resistant. Unlike heavy steel, which requires significant physical strength or lifting equipment to manage, aluminium components are easy for two people to handle. This material is especially effective for homes in coastal areas where salt spray can quickly corrode traditional metal structures.
Standard kits are typically engineered to meet the requirements of Wind Region A or B, which covers the majority of Australian residential locations. These designs follow Australian Standards to ensure they can handle the wind loads expected in these areas. If you live in a particularly exposed spot or a region prone to higher gusts, you must verify that your kit has the appropriate engineering certification for your zone.
You will definitely need at least one mate to help you with the assembly. While aluminium frames are light, lifting long rafters and positioning roof panels safely requires a second set of hands. Having someone to steady the ladder and help square the frame ensures the installation is safe and the final structure is perfectly level.
Polycarbonate is often the superior choice for residential carports because it lets in natural light while blocking 99% of harmful UV rays. Metal roofing provides complete shade but can make the interior of your home feel dark if the structure is near windows. Polycarbonate also tends to be quieter during heavy rain and features heat-reflective properties to keep your car cooler.
You secure the structure by drilling directly into the concrete and using heavy-duty masonry bolts or chemical anchors. Your slab should be at least 100mm thick to provide a reliable foundation for the base plates. It’s important to clear all dust from the drilled holes before driving the anchors home to ensure a permanent, high-strength connection to the ground.
Residents in cyclonic areas must use kits specifically engineered for Wind Region C or D. These structures feature reinforced frames and specialised fasteners to withstand extreme weather events. If you cannot build a permanent cyclonic-rated structure, a foldable solution like the CarCave can provide an effective way to protect your vehicle during high-risk periods.
Yes, a well-constructed carport with high-impact polycarbonate or metal roofing provides excellent protection against most Australian hailstorms. These materials are designed to absorb impacts that would otherwise cause dents or shattered windscreens. For homeowners in severe hail zones who can’t install a permanent fixture, a portable hail protector offers a flexible and reliable alternative.