
Recent data shows that 83% of Aussie homeowners renovating their backyards in 2026 are now prioritising a dedicated lounge or seating area. It’s a great goal, but the thought of complex timber carpentry and expensive cutting mistakes often puts the brakes on a project. You probably want a stylish, weather-tight space but don’t want to spend weeks deciphering engineering rules or digging incorrect footings. This is where easy install pergola kits change the game for local DIYers. By choosing a pre-engineered aluminium system, you can bypass the stress of onsite metal cutting and traditional trade hurdles.
We understand that navigating council permits and harsh weather requirements can feel overwhelming. In this guide, we’ll show you how these kits simplify outdoor construction with zero guesswork. We will break down the latest 2026 permit exemptions across Australia, outlining typical footprint thresholds, and explain how to select materials that survive the intense summer heat. You’ll learn exactly how to achieve a professional, low-maintenance finish over a single weekend without needing a workshop full of tools or a team of contractors.
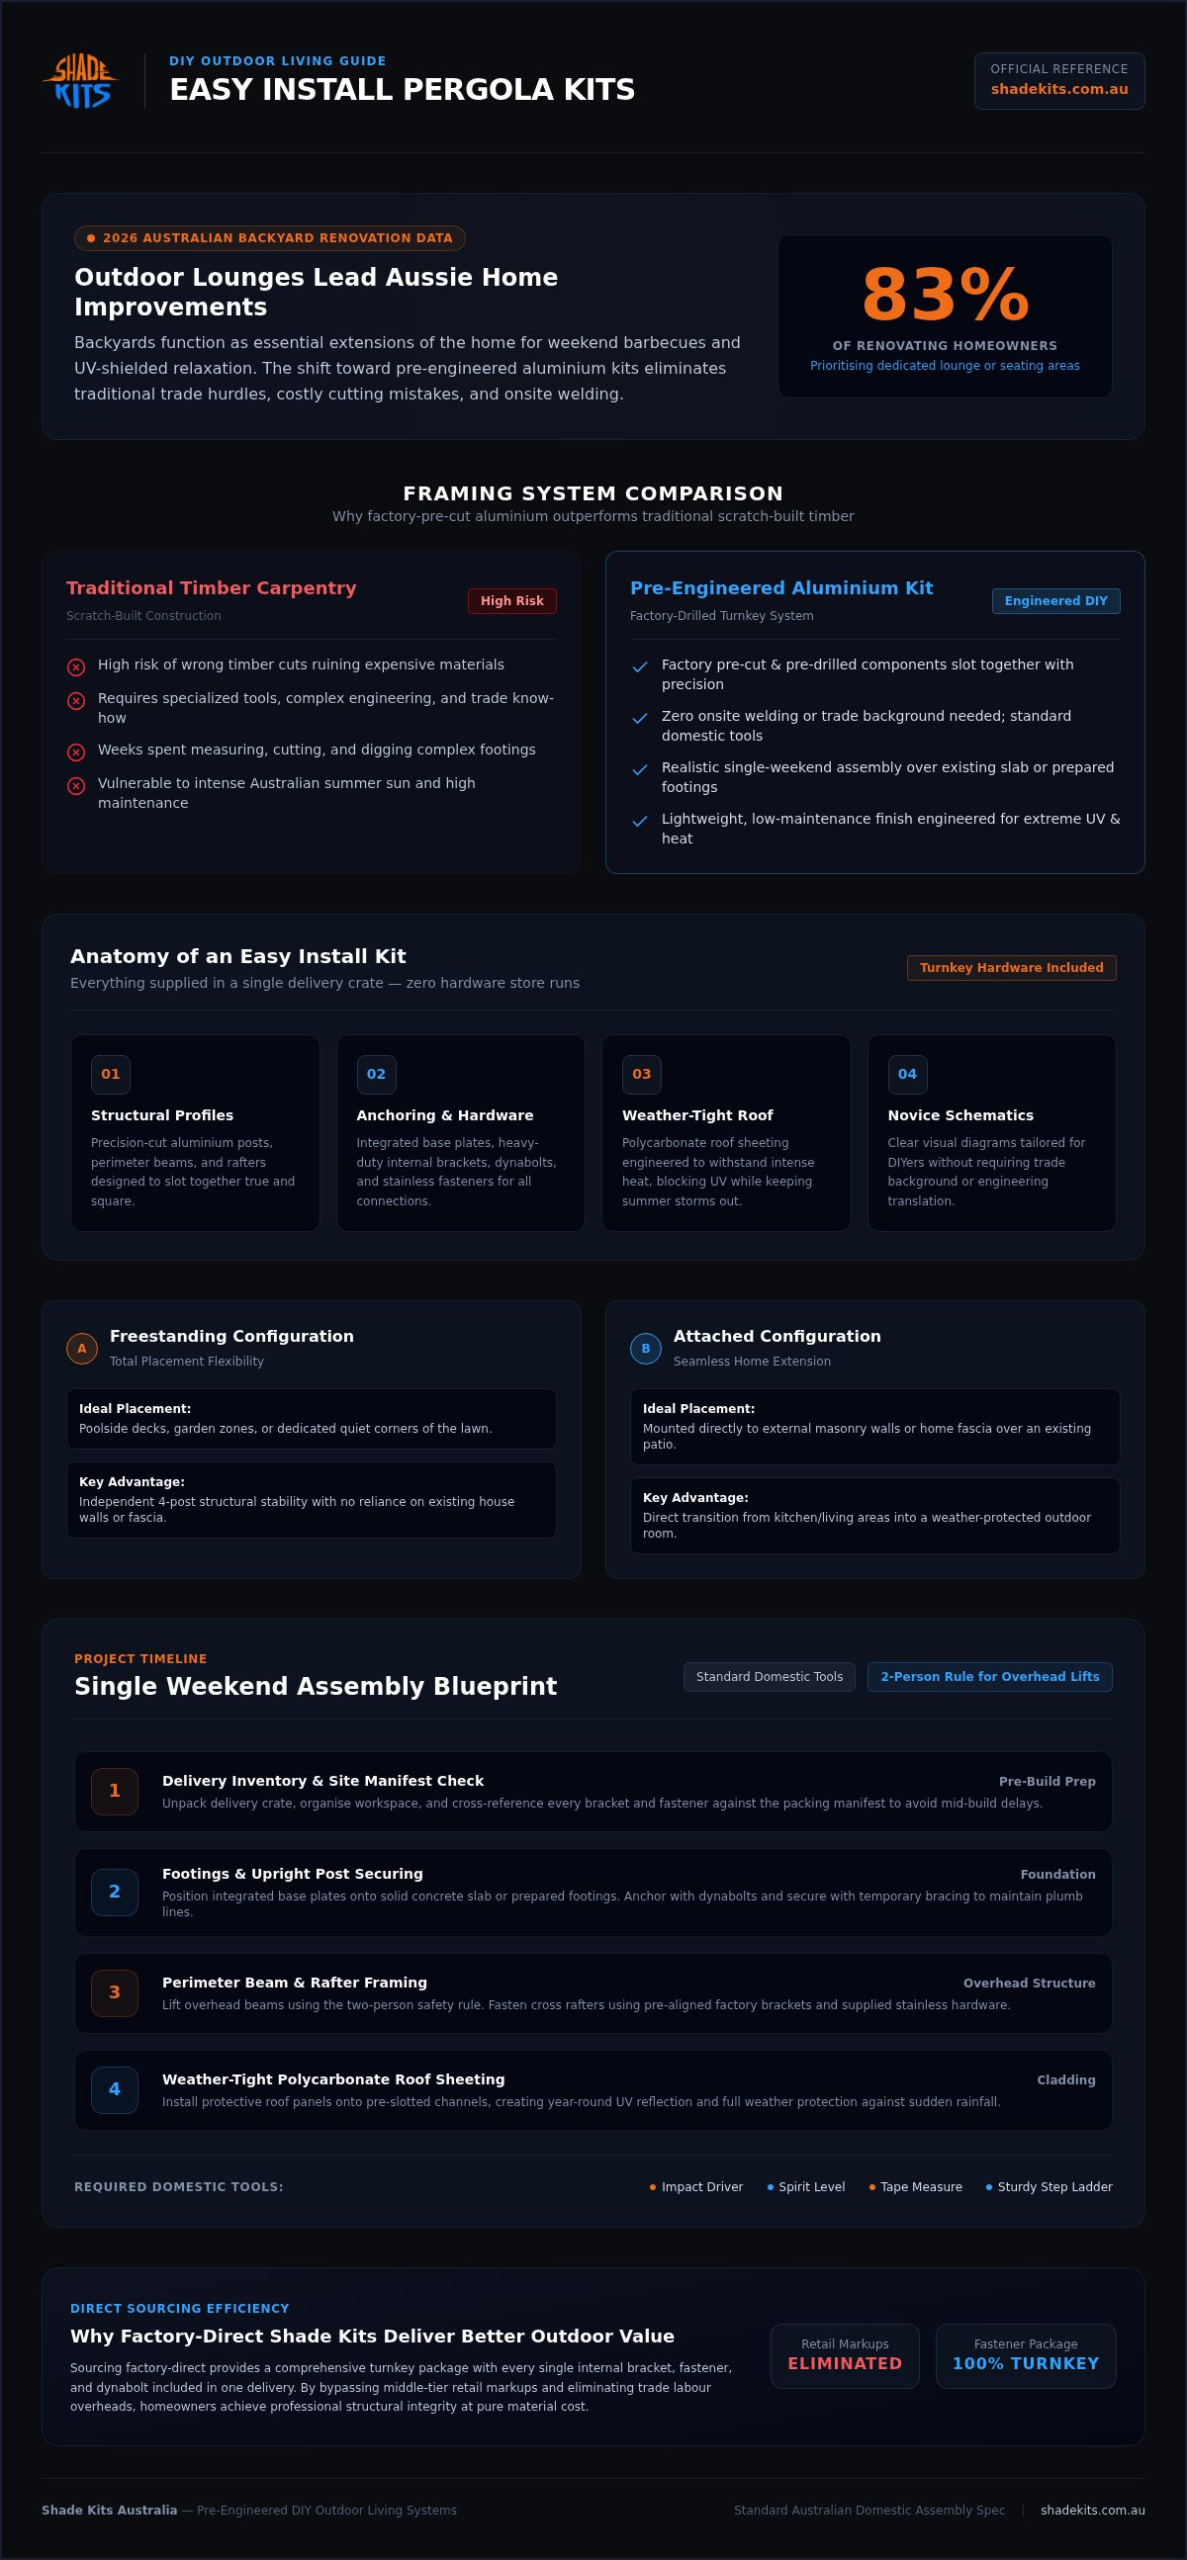
Building a structure from scratch often involves a steep learning curve, expensive tools, and a high risk of making a wrong cut that ruins a piece of timber. An easy install pergola kit solves these problems by providing a fully engineered, factory-pre-cut system. Instead of spending your weekend measuring twice and cutting once, you receive a package where every profile is already sized and pre-drilled. This precision eliminates the need for onsite welding or specialised carpentry, effectively removing the guesswork that usually plagues home improvement projects.
In Australia, our backyards are more than just patches of grass. They function as essential extensions of our homes, providing space for weekend barbecues and quiet afternoons. A well-placed outdoor garden feature like a pergola creates a defined entertaining zone that shields you from the intense UV rays. While some people prefer open-slat shade frames for simple aesthetics, many Aussie families opt for covered pergolas. These weather-tight structures use polycarbonate roofing to provide year-round protection, ensuring your outdoor plans don’t get washed out by a sudden summer storm.
The secret to a stress-free build lies in the components. These kits feature precision-cut aluminium posts, rafters, and perimeter beams designed to slot together effortlessly. You won’t find yourself hunting for odd screws at the local hardware store. Every kit includes a comprehensive hardware package with heavy-duty internal brackets and dynabolts for secure anchoring. The included schematics are tailored specifically for novice builders, using clear diagrams that guide you through the assembly without requiring a trade background. It’s a methodical process that prioritises structural integrity and ease of use.
Choosing the right layout depends on your existing space and how you plan to use it. Freestanding easy install pergola kits offer total positioning flexibility. They are perfect for creating a shaded retreat over a poolside deck or a quiet corner of the lawn. Conversely, attached kits anchor securely to your home’s external masonry or fascia. This configuration effectively extends your living room outdoors, providing a seamless transition from the kitchen to the patio. Evaluating your mounting options early ensures you select the most straightforward installation path for your specific backyard layout.
Building your own outdoor structure doesn’t need to be a months-long saga. With easy install pergola kits, you can realistically transform your backyard over a single weekend by following a logical five-phase workflow. The process is designed to be methodical, taking the mathematical frustration out of the build by using factory-drilled alignments that ensure your corners are perfectly square from the start. You won’t need a trailer full of professional trade gear either. Most projects only require standard domestic tools like an impact driver, a spirit level, a tape measure, and a sturdy step ladder.
Before you pick up a tool, remember that meticulous preparation is the key to preventing structural misalignment. While these kits are engineered for simplicity, rushing the initial layout can lead to headaches later. Always observe the two-person rule when it’s time to lift overhead components. Having an extra set of hands makes positioning rafters and perimeter beams much safer and significantly more accurate. It’s about working smarter, not harder, to achieve a professional result.
Start by unpacking your delivery crate and cross-referencing every component against the assembly manifest. It’s much easier to organise your workspace now than to go looking for a specific bracket mid-build. Once you’re ready, establish your plumb upright posts by securing the integrated base plates onto your solid slab or prepared footings. Use temporary bracing to keep these vertical posts stable while you begin assembling the perimeter framework. This ensures the skeleton of your structure remains true while you work.
With the perimeter secure, you’ll fasten the cross rafters using the supplied stainless hardware and pre-aligned brackets. This is where the precision engineering really shines, as the pieces should slot together without force. Next, slide your UV-resistant polycarbonate roofing panels into their dedicated weather-sealing channels. You can explore the benefits of aluminium pergola kits to see how these materials stand up to the elements long-term. If you’re looking for similar durability for your vehicles, check out our engineered carport solutions.
The final phase focuses on longevity and weatherproofing. Fasten the integrated storm water management channels and discreet downpipe components to ensure water moves away from your entertaining area effectively. Take the time to torque every structural bolt to the manufacturer’s specifications across every corner bracket. A final inspection of the roof sheet seals will guarantee complete protection before you start styling your new space with furniture and lighting. Once the last bolt is tightened, your low-maintenance retreat is ready for years of use.
Choosing the right structural material is the most critical decision you’ll make for your outdoor project. While traditional timber has been a staple in Aussie backyards for decades, modern easy install pergola kits have shifted the preference toward architectural aluminium. This isn’t just about aesthetics; it’s a pragmatic choice based on how different materials behave under the punishing Australian sun. Timber looks great initially but requires a lifetime of re-oiling, staining, or painting to prevent rot and termite damage. If you neglect a timber frame for just a couple of seasons, you’ll likely notice warping or splitting that compromises the entire structure.
Steel is another common alternative, often prized for its industrial strength. However, for a DIYer, steel presents significant logistical hurdles. It’s incredibly heavy, frequently necessitating mechanical lifting equipment or a large crew just to get the perimeter beams in place. Even galvanised steel can succumb to rust if the surface is scratched during a clumsy installation. Aluminium sits in the “Goldilocks” zone. It’s naturally corrosion-resistant, lightweight enough for two people to handle, and comes with factory-applied powder coatings that won’t peel or flake. This means your structure stays looking new without you ever having to pick up a paintbrush.
The success of a weekend build often comes down to physical fatigue. Aluminium frames dramatically reduce lifting strain, making overhead beam installation manageable for a two-person team. Unlike timber, which requires heavy sawing and messy chisel work on-site, aluminium components arrive pre-cut to the millimetre. You don’t have to worry about the structural integrity of your joints because the engineering is already done. A 2026 study into home renovations highlighted that 73% of homeowners now prioritise low-maintenance materials, a trend driven by the desire to spend weekends relaxing rather than maintaining garden structures.
Beyond the frame, the roofing material dictates how much you’ll actually enjoy the space. Advanced polycarbonate panels are designed to block scorching infrared heat while still allowing soft, ambient light to filter through. This creates a comfortable microclimate for your outdoor lounge. High-quality UV stabilisation is built into these panels to prevent your outdoor furniture and decking from sun bleaching. If you’re looking to extend this level of protection to your vehicles, you might also consider how similar technology is applied to modern carports. By choosing materials engineered for our climate, you ensure your entertaining zone remains a cool retreat even during a February heatwave.
Before you even place an order for your kit, you must verify your ground conditions and ensure the surface is level. A structure is only as reliable as the ground it sits on. In Australia, reactive clay soils can cause significant movement, so site preparation is non-negotiable. If you’re bolting down onto an existing structural concrete slab, ensure the concrete has adequate cured compressive strength and depth to handle the weight and wind uplift. For those starting from scratch, you’ll need to decide between pouring a new reinforced pad or using traditional in-ground footings. Engineering standards are vital here, especially on open properties where wind load ratings dictate how your structure is anchored.
Getting the foundation right prevents structural misalignment that can ruin an otherwise perfect build. While easy install pergola kits are designed for precision, they can’t compensate for a base that is out of level. Taking the time to survey your site properly ensures that when the delivery arrives, you’re ready to start assembly immediately. This proactive approach saves time and avoids the frustration of having to pause your project to fix site issues mid-weekend. It’s about building a foundation that matches the high engineering standards of the aluminium frame itself.
Mounting your pergola onto a reinforced concrete slab is often the fastest route for DIYers, provided the slab meets minimum engineering depth requirements. If your backyard currently only has grass or pavers, in-ground footings are necessary. This involves digging post holes to an engineered depth and backfilling them with concrete to create a permanent anchor point. To ensure your sub-base framing stays perfectly square, use the classic 3-4-5 triangulation method. This simple geometry trick ensures your posts align correctly before you begin the overhead assembly. Meticulous measurement at this stage guarantees that the pre-drilled holes in your kit will line up exactly as intended.
Permit requirements vary across different jurisdictions, but there are common national standards you should understand. Many residential structures fall under exempt development if the floor area remains under specific thresholds, often around 20 to 25 square metres, and the total height stays below 3 metres. However, structures with a waterproof roof are often classified differently than open-roofed frames and may require a building permit regardless of size. You must always consult your local council to verify boundary setback distances and floor area ratios, as these rules change depending on your specific property zoning.
Always check your local boundary setback distances, as many areas require structures to be at least 900mm from side and rear fences. If your project value exceeds certain financial thresholds, you might also need to look into owner-builder licensing requirements. Factory-engineered plans simplify this paperwork significantly, providing the technical data and wind ratings that certifiers look for. To get started with a compliant, high-quality structure that suits your local environment, you can browse our range of engineered DIY kits. Taking these steps early ensures your new outdoor space is both safe and legally compliant.
Traditional retail models often involve multiple layers of markups that inflate the final cost of home improvement projects. When you choose factory-direct easy install pergola kits, you’re effectively cutting out the middleman. This ensures that your investment goes directly into high-grade architectural aluminium and UV-resistant polycarbonate rather than showroom overheads or retail profit margins. It’s a pragmatic way to secure premium materials that are engineered to last, delivered straight from the fabrication floor to your driveway.
One of the most significant advantages of this model is the turnkey packaging. There is nothing more frustrating than starting a project only to find you’re missing a specific bracket or fastener. These kits are designed to arrive as a complete system, where every post, rafter, and roofing sheet is accounted for in a single delivery. This level of organisation eliminates the need for multiple trips to the hardware store, allowing you to focus entirely on the assembly process. You get a professional-grade outdoor transformation without the logistical headaches typically associated with custom builds.
The financial benefits of a DIY project extend far beyond the initial purchase. By dedicating one rewarding weekend to assembly, you bypass the substantial hourly labour rates typically charged by specialised tradespeople. Because these systems are pre-punched and pre-cut, the “work” is largely simplified into a sequence of logical steps. Beyond the build, the choice of aluminium offers ongoing savings. You won’t face the recurring costs of repainting, restaining, or termite protection that timber structures require. In the competitive 2026 property market, adding a high-quality alfresco entertaining area is a proven way to increase overall property appraisal value without committing to a high-maintenance asset.
Achieving a cohesive look for your home is easier when you can match your outdoor structures. Once you’ve mastered the installation of your pergola, you might consider extending that same durability to other areas of your property. You can pair your new entertaining space with matching vehicle protection or an awning kit to create a unified aesthetic. For those concerned about protecting their vehicles from unpredictable weather, it’s worth exploring the defensive benefits of the CarCave for hail protection. If you’re planning a larger project for a caravan or multiple cars, review our comprehensive DIY carport kits Australia guide to understand the engineering requirements for larger spans. Choosing a consistent system across your backyard ensures every structure meets the same high standard of weather resistance and ease of use.
Transforming your backyard into a functional outdoor room doesn’t have to mean dealing with complex timber carpentry or unpredictable trade schedules. Choosing precision-engineered aluminium framing allows you to bypass the traditional construction headaches and focus on creating a beautiful entertaining area. By understanding your local council guidelines and preparing your site correctly, you can confidently manage the assembly yourself. Selecting easy install pergola kits ensures that your project moves smoothly from delivery day to final inspection over a single weekend.
Every kit includes nationwide delivery and a complete package containing all structural hardware, ensuring you have everything required for a successful build. The combination of durable aluminium and UV-resistant polycarbonate roofing is specifically tailored for the harsh Australian climate, offering long-term resilience without the need for constant maintenance. If you’re ready to add value to your property and create a stylish shelter for your family, explore our factory-direct DIY pergola kits today. Taking control of your backyard renovation is a rewarding experience, and with the right pre-engineered system, you’ll be enjoying your new shaded retreat in no time.
Most easy install pergola kits can be fully assembled over a single weekend. Because the components arrive pre-cut and pre-drilled from the factory, you save hours that would otherwise be spent measuring and cutting raw materials. A team of two adults can typically complete the structural framing on Saturday and finish the roofing and drainage components on Sunday. Your actual timeline will depend slightly on your site preparation and the complexity of your chosen layout.
No, you do not need specialised carpentry tools to complete the installation. The engineering process eliminates the need for complex trade equipment like drop saws or welding gear. You will only need standard domestic tools that are likely already in your garage. These include an impact driver, a reliable spirit level, a tape measure, a step ladder, and a hammer drill if you are anchoring the structure into concrete.
Yes, you can install an aluminium pergola kit directly onto an existing concrete patio, provided the slab is structurally sound. Mounting onto a reinforced concrete surface is one of the most straightforward installation methods available. You will use the heavy-duty internal brackets and dynabolts included in the kit to anchor the base plates firmly. It’s essential to verify that your slab has cured completely and possesses adequate depth to handle the wind uplift requirements.
Whether you require council approval depends on your specific location, structure size, and roofing material. For example, unroofed structures under certain size limits are often exempt from building permits in several states. However, adding a waterproof polycarbonate roof can reclassify the structure as a verandah, which frequently triggers a permit requirement. You must always consult your local council to verify boundary setback distances and specific regional regulations before commencing your build.
Pre-engineered aluminium pergola kits perform exceptionally well in severe weather because they are designed to meet strict Australian engineering standards. The lightweight nature of architectural aluminium does not compromise its strength; when anchored correctly to concrete footings, the frame resists significant wind loads. Additionally, the UV-resistant polycarbonate roofing panels are flexible enough to withstand heavy rain and hail without cracking, ensuring your entertaining zone remains secure during sudden seasonal storms.
Aluminium pergolas require virtually no ongoing maintenance apart from an occasional wash with a garden hose. The factory-applied powder coating is highly resilient, meaning it will not peel, warp, or crack under the intense Australian sun. Unlike traditional timber structures, you will never have to spend your weekends sanding, re-oiling, or painting the frame. The material is also completely immune to termite damage and rot, saving you significant money over its lifetime.
While the assembly steps are straightforward, it is highly recommended that at least two people work together. You can easily manage the inventory check, tool preparation, and bracket attachments by yourself. However, lifting the overhead perimeter beams and positioning the cross rafters requires a second person for safety and alignment accuracy. Observing this two-person rule ensures that components are held level while fasteners are torqued to manufacturer specifications.