
What if the best pergola for your home isn’t the biggest one you can fit, but the one that makes everyday outdoor living easier? Choosing residential pergola kits starts with how your household will use the space, whether that’s for family meals, a quiet shaded spot or room to entertain.
Dimensions, layout and roofing choices can feel difficult to pin down. A kit needs to suit the usable space, your home and your DIY plans, as well as the conditions at your property. Starting with how you’ll use the area makes those decisions more straightforward.
This guide explains how to plan a practical pergola, compare configurations and roofing, and prepare your site before ordering. It also covers approval checks with your local council, as requirements can vary across Australia. Shade Kits’ factory-direct DIY pergola kits have aluminium frames and UV-resistant polycarbonate roofing, with customisable options for Australian homes. Work through the key checks below to develop a clear plan before choosing a kit.
A well-planned outdoor area can make the connection between home and garden more useful, not just more polished. Residential pergola kits provide a coordinated structure for creating a defined outdoor space, with the layout shaped around your household and the area available. A pergola can give an outdoor setting a clearer purpose, whether it sits beside the house or stands separately in the garden.
A residential pergola kit is a set of coordinated components designed to form an outdoor structure, not a complete renovation of your home or garden. It provides a planned starting point for a DIY project, while site preparation and decisions about how the area will function remain part of your plan. For a general introduction to pergola forms and uses, see What is a Pergola?
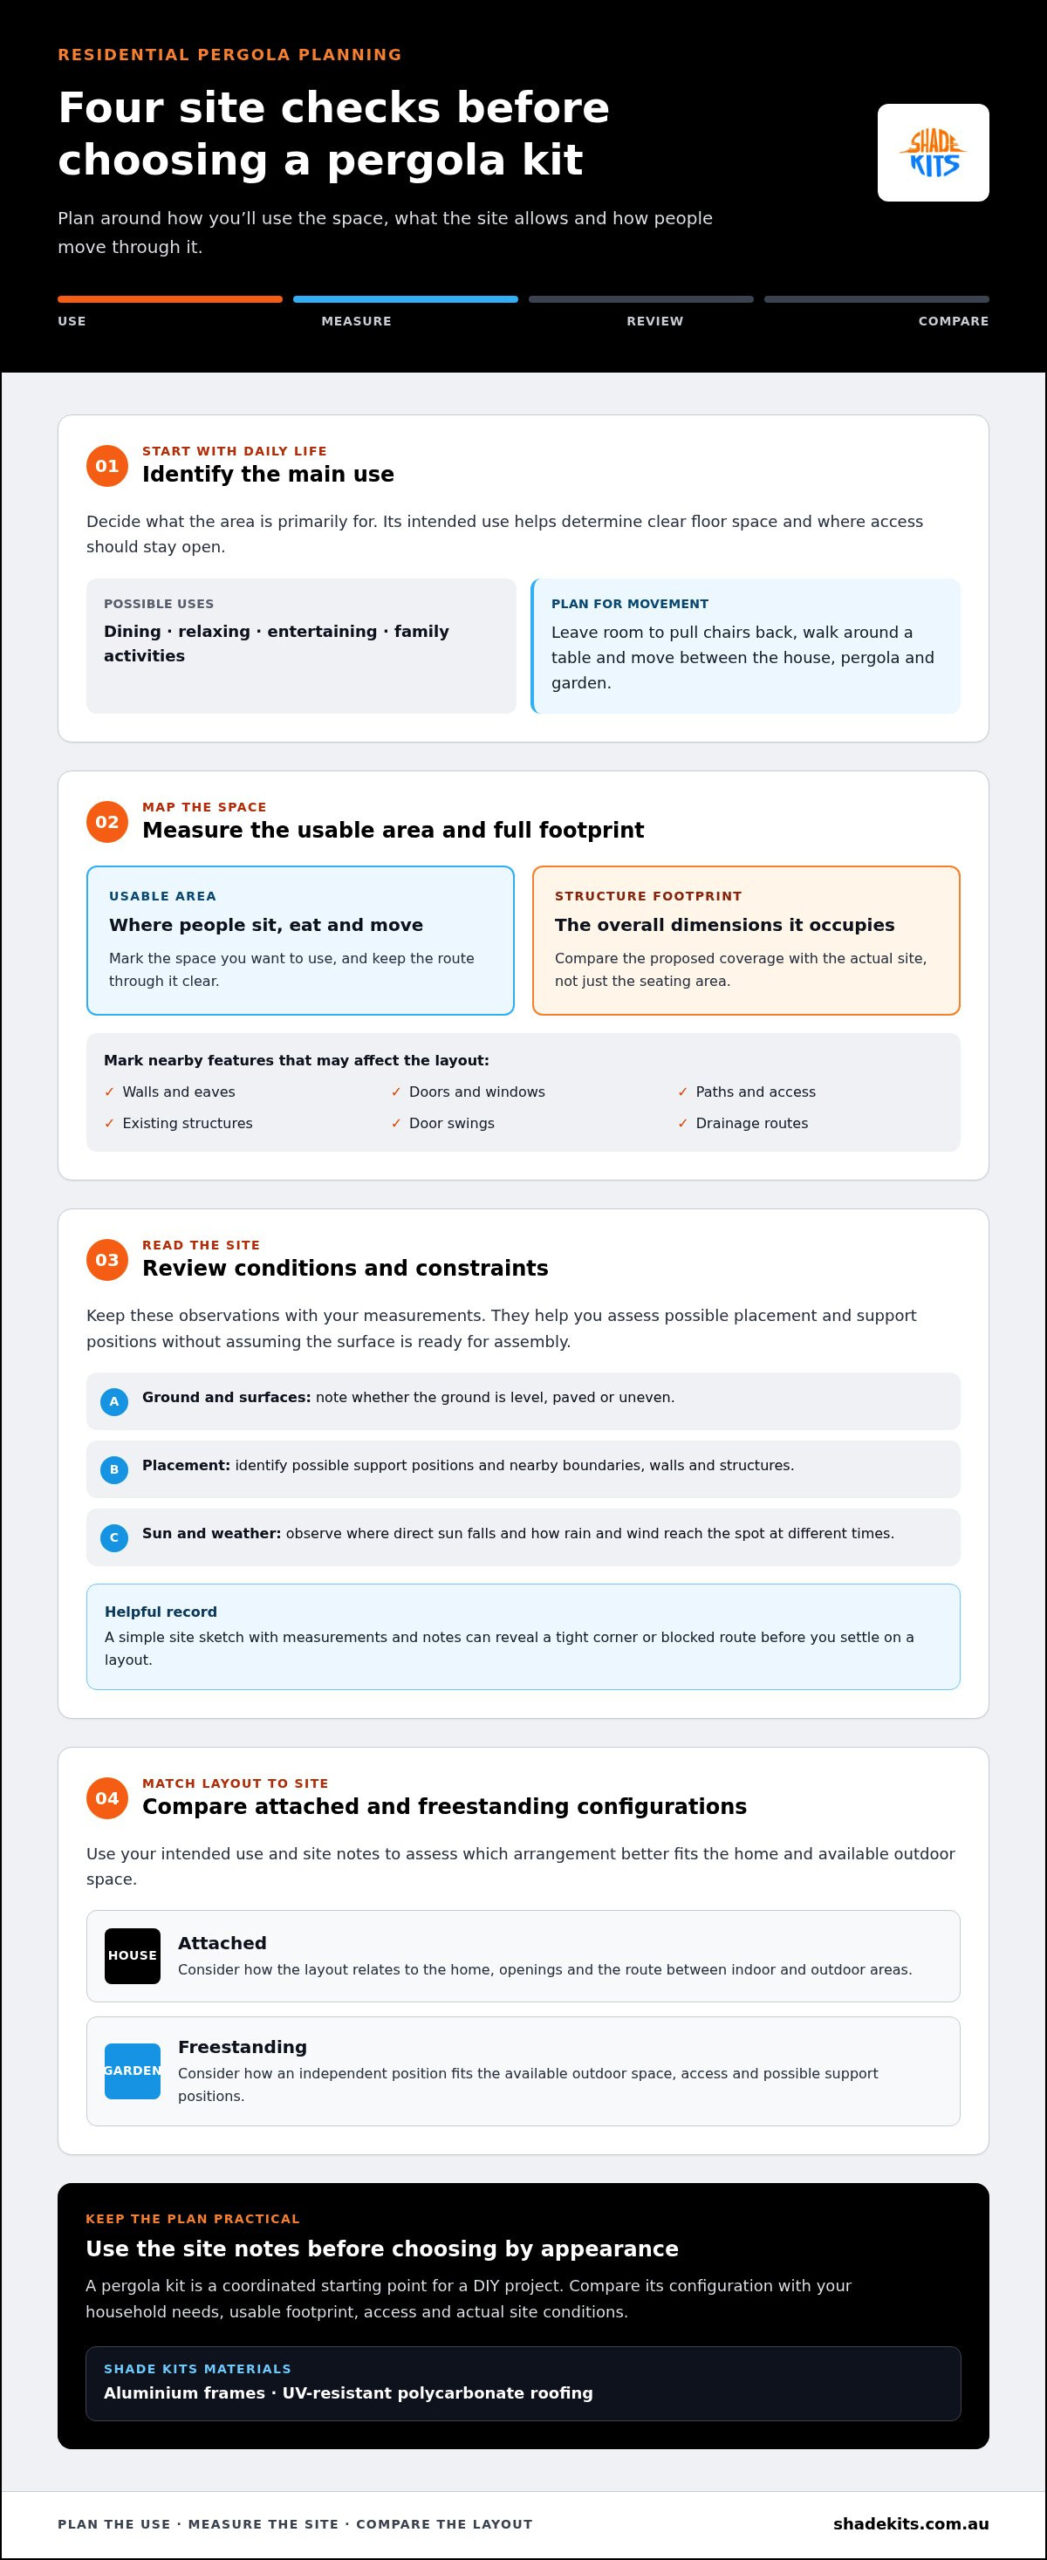
Start with a typical day, rather than an idealised entertaining setup. Will the area mainly be used for meals, relaxing, hosting visitors or everyday family routines? A dining setting needs room to pull chairs back and walk around the table. A lounge area may need a clear route through it, while a family space might need direct access to the garden.
Plan for movement as well as furniture. Consider how people will get between the house, pergola and existing garden or patio areas. Keep doorways usable, leave a comfortable route through the space and avoid placing furniture where it obstructs regular movement. These details help determine where the structure should sit and how much area it needs to cover.
A kit groups components into a planned DIY solution, giving you a defined structure to organise your project around. That can help you work through decisions, from choosing a suitable area to preparing for assembly. Shade Kits’ DIY pergola kits use aluminium frames and UV-resistant polycarbonate roofing, a practical material combination for outdoor use.
A kit doesn’t make every site the same. The shape of your home, available footprint, access and intended use all affect which arrangement will suit the property. Treat the kit as a structured starting point, then compare its configuration with the actual site conditions. Once use, circulation and coverage are clear, you can consider appearance and customisable options. This order keeps the focus on making the outdoor area work well, rather than choosing a look that’s awkward to live with.
A layout that looks right on a plan can feel cramped once furniture, doors and daily foot traffic are in the picture. Assess the site before comparing kit configurations. This helps you distinguish the space you want to use from the footprint the structure will occupy, and gives you more useful information for planning a DIY project.
Measure the usable area where people will sit, eat or move around, then compare it with the full footprint the structure would take up. Check door swings and window access, and keep paths clear between the house, pergola and garden. Record fixed obstacles and drainage routes too. A simple site sketch with measurements and notes can help you spot a tight corner or blocked route before choosing a layout.
Observe the area at different times of day. Note where direct sun falls and how rain or prevailing weather reaches the proposed space. These observations help you consider the level and position of coverage that may suit your household. They don’t replace checking the kit’s specifications against your site, but they help you define what your measurements need to answer.
First, note whether the structure would sit beside the home or stand independently. Record whether the ground is level, paved or uneven, and identify possible support positions without assuming the surface is ready for assembly. Nearby walls, boundaries and existing structures can also affect placement and access. Keep these observations with your measurements so you can compare configurations against the actual site.
Residential pergola kits are easier to assess when your plan reflects both household needs and property constraints. For broader context on aluminium pergola kits, use the aluminium pergola kit guide alongside your site notes. Together, these steps provide a practical basis for comparing layouts instead of choosing by appearance alone.
Once you’ve assessed the site, compare how each configuration relates to the house and the way you’ll use the outdoor area. An attached layout connects closely with the home’s outdoor access, while a freestanding arrangement can define a separate spot in the garden. Neither is automatically the better choice. The available footprint, existing access and intended use all matter.
An attached pergola may suit a space beside a frequently used doorway, creating a direct connection between indoors and outdoors. Check that its position works with doors, windows and the surrounding wall. A freestanding layout may suit a garden or patio set apart from the house, where the pergola can mark out a distinct destination. For either option, consider how people will reach and move through the space.
| Configuration | May suit when | Check for site fit and access |
|---|---|---|
| Attached | You want the outdoor area closely related to the home’s existing access. | Consider the wall, eaves, doors and windows, and make sure the layout preserves practical routes in and out. |
| Freestanding | The intended use is in a separate part of the garden or outdoor space. | Allow for clear approaches from the house and check how the structure fits around paths, paving and existing features. |
| Open-sided | You want to keep the sides of the area open to the surrounding space. | Think about how the layout feels from different directions and whether furniture placement leaves movement routes clear. |
| Overhead coverage | You want a roofed area for the activities and furniture planned beneath it. | Consider the area that needs coverage, site exposure and how the roof affects light and the feel of the space. |
Start with what needs shelter. A dining table, lounge setting or regular family-use area may call for different coverage from a spot used mainly as an open transition to the garden. Open sides can preserve a connection with the surrounding area, while overhead coverage provides a roof above the planned space. The right balance depends on how you’ll use the area and the conditions at your site, not appearance alone.
Keep the distinction clear: “open-sided” describes the perimeter, while “covered” describes what’s overhead. A space can have open sides and still have a roof. Shade Kits’ pergola kits use UV-resistant polycarbonate roofing, so consider the roof’s role alongside placement and configuration rather than treating these as interchangeable choices.
Before settling on a layout, compare it with your measurements and the routes people use every day. Check that the proposed footprint leaves room for access, furniture and the surrounding outdoor area. This helps narrow down residential pergola kits to a configuration that suits your home, rather than one chosen simply because it looks appealing.
A layout that suits your household still needs to fit the rules and conditions that apply to your property. Approval requirements for residential pergola kits can vary between states and territories, local councils and individual projects. Structure type, position and other site details may affect which checks are needed, so don’t rely on a rule of thumb from somewhere else.
The National Construction Code (NCC) is a relevant national framework, but its current requirements and application depend on the project and jurisdiction. Before settling on a layout or ordering a kit, check the guidance that applies to your address with your local council and relevant state or territory building authority. Ask which planning and building requirements apply to the proposed structure, rather than assuming a pergola is automatically exempt or always needs the same approval.
Start with the council’s planning and building information for your property. Check whether the proposed position, dimensions and configuration trigger any requirements. Depending on the site, relevant considerations may include boundary setbacks, height, site coverage, heritage controls or other planning overlays. These aren’t universal rules, and details can vary locally. Keep a record of the guidance and the project details it relates to.
If the structure is near a boundary, attached to the home or planned for a property with heritage considerations, include those details in your enquiry or online search. A change in position or coverage could affect the assessment, so complete these checks before committing to a layout. This helps you avoid basing an order on assumptions that may not suit your site.
Approval is only one part of getting ready. Consider wind exposure, how rainwater drains across the area, the condition and level of the ground, and the distance from nearby buildings or other structures. Existing paving may influence where supports can go, while uneven ground or poor drainage could mean the area needs preparation before assembly. Don’t assume a surface is suitable just because it’s already paved.
Keep product-specific requirements separate from general guidance. Don’t assume a kit has a particular wind rating, engineering design or compliance status unless that information is stated in documentation that applies to the exact product and project. Where plans or technical details are needed for an approval, use the relevant project documentation and ask the appropriate authority how it should be assessed.
Once you’ve checked local requirements and noted any preparation needed, you’ll have a more reliable basis for choosing a position and planning your DIY project. Explore pergola kit options as part of that process, using your site and approval checks to guide your selection.
Choosing a kit and preparing to assemble it are related, but separate parts of the project. First, settle on an option that matches your household and site. Then work out whether you have the time, space, tools and confidence to follow the assembly process. Keeping these decisions in order makes it easier to identify questions before you commit.
Shade Kits supplies DIY pergola kits for self-installation. Include assembly in your project plan, along with time to prepare the site and organise the components. A realistic preparation plan helps you get everything ready before work begins.
Consider who will take responsibility for assembly and whether they’re comfortable following the supplied instructions. Check that you have suitable tools, a clear area to organise components and enough time to prepare the site and complete the work. If the proposed position needs attention first, such as clearing the area or addressing uneven ground, include that preparation in your schedule.
Shade Kits’ kits use aluminium frames and UV-resistant polycarbonate roofing. These materials are part of the kit, but the specific product details and assembly instructions should guide your preparation. Set aside a suitable space for the components and review the instructions before starting. That way, you can understand the sequence and plan the work around your household.
Before ordering, work through the decisions in sequence. If anything has changed since your initial site assessment, update your measurements and checks before proceeding.
Finally, review the product and assembly information for the specific kit you’re considering. Use its dimensions and instructions to make sure your plan, site preparation and assembly approach align. If they don’t, resolve the mismatch before ordering. A careful final check can turn the project into a more manageable series of decisions.
Once your practical checks are complete, explore Shade Kits’ residential pergola options and compare them with the plan you’ve prepared for your home.
A pergola is most rewarding when it supports the routines you want to make room for outdoors. Picture an ordinary day in the finished space: where you’ll sit, how you’ll move through it and what would make it comfortable to return to. That practical vision can help you choose residential pergola kits with confidence, rather than getting caught up in options that don’t suit your plans.
Shade Kits supplies factory-direct DIY outdoor shade kits, with customisable options and Australia-wide delivery. Its pergola kits pair aluminium frames with UV-resistant polycarbonate roofing, giving you a defined starting point for planning your project. Compare the relevant product information with your site and assembly plans, then choose an arrangement that suits your household.
Ready to take the next step? Explore residential pergola kits for your outdoor space and start shaping an outdoor area that works for everyday life.
Possibly, so check with your local council before ordering or starting work. Requirements can depend on your state or territory, local planning rules and details such as the structure’s position and design. The National Construction Code is a relevant framework, but it doesn’t mean every project follows the same approval pathway. Ask which planning and building checks apply to your property and keep any guidance with your project records.
Yes, Shade Kits supplies DIY pergola kits for homeowners to assemble themselves. Before starting, read the instructions and check that you have the tools, workspace and time the project requires. Organise the components so they’re easy to identify during assembly, and plan how you’ll manage the work safely.
There’s no single space allowance that suits every home. Work backwards from the furniture and activities you want to accommodate, including room to use chairs, open doors and move comfortably around the area. Then compare that usable space with the structure’s full dimensions. For example, a table may fit within the footprint but leave too little room to pull chairs out. Check measurements against the product information before ordering.
Neither option is automatically better. The right choice depends on your home and where you want to use the space. An attached layout may connect with an existing doorway, while a freestanding structure can define an area away from the house. Consider how each affects access, placement and the surrounding outdoor area. Include the proposed configuration in your council checks, as project details can affect approval requirements.
Consider how exposed the site is to wind, sun and rain, and how water drains from the proposed location. These conditions can influence where the structure sits and what preparation the ground may need. Review product-specific engineering and wind information rather than assuming a general claim applies to your property. If your site has unusual exposure or constraints, make sure the relevant documentation addresses the conditions before proceeding.
Shade Kits pergola kits use aluminium frames and UV-resistant polycarbonate roofing. The aluminium forms the frame, while the roofing provides overhead coverage as part of the kit. Customisable options let you consider a configuration for your outdoor space. Use the information for the specific kit you’re considering to understand its dimensions and components and plan assembly accurately.