
If a severe storm hit your suburb tonight, would you trust a DIY structure to protect your car, or would you be watching the window, waiting for the roof to lift? It’s a natural concern for many Australian homeowners. When you’re researching diy carport kits for high wind areas, the technical jargon around N versus C ratings often feels more confusing than helpful. You want the cost-effectiveness of a self-build project but need the absolute certainty that your kit won’t become a liability when the wind picks up.
This 2026 guide will show you exactly how to select and secure an engineered kit that stands firm against the harshest conditions. We’ll demystify the latest Australian wind standards, explain why aluminium and polycarbonate are your best allies, and walk through the critical steps for a rock-solid installation. By the end, you’ll have the confidence to build a durable, wind-rated shelter that provides genuine peace of mind all year round. Whether you’re in a coastal zone or an open rural area, getting the structural details right is the only way to ensure your investment stays grounded.
Before you commit to a design, you must understand the engineering standards that keep your vehicle safe. In Australia, residential structures are governed by the AS 4055 standard, which classifies how much wind pressure a building can handle. Understanding Australian Wind Ratings is about more than just checking a map; it’s about recognising how air moves around your specific property. When selecting diy carport kits for high wind areas, the rating on the box must match or exceed the specific requirements of your site to ensure legal compliance and structural safety.
Australian wind ratings are split into two main categories: Non-Cyclonic (N) and Cyclonic (C). Most homeowners in southern and inland regions will deal with N ratings, while those in the north or near certain coastal strips require C-rated engineering. Here is how the classifications generally break down:
It’s vital to identify your zone before purchasing. Most reputable suppliers of carport kits provide engineering documentation that specifies which of these ratings the structure meets. Don’t rely on guesswork; a quick call to your local council or a check of national wind region maps will confirm your base requirement.
Your base wind region is only the starting point. Your specific “Terrain Category” can actually change the rating you need. For example, a house in a densely packed suburb (Terrain Category 3) has plenty of shielding from nearby buildings, which breaks up the wind. However, if you’re building on the edge of an open field or near a large body of water (Terrain Category 1 or 2), the wind hits your carport with much higher velocity.
You should also consider the “Wind Tunnel” effect. If you plan to install your carport in a narrow space between your home and a boundary fence, the wind can accelerate as it’s squeezed through the gap. This creates localised high-pressure zones that a standard kit might not be prepared for. Always aim for a kit with a slightly higher rating if your site is particularly exposed or prone to these aerodynamic quirks. Calculating your terrain category properly ensures that the diy carport kits for high wind areas you consider are actually fit for purpose on your specific block of land.
Choosing the right materials is just as critical as understanding the wind ratings discussed earlier. For diy carport kits for high wind areas, the combination of high-grade aluminium and polycarbonate roofing offers a unique engineering advantage that traditional materials like timber often struggle to match. While timber can become brittle or rot over time, and heavy steel can be difficult for a DIYer to handle safely, aluminium provides a superior strength-to-weight ratio. This allows the structure to remain rigid enough to protect your vehicle while possessing the slight natural flexibility needed to absorb sudden energy from high-velocity gusts without snapping. These materials are specifically selected to meet Australian wind rating standards for Class 10a structures, ensuring they perform when it matters most.
Aluminium’s secret lies in its extruded profiles. Unlike timber, which is a solid but inconsistent natural product, aluminium is engineered with internal reinforcing ribs designed specifically for lateral load resistance. This means the frame can withstand the “push and pull” of a storm without warping. In coastal environments, where high winds often carry salt spray, aluminium is the clear winner. It naturally forms a protective oxide layer that prevents the deep-seated corrosion often seen in untreated steel. You won’t need to spend your weekends sanding back rust or repainting to maintain structural integrity. This long-term durability makes it an ideal choice for those seeking a low-maintenance but robust aluminium carport kit.
The roof is often the first part of a structure to fail in a storm. However, polycarbonate is virtually shatter-proof, boasting up to 250 times the impact resistance of glass. This is vital during an Australian storm season when wind-borne debris or large hailstones are a constant threat. Modern kits don’t just rest the panels on top; they utilise specialised glazing bars or heavy-duty fastening systems that lock the panels into the frame. This prevents the “blow-off” effect where air pressure under the roof lifts the panels away. Additionally, high-quality polycarbonate includes co-extruded UV protection. This ensures the panels won’t become brittle or yellow under the intense sun, maintaining their flexibility and impact resistance for decades. By choosing a kit that pairs an engineered frame with high-tensile roofing, you’re building a shelter designed to survive the elements rather than just endure them.
The most resilient frame in the world won’t protect your vehicle if it isn’t properly tethered to the ground. In high-wind events, the roof of a carport acts like a giant wing, creating massive uplift forces that try to pull the entire structure out of the earth. This is why the foundation is the most frequent point of failure. When you’re installing diy carport kits for high wind areas, your focus must shift from the assembly of the beams to the integrity of the anchorage. Every bolt and every cubic metre of concrete serves as the final line of defence against storm-force gusts.
If you’re building on soft soil or in an area rated N3 or higher, “dig and pour” footings are generally the safest option. For most standard residential carports, footings need to be between 600mm and 1200mm deep, depending on your specific wind classification and soil type. You should use a structural concrete grade, typically 20MPa or 25MPa, to ensure the post is encased in a heavy, solid mass that resists being levered out of the ground. Don’t rush the process. While it’s tempting to start bolting the frame together immediately, concrete takes time to cure. You should wait at least 7 days before applying significant structural loads to the footings to prevent cracking or shifting.
Many homeowners prefer to mount their kit directly onto an existing driveway. While this is faster, it requires a careful assessment of the concrete’s thickness and health. A standard 100mm garden slab is rarely enough to hold diy carport kits for high wind areas during a severe storm. You need to ensure the slab is thick enough to support heavy-duty chemical anchors or specialised dynabolts. Even though you’re likely working with an aluminium frame, the principles found in steel construction standards for anchoring Class 10a structures are vital for ensuring your base plates can withstand significant uplift forces.
If your slab is thin or shows signs of deep cracking, you shouldn’t risk a surface mount. In these cases, it’s better to cut out sections of the concrete and pour dedicated deep-set footings. When you do mount to a slab, use base plates with a wide footprint to distribute the load. Ensuring your upright posts are perfectly plumb during this stage is essential; even a slight lean can cause uneven load distribution, putting unnecessary stress on the anchors when the wind hits. If you’re unsure about your current driveway’s suitability, exploring a high-quality carport kit with comprehensive engineering plans will give you the specific base requirements needed for your site.
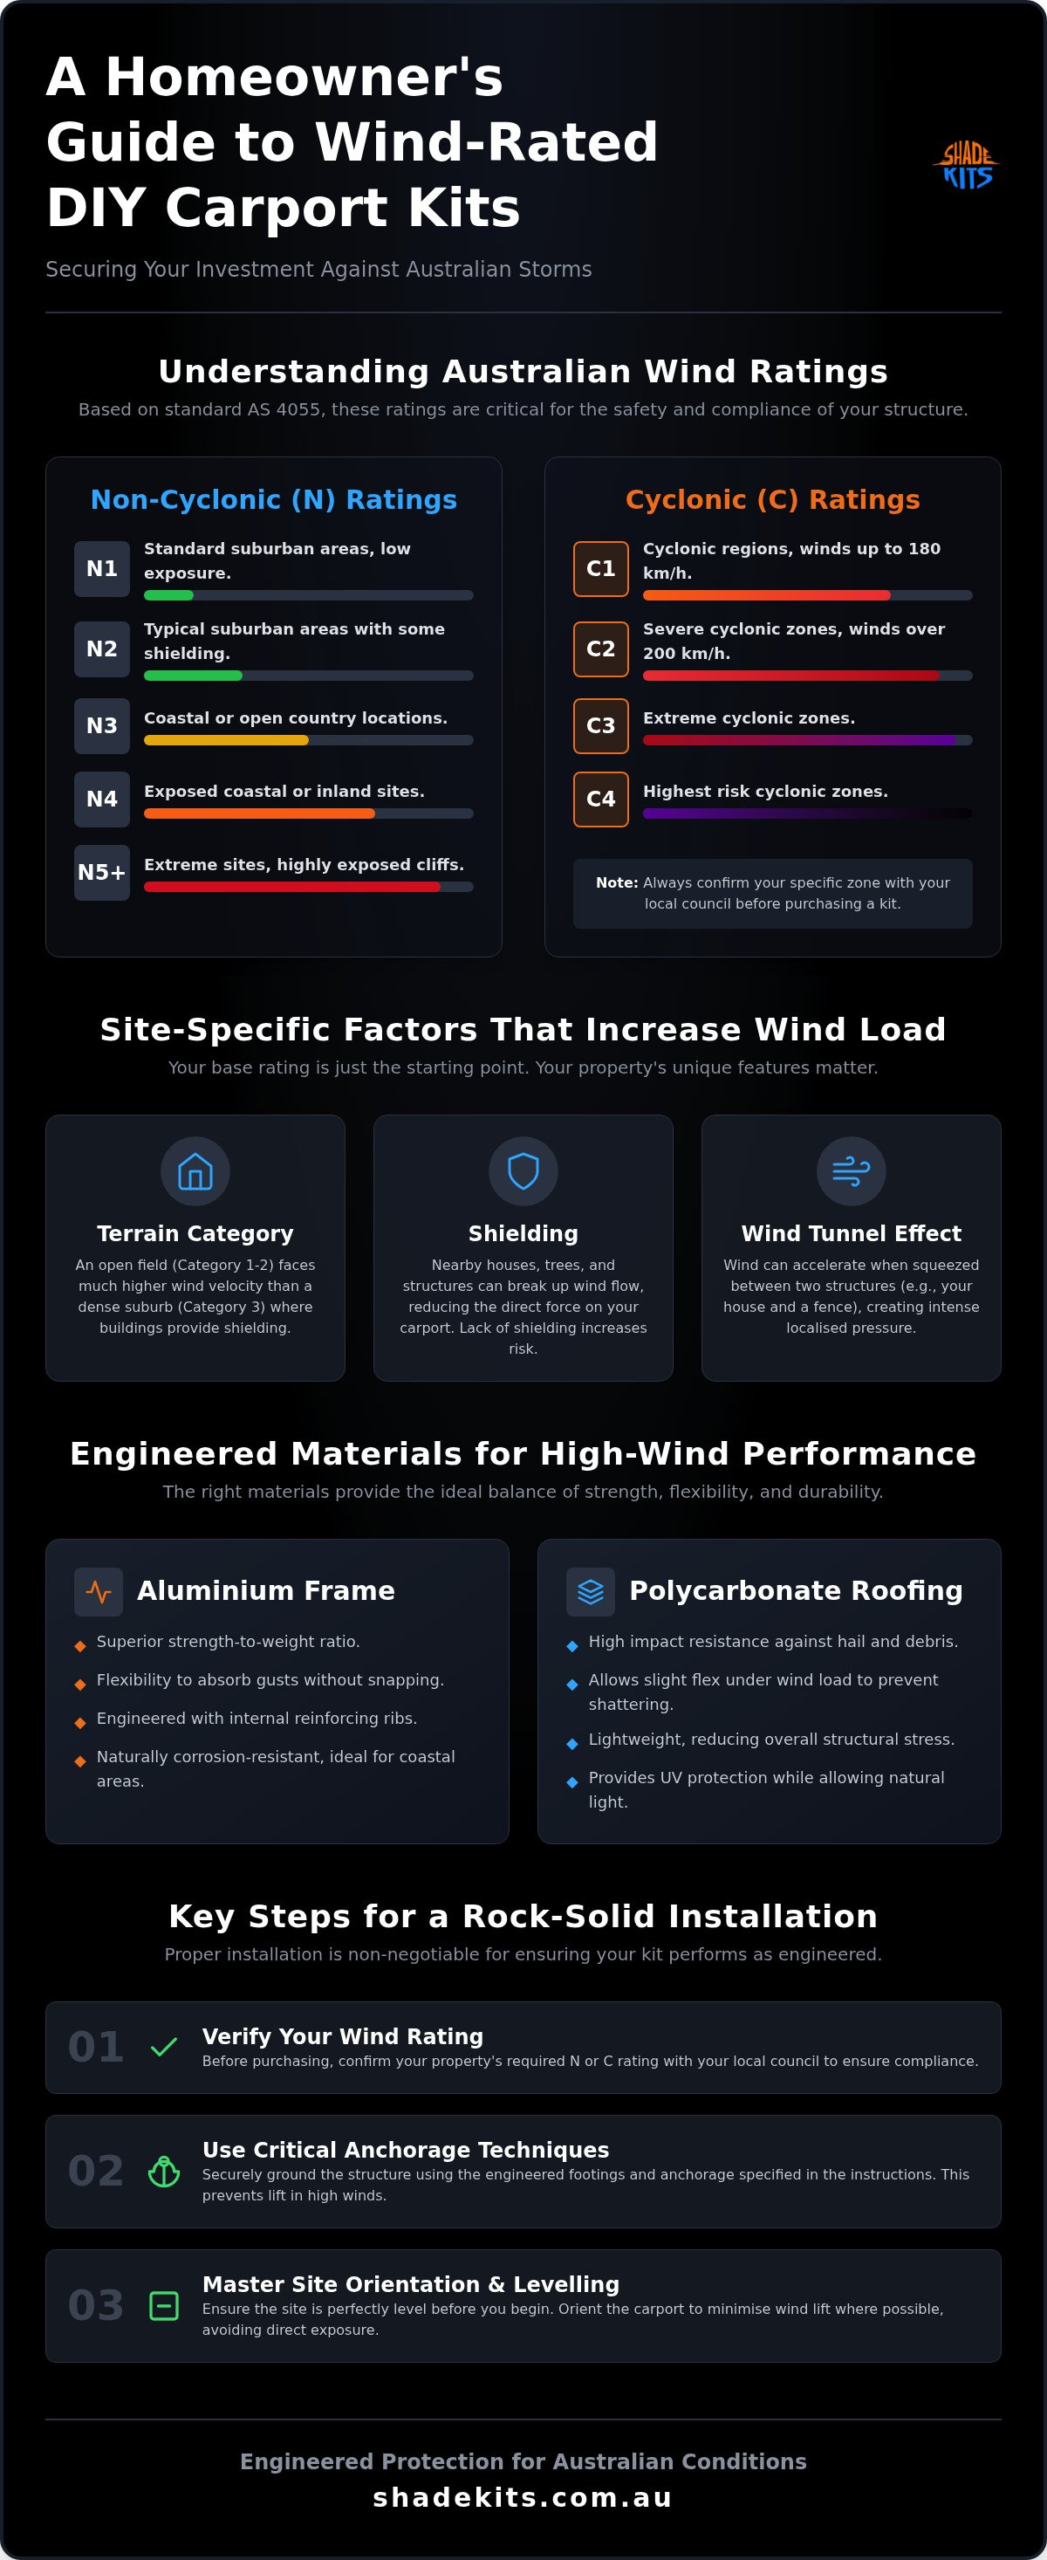
Successful installation of diy carport kits for high wind areas begins long before you pick up a drill. While the engineering of the kit provides the foundation, your assembly choices determine how that structure interacts with the local environment. A carport that is perfectly square and level isn’t just about aesthetics; it’s about ensuring that structural loads are distributed exactly as the engineers intended. If the frame is slightly skewed, wind pressure won’t hit the beams evenly, which can lead to premature fatigue or fastener failure during a storm.
Start by analysing the prevailing wind direction on your property. If most of your severe weather comes from the south-west, you should avoid placing the open face of the carport directly into that path. This reduces the “parachute effect” where wind gets trapped under the roof, creating massive upward pressure. You also need to decide between an attached or freestanding model. Attached carports can gain stability from the main dwelling, but they also transfer wind loads to your home’s fascia. Freestanding kits offer more flexibility in placement to avoid natural wind tunnels created by surrounding fences or trees. For a deeper dive into these logistical decisions, consult our Essential Australian Carport Checklist to ensure your site is truly ready for construction.
When you’re building in a high-wind zone, the assembly phase itself is a period of vulnerability. Never leave a partially completed frame overnight if there’s a breeze forecast; an unanchored or unbraced structure can easily catch the wind and buckle. This is why having two sets of hands is non-negotiable. One person needs to steady the components while the other secures the fasteners, preventing the aluminium profiles from twisting under their own weight. Pay close attention to the fastener torque. Every bolt must be tightened to the manufacturer’s specification to ensure it acts as a structural contributor rather than just a placeholder.
Once the frame is up, double-check every roof panel clip and purlin attachment. In high-wind areas, these small components are what prevent the polycarbonate from lifting. Finish the job by sealing any gaps where wind could enter and create internal pressure. If you’re ready to start your project with a kit designed for the rigours of the Australian climate, browse our range of engineered carport kits to find the right fit for your home.
When you’re investing in a home improvement project, you need a partner who understands the unique volatility of the Australian climate. Shade Kits bridges the gap between high-end engineering and DIY accessibility, providing diy carport kits for high wind areas that are both robust and manageable. By specialising in factory-direct aluminium kits, we eliminate the middleman markup, ensuring that homeowners can access professional-grade structural integrity without the inflated price tag. Every component is designed to meet national durability standards, providing a reliable shield for your vehicles during the most intense storm seasons.
Our design philosophy centres on the resilience of high-grade aluminium frames and UV-resistant polycarbonate roofing. These materials aren’t just chosen for their longevity; they’re selected because they simplify the assembly process for the everyday DIYer. We’ve engineered our diy carport kits for high wind areas to be straightforward to install while maintaining the lateral load resistance required by Australian building codes. You don’t need a background in construction to achieve a result that’s both aesthetically pleasing and structurally sound. Explore our range of wind-resistant carport kits to see how we balance ease of use with heavy-duty performance.
Sometimes, a permanent fixed structure isn’t the right fit for your property or your budget. This is where the CarCave provides a unique advantage. As a foldable alternative, it offers rapid protection against hail and wind-borne debris without the need for extensive permanent footings. It’s an ideal solution for renters or those who need an immediate defence strategy during the peak of storm season. See how the CarCave defends against hail and storms, providing a flexible shield that can be deployed exactly when the Bureau of Meteorology issues a warning.
Choosing the right protection involves understanding the full scope of what’s available in the 2026 market. For a comprehensive look at all your options, read our Ultimate Guide to DIY Carport Kits in Australia (2026). We provide Australia-wide delivery, ensuring that whether you’re in a coastal high-wind zone or a rural area prone to sudden gusts, storm-rated protection arrives directly at your door. With Shade Kits, you aren’t just buying a kit; you’re gaining the peace of mind that comes from a structure engineered specifically for the land we live on.
Building a shelter that survives an Australian storm is about combining smart engineering with precise execution. You now understand how wind classifications dictate your structural needs and why the flexibility of aluminium and polycarbonate is a major asset in coastal zones. By prioritising deep-set anchorage and careful site orientation, you can ensure your diy carport kits for high wind areas remain a permanent, secure fixture on your property rather than a liability during a weather event.
At Shade Kits, we take the guesswork out of the process with factory-direct Australian supply and durable aluminium and polycarbonate construction. We provide the technical documentation you need for peace of mind, ensuring your structure meets the standards required for your specific region. With nationwide delivery available, getting a storm-rated solution to your home has never been more straightforward. You don’t have to compromise on safety to achieve a cost-effective, professional result.
Browse our range of high-wind resistant DIY carport kits today and start your project with confidence.
Yes, diy carport kits for high wind areas are entirely safe when they carry the appropriate engineering certification for your specific location. Shade Kits designs products for Australian conditions using durable aluminium frames and UV-resistant polycarbonate. The key to safety lies in choosing a kit rated for your wind region (N or C) and ensuring the anchorage is installed exactly as specified in the provided instructions to resist uplift forces.
Coastal areas typically require an N3 rating in non-cyclonic regions or a C1 rating in cyclonic zones. If your property is within 500 metres of the ocean or positioned on a cliff top, wind speeds are often higher due to a lack of shielding. You must check your local council wind map to determine if you need cyclonic-grade engineering. Choosing a kit with a higher rating than the minimum required provides an extra margin of safety.
You can install a kit on an existing slab if the concrete is structurally sound and meets the minimum thickness required for heavy-duty anchors. Most high-wind installations require a slab depth of at least 100mm to 150mm for secure mounting. If your driveway is thin or cracked, it is safer to cut out sections and pour deep-set concrete footings. This ensures the structure resists the massive uplift forces generated during severe storms.
Most carport installations in Australia require council approval, regardless of their wind rating. While some states offer exemptions for small freestanding structures under 10 square metres, these rules often change in high-wind or cyclonic regions. You should always consult your local council before starting your project. Shade Kits provides the necessary engineering documentation to assist with your application, making the approval process for your diy carport kits for high wind areas much smoother.
Your kit cyclonic status is determined by its engineering certification. Look for a “C” classification, such as C1 or C2, which indicates the structure is designed for wind speeds exceeding 180 km/h. Non-cyclonic kits are marked with an “N” rating. Reputable suppliers will clearly state the maximum wind speed the kit can withstand in their technical specifications. If the documentation only lists N1 or N2, the structure is not suitable for cyclonic regions.
If a storm damages your carport, you should first document the evidence for insurance purposes. Most home insurance policies cover carports if they were installed according to local building codes and manufacturer specifications. Aluminium frames are highly resilient and won’t rot or rust, but extreme debris can damage polycarbonate panels. Because Shade Kits are designed for straightforward self-installation, replacing individual components like roof panels is often a manageable task for a homeowner to complete independently.
Both roof types can be engineered for high winds, but they interact with air differently. A flat or skillion roof has a lower profile, which can reduce the total wind load hitting the structure. However, gable roofs are excellent at shedding water and can be very rigid when properly braced. The most important factor isn’t the shape itself, but the engineering behind the fasteners and the quality of the aluminium frame used to secure the roofing panels.
You should perform a structural check at least once a year, preferably before the storm season begins. In particularly windy areas, it is wise to inspect the fasteners after any significant weather event. Check that all bolts remain tight and that there is no movement in the base plates or footings. Regular maintenance ensures the structural integrity of your kit remains intact, providing long-term value and consistent protection for your vehicle against the elements.