
Could the wrong drill bit bring your awning installation to a halt just as you’re ready to mount it? The tools required for installing a DIY awning depend on more than what’s in your toolbox. Your kit instructions and mounting surface matter too. A drill, ladder and a few fixings might seem like enough, but using tools or fasteners that don’t suit the surface can cause delays, poor alignment or an insecure mounting.
A DIY awning kit is designed for straightforward self-installation, and a little planning can make the process more manageable. This guide helps you prepare a prioritised checklist, identify which items depend on your awning and wall, and set up safely before drilling or lifting components. You’ll learn which measuring and alignment tools are useful, why drill bits and fixings differ for timber and masonry, and what to prepare for working at height. Follow your kit instructions throughout so you can start with the right equipment and avoid unnecessary trips back to the toolbox.
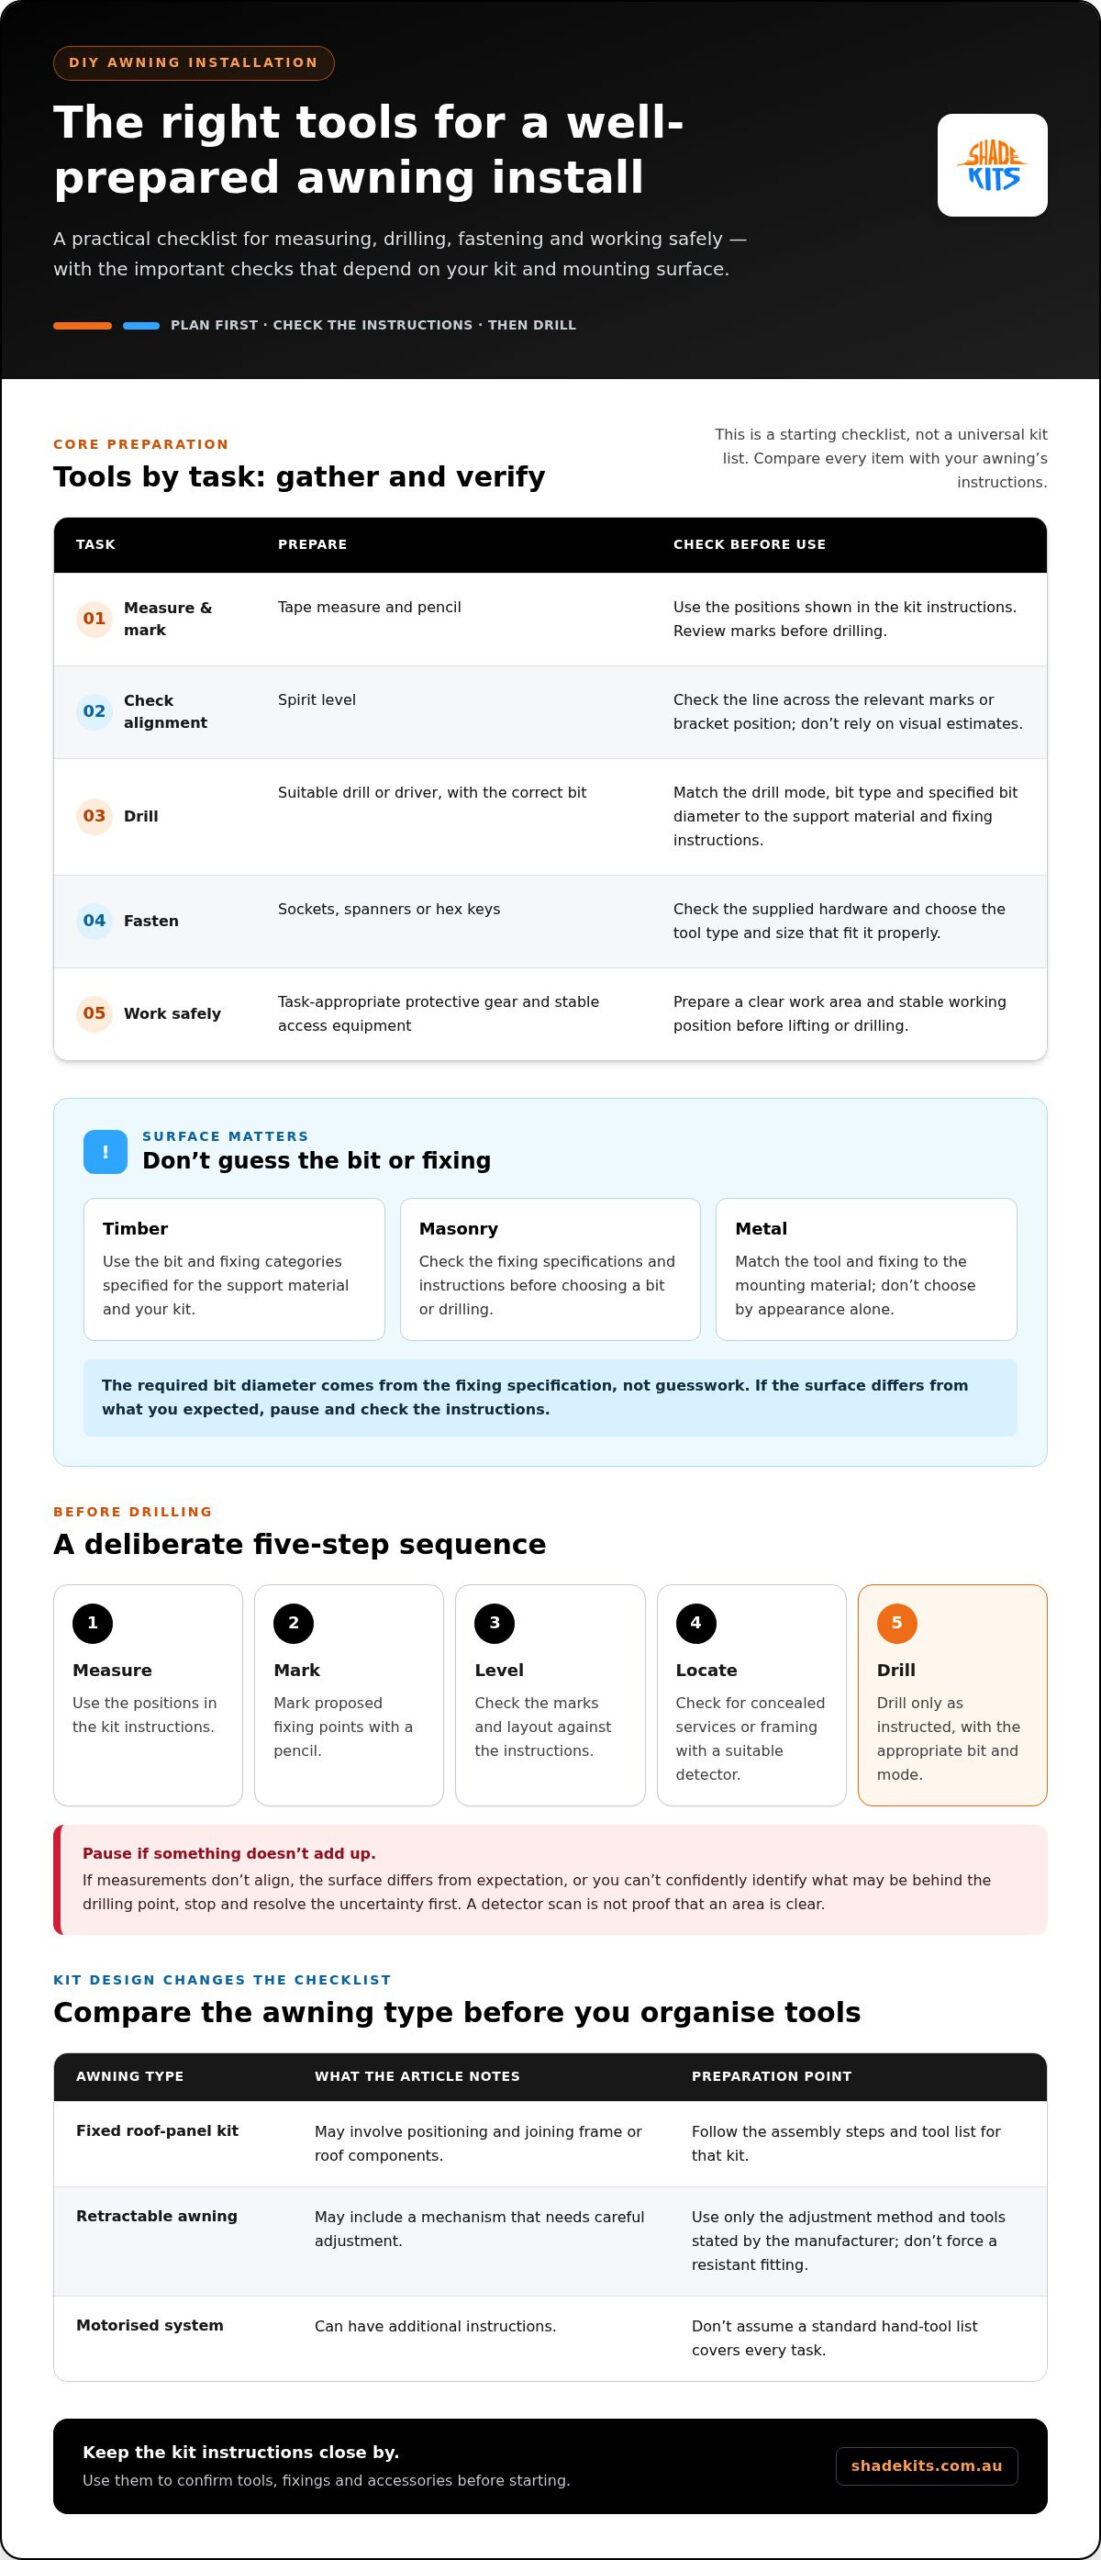
Start by grouping tools by task, then compare the list with your awning’s assembly instructions. A useful preparation checklist includes:
This is a starting point, not a universal kit list. The tools required for installing a DIY awning depend on its design, the support surface and the assembly instructions. Check which tools, fixings and accessories are included, and identify anything you need to gather before starting. Keep the instructions close by so you can match each tool to the relevant step.
That check matters because an awning needs to be aligned and fastened using the method intended for its design and mounting conditions. A tool that suits one job may be wrong for another. Don’t choose drill bits or fixings by appearance alone. Use the instructions and fixing specifications to guide your preparation.
A tape measure helps you mark the installation position, while a pencil lets you make marks that are easy to review and adjust. Use a spirit level to check alignment before drilling. A suitable drill or driver may be needed for pilot holes or fastening, but its bit and settings must match the instructions and support material. A detector may also be useful if you need to locate concealed framing or services before drilling.
For fastening, check the hardware first. Some assemblies call for sockets or spanners; others may use hex-head fasteners that need a particular key. Compare the tool type and size with the kit instructions and actual hardware. A generic assortment is less useful than the specific tools that fit the fasteners properly.
A fixed roof-panel kit and a retractable awning have different components, so their assembly steps and tool needs can differ. A fixed kit may involve positioning and joining frame or roof components. A retractable system may include a mechanism that needs careful adjustment. Motorised systems can have additional instructions, so don’t assume a standard hand-tool list covers every task.
Adjustment tools may be specific to a retractable mechanism. Use only the method and tools stated by its manufacturer, and don’t force a fitting that resists. For a broader overview of types of awnings and their components, consider how fixed and retractable designs differ before organising your tools. Use the instructions for your chosen kit as the final checklist.
Careful measuring and drilling help keep the installation aligned and reduce the chance of correcting misplaced holes. Before picking up a drill, follow this sequence:
Pause if the measurements don’t align, the surface differs from what you expected or you can’t confidently identify what may be behind it. A hole in the wrong spot can mean extra repairs and may affect how securely a bracket can be mounted. Accurate marking and drilling suited to the substrate help prevent avoidable rework.
A tape measure helps transfer the positions and spacing provided in the kit instructions. Mark each point lightly with a pencil so you can review the layout before drilling. Then place a spirit level across the relevant marks or bracket position to check that the line is level. Don’t rely on visual estimates: perspective can make a line look straight when it isn’t.
Recheck the measurements against the instructions before making holes. If a mark appears inconsistent with the stated layout, measure again rather than shifting it by eye. This pause helps catch small measuring errors while they’re still easy to correct.
Choose the drill mode and bit type to suit both the support material and the fixing instructions. A bit intended for one material isn’t automatically suitable for another, and the required bit diameter should come from the fixing specification, not guesswork. Before drilling, match the tool to the surface and check the instructions for any limits on how the hole should be made.
A suitable detector can help identify concealed services or framing, depending on the device and task. Read its instructions and use it as directed. Don’t treat a single scan as proof that an area is clear. If you can’t identify what lies behind the proposed drilling point, stop and resolve that uncertainty before proceeding. Drilling into a concealed service can create a serious hazard.
Keep the sequence deliberate: measure, mark, level, check for obstructions, then drill. Use the right tool for the material and specified fixing, and avoid forcing the bit if the surface behaves differently than expected. If you’re preparing for a Shade Kits DIY awning kit, explore the awning kit options and refer to the instructions for the specific design you’re installing.
The right drill is only part of the decision. The material you’re drilling into and the fixing system specified for the awning determine which bit and fastening tools are appropriate. A powerful drill can’t make an incompatible fixing suitable, so identify the actual support before preparing to mount the brackets.
Use this comparison to identify tool categories to check, not as a fixing specification. The awning instructions and fixing manufacturer’s guidance take precedence.
| Support material | Tool category to check | Key consideration |
|---|---|---|
| Timber | Bit and drill settings suited to the specified fixing | Confirm the fixing is intended for the timber support and follow its installation directions. |
| Masonry | Masonry-suitable bit and the drill mode required by the instructions | Check the specified anchor system and its drilling requirements. |
| Metal | Bit and drill settings suited to the metal support and specified fixing | Identify the support and use a fixing method intended for that material. |
Each material calls for a suitable bit and drilling approach. A bit designed for masonry isn’t a substitute for one intended for metal or timber, and the same drill mode may not suit every surface. Check both the awning instructions and the fixing manufacturer’s directions before drilling. Don’t assume a bit that fits the drill is suitable for the material.
Distinguish the visible finish from the structural support behind it. Cladding may cover timber, masonry or another material, but its appearance doesn’t establish what’s underneath or whether it can carry the awning. Don’t treat cladding as the support unless the installation instructions specifically allow for that mounting method. If you can’t identify the material behind the cladding, pause before choosing the fixing or drilling.
Surface matching is about more than making a hole. The fixing system must be compatible with the support, and the hole must be made as its manufacturer specifies. Avoid substituting a convenient fixing or changing the drilling method to suit the tools already on hand.
Match the hand tool to the fastener head: a socket or spanner may suit one type, while another may call for a hex key. Check the size and shape against the actual hardware and instructions rather than assuming a standard tool will fit. A poor-fitting tool can make controlled tightening difficult or damage the fastener.
Anchor installation tools also vary by fixing system. The fixing manufacturer’s directions determine the required drilling method and any tool needed to install the anchor. Don’t guess anchor sizes or load ratings. Use only the specifications provided for the particular awning and mounting conditions. The tools required for installing a DIY awning therefore depend on both the substrate and the specified hardware, not simply on the drill’s power.
A tidy work area makes it easier to focus and reach tools without stretching or stepping around loose parts. Before unpacking components or drilling, run through this pre-start check:
Don’t drill, lift or work at height without a stable, safe setup. Awning parts can be cumbersome, and managing a component while balancing or reaching can compromise control. Plan how each part will be moved into position before lifting it. Pause if you can’t handle it safely.
Have suitable eye protection ready for drilling and any task that could send dust or fragments towards your eyes. Wear gloves when handling components if they’re appropriate for the task, but keep them clear of rotating parts and follow the power-tool manufacturer’s instructions. Use hearing protection when the tool or working conditions call for it. Protective equipment should suit the job, not replace safe tool use.
Position a ladder or platform on a firm, stable surface and use it according to its instructions. Choose access equipment that suits the task and site, and avoid leaning sideways to reach a fixing point. Keep loose clothing, hair and jewellery away from rotating tools. Set a clear boundary so others don’t walk beneath or through the work zone.
Before drilling, consider what may be concealed behind the proposed fixing points, including electrical cables and pipes. Use an appropriate detector according to its instructions, and don’t rely on guesswork if the wall or support construction is unclear. Stop if you can’t confidently assess the drilling area or access conditions. Resolve the uncertainty before proceeding.
Lay out the tools required for installing a DIY awning in a practical order. Keep measuring and marking tools together, place the drill and task-appropriate bits nearby, and group fastening tools with the relevant hardware. Leave a clear route for moving components and keep tools away from edges where they could fall or become trip hazards.
Good preparation helps you work deliberately, keep the area organised and avoid rushing a lift or drilling task. If you’re planning a project, explore DIY awning kits and use the instructions for your chosen kit to plan the work area and support needed.
A final check helps separate what you can gather now from what must match your specific awning kit and mounting conditions. Keep the assembly instructions open while you lay everything out. The tools required for installing a DIY awning aren’t one-size-fits-all, so use the checklist below to spot gaps without assuming a tool or fixing comes with the kit.
Start with items to gather, then check the instructions for details specific to your installation.
Lay out each tool and compare it with the relevant assembly step. Check that the drill and bits suit the specified task, and that fastening tools fit the actual hardware. Confirm which fixings the instructions require for your mounting conditions. Don’t assume they’re included or substitute a different type based on what’s already in your toolbox.
If an essential tool or specified fixing is missing, or you don’t have a safe plan for handling the components, pause before assembly. It’s easier to resolve a gap while everything is still on the ground than part-way through positioning the awning.
The instructions for your particular kit give you a practical starting point: they show the assembly sequence and help identify the tools and hardware needed for those steps. Read them before organising your equipment, then relate the requirements to the actual mounting surface. Shade Kits supplies DIY awning kits designed for straightforward self-installation, with durable aluminium frames and UV-resistant polycarbonate roofing.
For broader context on awning materials and designs, explore this aluminium awnings guide. It can help you understand the product category, while the instructions for your chosen kit remain the reference for assembly tools and fixings.
Once the checklist is complete, take one last look at the work area, tools and handling plan. Then follow the kit instructions in sequence, stopping if the mounting conditions or equipment don’t match what they describe. If you’re still choosing a DIY option, explore Shade Kits awning kits and use the relevant instructions to prepare for your project.
With your equipment plan taking shape, choose an awning that suits the space and how you want to use it. The tools required for installing a DIY awning are guided by the specific kit and its instructions, so consider the design and mounting location together before organising your project.
Shade Kits’ DIY awning kits are designed for straightforward self-installation, with durable aluminium frames and UV-resistant polycarbonate roofing. Once you’ve found an option that fits your outdoor space, its assembly instructions can help you plan around the particular kit rather than relying on a generic tool list.
Explore DIY awning kits for your outdoor space and take the next step towards a well-planned installation. With the right kit and a considered approach, you can get your project underway with confidence.
Common starting points include a tape measure, pencil, spirit level and a suitable drill or driver. You may also need fastening tools that fit the hardware, plus protective equipment suited to the work. The tools required for installing a DIY awning depend on its design and where it will be mounted. Treat the kit’s assembly instructions as your working list, and compare each step with the tools you have before starting.
Not always. The drill needs to suit the mounting material and the task described in the instructions, so a standard drill may be appropriate for one installation but not another. The bit must also match the material and specified fixing. For masonry, a drill with a suitable mode may be needed, but don’t select a setting or bit size by guesswork. Follow the instructions for the particular awning and fixing system.
Possibly, if your household tools match the kit’s assembly requirements and the mounting conditions. A tape measure and level might be on hand, for example, but the drill, bits or fastening tools may need to suit specific hardware. Check the instructions before assuming your usual toolkit is enough. If an essential item is missing or unsuitable, arrange it before assembly rather than improvising with a tool that doesn’t fit.
Inclusions can differ between kits, so check the product information and assembly instructions to see what’s provided and what you’ll need for your installation. The mounting surface matters too: the specified fixing may depend on the support material. Keep supplied components separate from items you’ve gathered yourself, so it’s clear which parts belong to the kit and which need to be matched to the instructions.
For brick, you’ll generally need a drill and masonry-suitable bit, but the required bit type, drill mode and fixing system depend on the awning instructions and fixing manufacturer’s directions. Don’t choose a diameter or anchor based on a general rule. First establish that the proposed fixing point is suitable for the installation, and check for concealed services. If you can’t assess the wall or what lies behind it, pause before drilling.
It depends on the component size, access and whether you can control each task safely. Awning parts can be awkward to position, so don’t attempt a lift alone if you can’t manage it steadily. Plan how components will be moved and supported before raising them. If the work requires reaching, balancing or handling a part beyond your control, stop and arrange suitable assistance rather than pressing on.
They can. A retractable awning has moving parts that a fixed roof-panel design may not have, and its instructions may specify tools for adjusting or assembling the mechanism. Motorised systems may also have their own assembly steps. Don’t assume a tool list for one style applies to another. Use the instructions for the exact design, and avoid forcing an adjustment if the mechanism doesn’t move as described.
It’s usually more practical to choose the kit first, then identify any tools you need from its instructions and the intended mounting surface. Buying a drill bit or fixing in advance can leave you with an unsuitable item if the kit or support material calls for something different. Take stock of the tools you already own, then fill any genuine gaps once you know the assembly requirements.